GitHub Enterprise Cloud - Azure Single Sign-On (SSO) Integration Guide
Made by Jack G Kafaty Senior Solutions Engineer @GitHub
Requirements
Before you start integrating Azure AD with your GitHub Enterprise Cloud Organization or Enterprise, Its important that your review the following requirements to ensure you have a successful setup. If you do not see any settings for your organization or enterprise make sure you have owner rights.- You have a GitHub Enterprise Cloud Account
- You have a GitHub Organization within your Enterprise
- You are an Enterprise Owner for your GitHub Enterprise
- You have an Azure AD subscription.
- You have Global Administrator Rights in your Azure tenant
Recommendations
👀 You might want to give this a read
⚠️ IMPORTANT ⚠️
If you are configuring SSO at the organizational level please use the following Azure Enterprise application - GitHub Enterprise Cloud - Organization. This is the only application that will allow you to configure the correct SAML attributes and have SCIM capabilities (provisioning and deprovisioning capabilities) for your GitHub Enterprise Cloud Organization.⚠️ IMPORTANT ⚠️
If you are configuring SSO at the enterprise level please use the following Azure Enterprise application - GitHub Enterprise Cloud - Enterprise Account. This is the only application that will allow you to configure the correct SAML attributes for your GitHub Enterprise Cloud Enterprise Account.Validate that you have the correct permissions to make changes to your GitHub Enterprise Cloud Organization or Enterprise and Azure AD tenant.
If you are using a single monitor, we recommend you open two separate browser windows and place them side-by-side. Meaning have your GitHub Organizational settings on one side of your screen and your Azure AD settings on the other side of your screen. This will allow you to easily navigate between the two applications and ensure you are following the steps correctly.
Please avoid testing any of the configurations until you have completed the entire setup. This will ensure you have a successful setup and avoid any issues.
Official & Helpful Documentation
GitHub Enterprise Cloud - Organization-Level Azure SSO Setup Docs
- About authentication with SAML Single Sign-On - GitHub Enterprise Cloud Docs
- About provisioning with SCIM - GitHub Enterprise Cloud Docs
- Managing team synchronization for your organization
- Azure AD SSO integration with a GitHub Enterprise Cloud Organization
- Azure AD SSO Configure GitHub for automatic user provisioning
- GitHub Enterprise Cloud - Organization Azure app
GitHub Enterprise Cloud - Enterprise-Level Azure SSO Setup Docs
Enterprise-level vs Organizational-level SSO integration - What's the difference?
| Feature | Enterprise Level SSO | Organizational Level SSO |
|---|---|---|
| SCIM support | No , There is no support for provisioning or deprovisioning of users. | Yes, Fully supports user provisioning and deprovisioning. |
| SSO Automatically enforced | Required for all organizations and resources. | Optional, can be enabled and enforced on a per-organization basis allowing further flexibility during setup. |
| Multiple IDP integration | No. | Yes, you can configure different supported IDPs per organization. |
GitHub Enterprise Cloud - Organizational-level setup tutorial video
GitHub Enterprise Cloud - Organizational-level TeamSync tutorial video
GitHub Enterprise Cloud | Organizational-level Microsoft Entra ID SSO Setup Step-by-Step!
Step 1 Adding the GitHub Enterprise Cloud Application from the Azure Enterprise application catalog
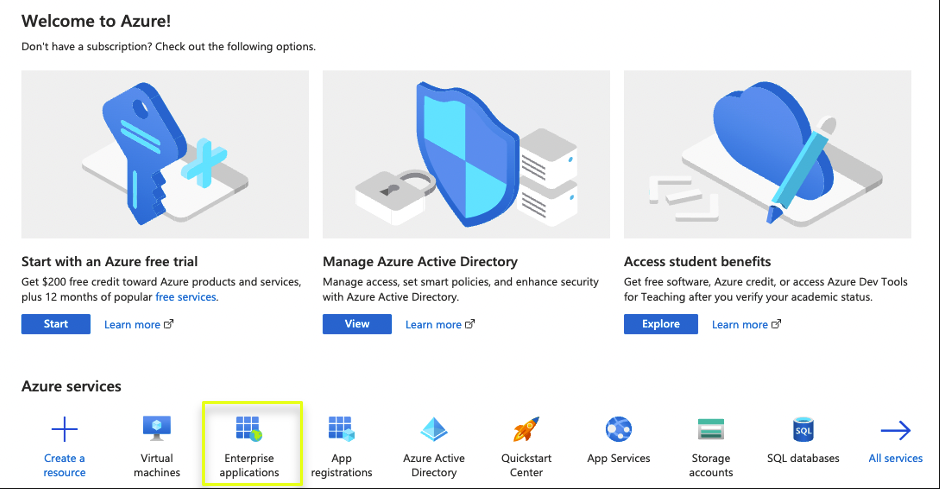
- Login to your Azure Portal, Make sure that you have Administrator permissions
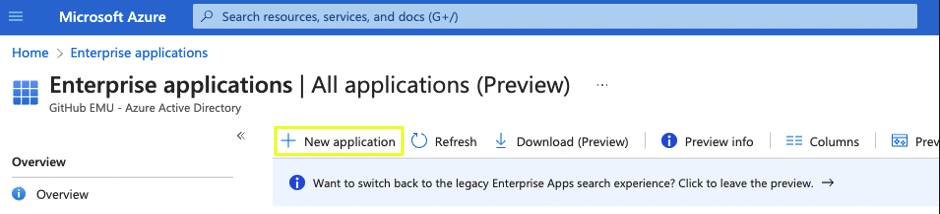
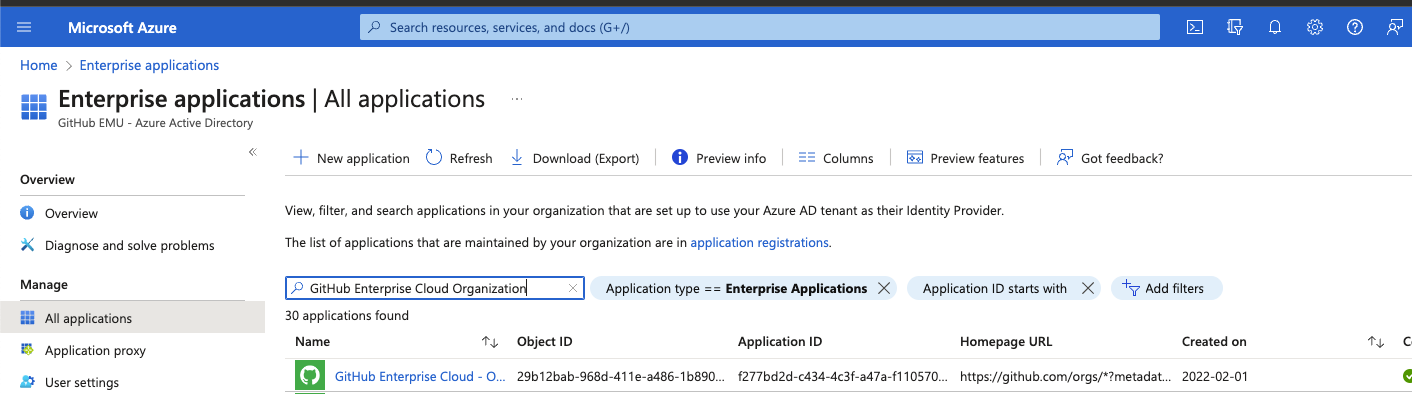
- Access “Enterprise Applications”
- Within Enterprise Applications, Click on “+ New Application”
- Within the Azure AD gallery search for GitHub Enterprise Cloud Organization.”
- Once Selected click “create” at the bottom left-side corner.

Step 2 Setting up SAML within the GitHub Enterprise Cloud application in Azure AD
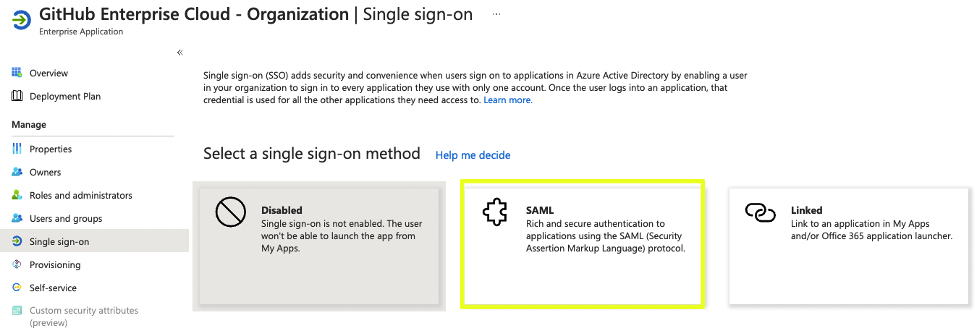
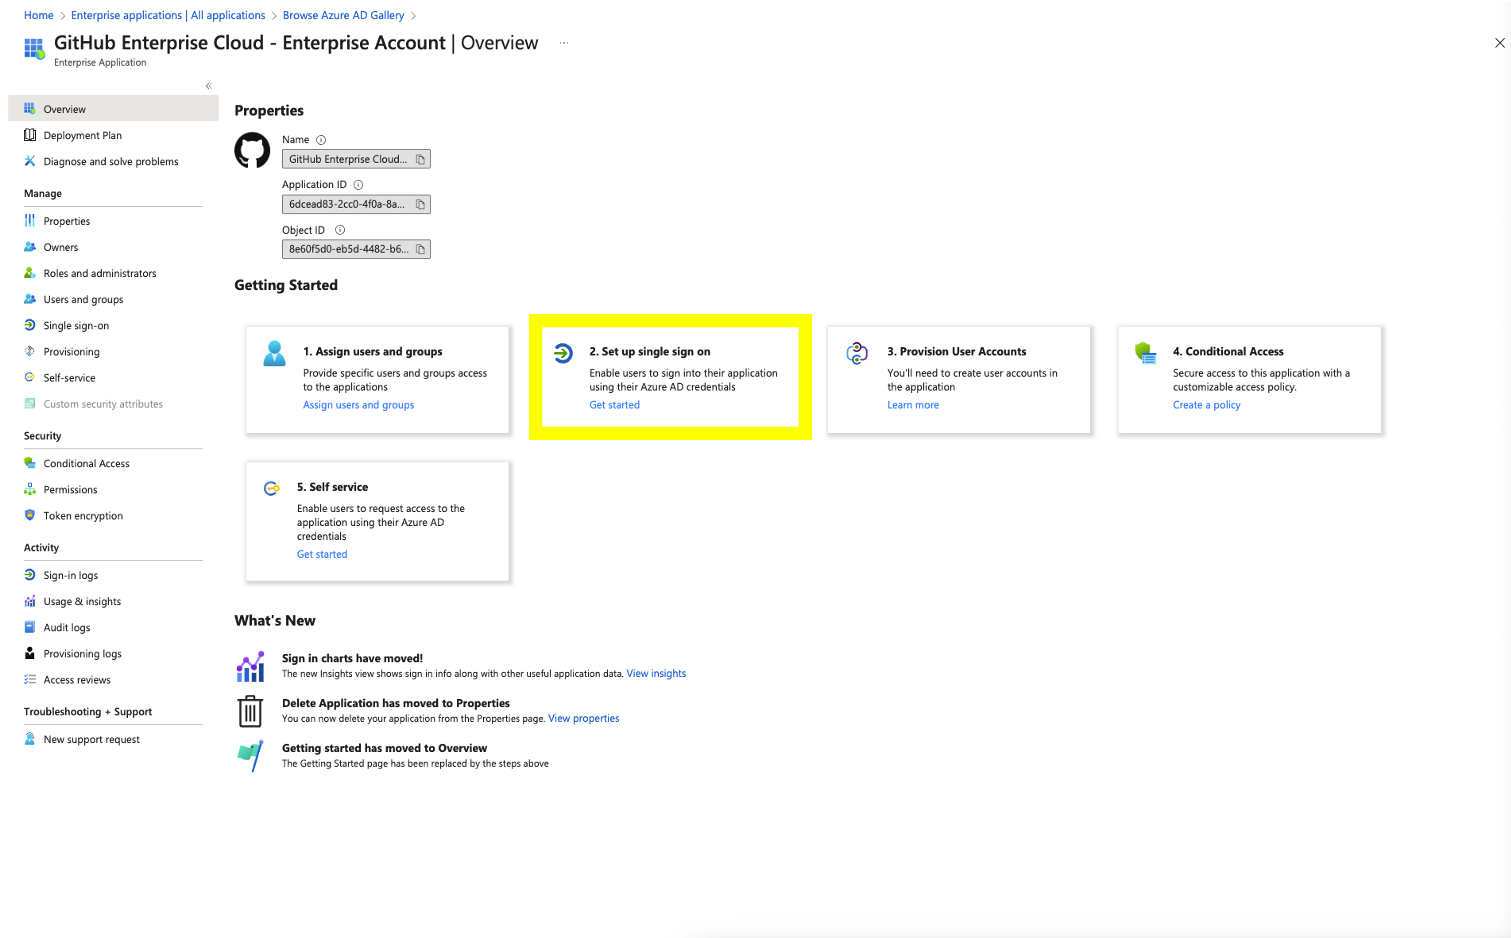
- Within the “GitHub Enterprise Cloud Organization” App select option ”2. Set up single sign on”
- Within the Single Sign-on select SAML as the Single Sign-on method.
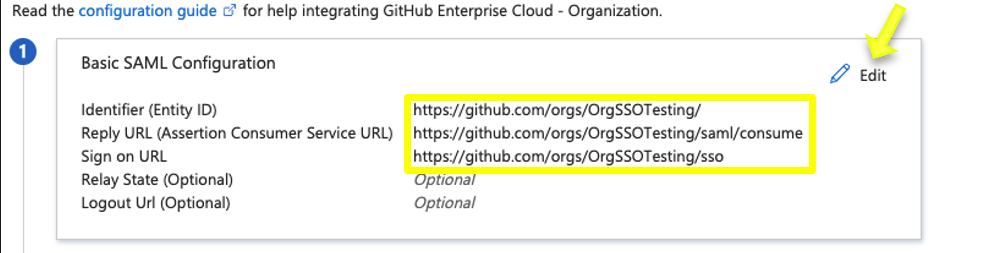
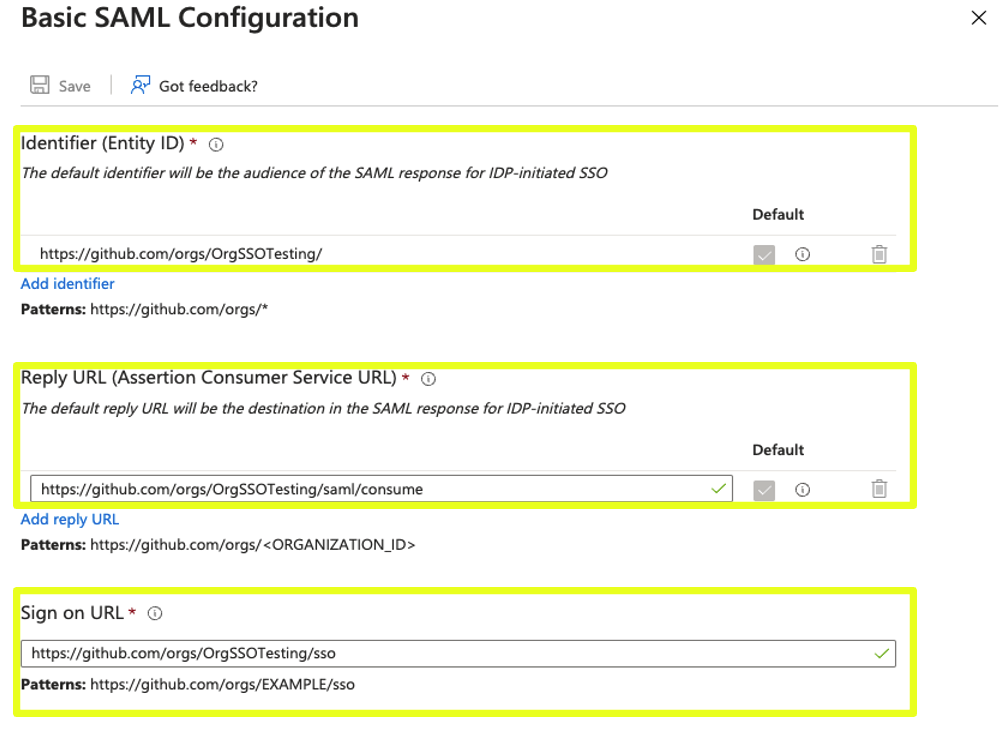
- Within the SAML configuration click “edit” on the Basic SAML Configuration.
- Under the basic SAML configuration, make sure you enter the correct values for example:
- Identifier (Entity ID) = https://github.com/orgs/Your_Organization_Name
- Reply URL= https://github.com/orgs/Your_Organization_Name/saml/consume
- Sign on URL= https://github.com/orgs/Your_Organization_Name/sso
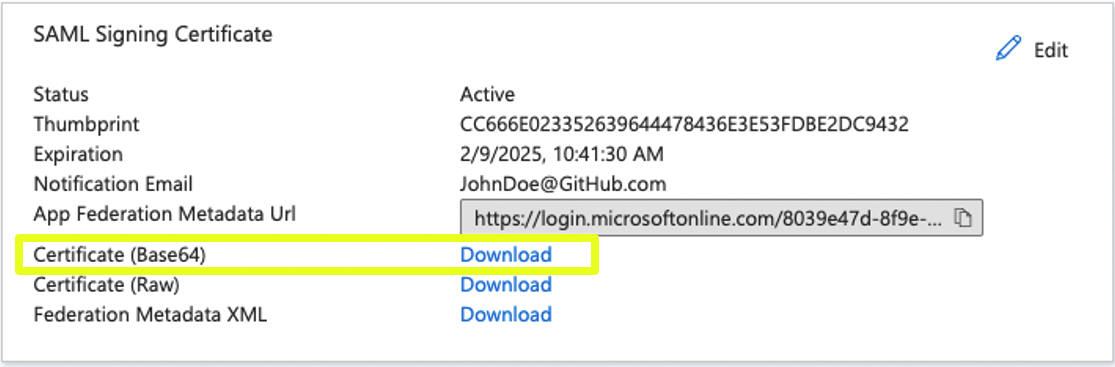
- Under SAML Signing Certificate, download the Base64 Certificate and open it using your code editor of choice. Keep it handy as we will need it later during this guide.
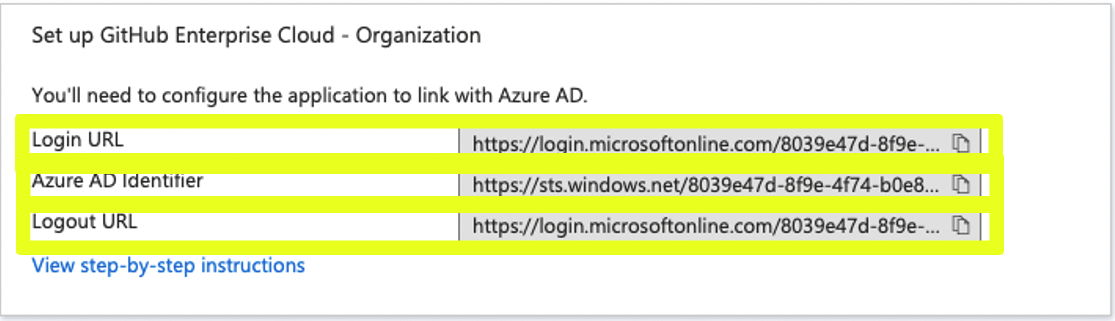
- Under Set up GitHub Enterprise Cloud - Organization, within the Azure AD SAML configuration copy the following values and keep them handy as we will also need them later on during this guide.
- Login URL
- Azure AD Identifier
- Logout URL

⚠️NOTE: You might get a prompt to test the SAML configuration! Let's not do that now as it will fail. Remember we are still missing to configure SAML on GitHub.⚠️
Step 3 Adding Users and Groups
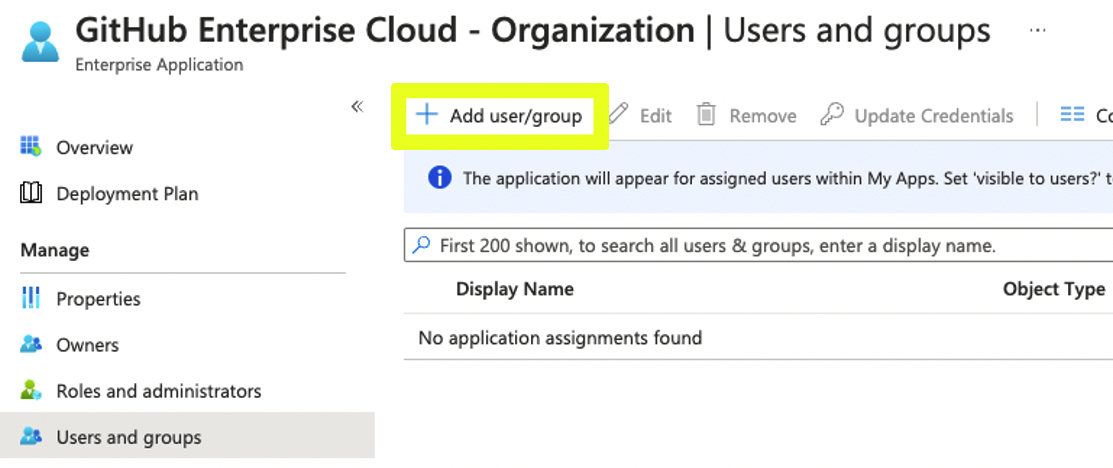
- Within the SAML configuration page on Azure AD, at left-side menu under "Manage" access "Users and groups”
- Click on Add user/group and proceed on adding your users or groups who will be authenticating via SAML in GitHub. It’s important that while doing this setup you must add your user and make sure your user has global administrator privileges in order to successfully complete the setup.


Step 4: Login and access the settings
- Login to your GitHub account, Please ensure you are an Enterprise or Organizational owner.
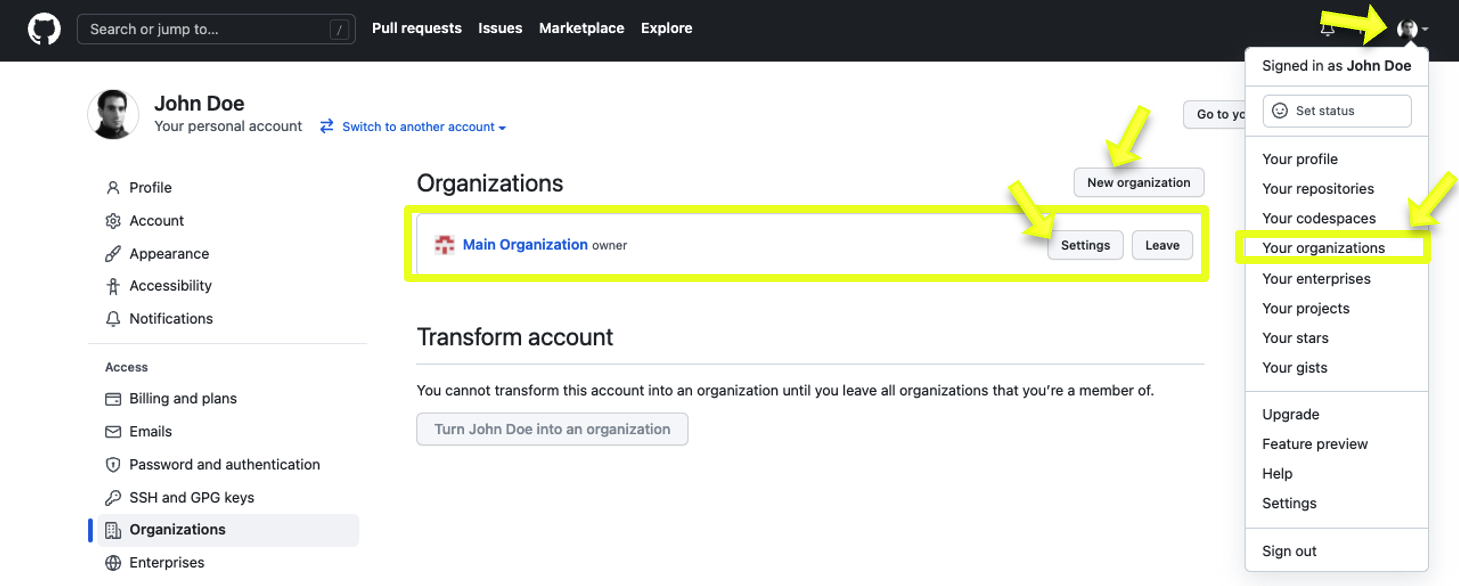
- Within GitHub on the top-right corner click on dropdown next to you profile image. Within the dropdown select “Your Organizations”. Once done, you will be redirect to your profile's organizational access overview which will display all the organizations you have access too. Click on settings next to the Organization you will be integrating Azure SSO.

Step 5: Configuring SAML
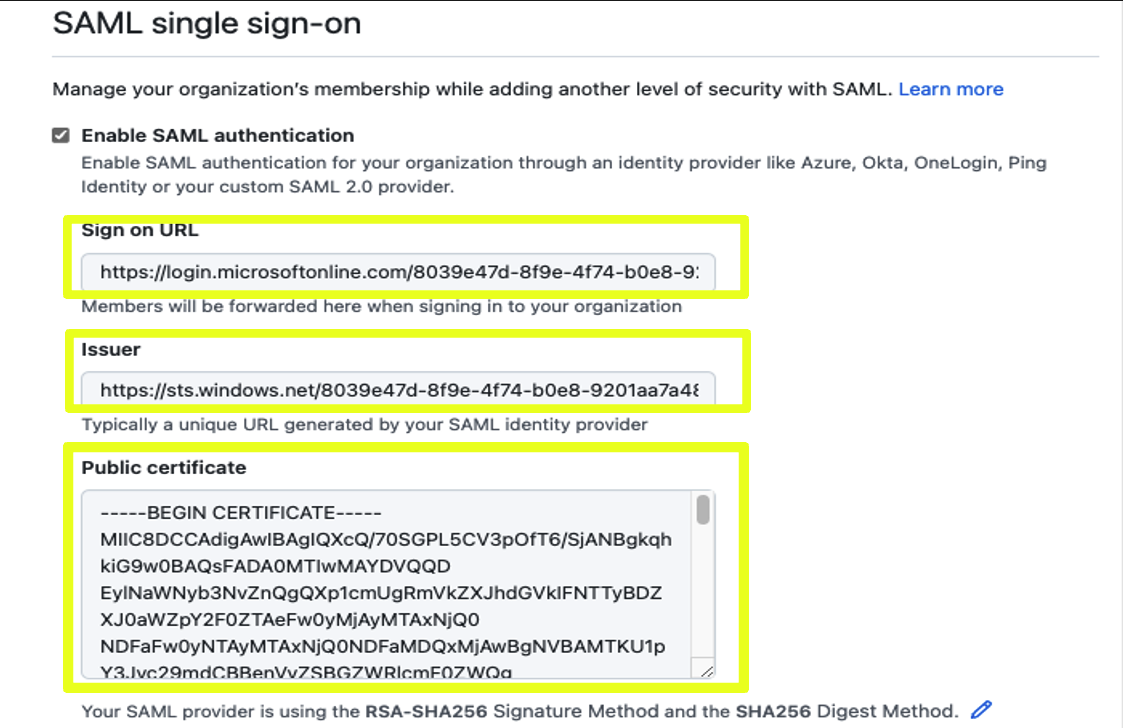
- Within the organization settings on the left-side menu under Security click on Authentication Security. Afterwards click on Enable SAML authentication
- Once SAML is enabled proceed on filling out the information as follows:
- Sign on URL = Login URL (on Azure)
- Issuer = Azure AD Identifier (on Azure)
- Public Certificate = Base64 Certificate (on Azure)


Step 6 (Optional): Team Synchronization
- Once your SAML configuration is completed click on Single Sign-on to SSO into GitHub and proceed on enabling Team Sync by clicking on Enable for Azure AD
- Once you click on “Enable for Azure AD” you will be redirected to a screen to Enable Team Synchronization.
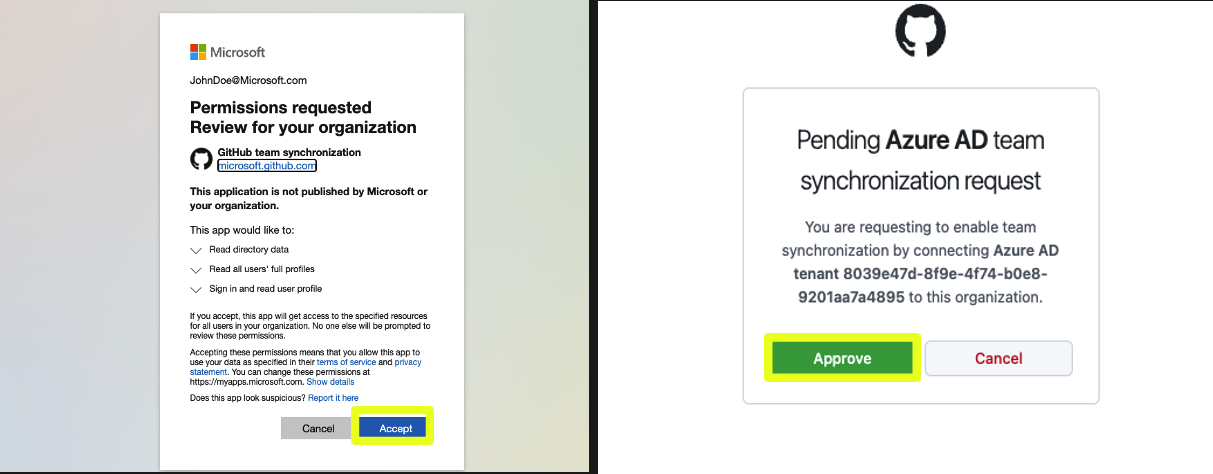
- Once done you will be requested to Authenticate with your Azure credentials and grant permissions and finally to approve the synchronization request.
- Once completed, You will be redirected back to your organization SAML settings, and you will notice you will now see the option to disable team synchronization, meaning it has now been fully enabled.


Step 7 (Optional) Configuring SCIM to provision and deprovision users
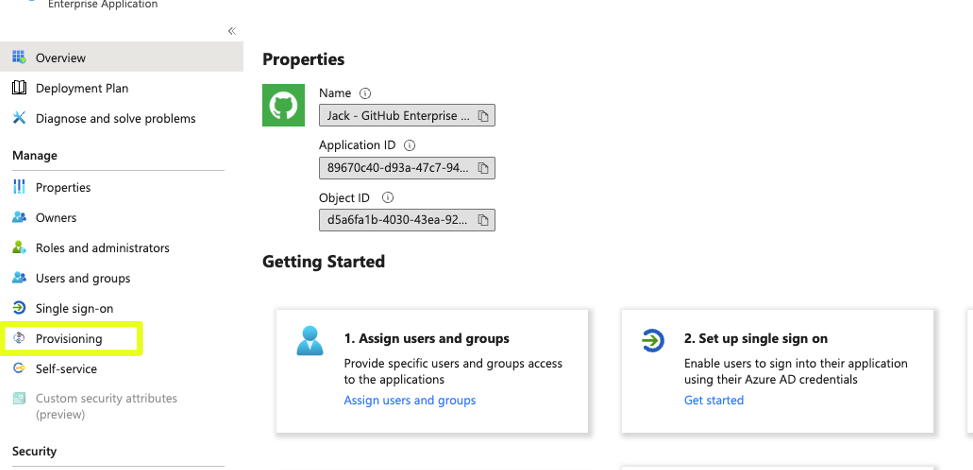
- Login to your Azure Portal and Search for the GitHub Enterprise Cloud Organization under Enterprise Applications created in Step 1 in this guide. Once identified click on it to access its settings.
- Within the settings locate provisioning located on lef-side menu bar under Manage and Click on provisioning to access the provisioning settings
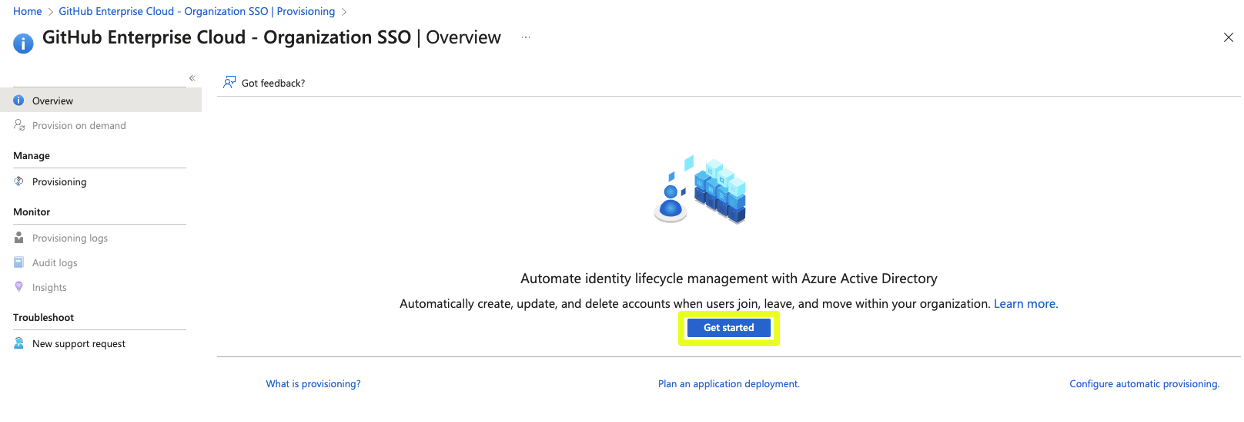
- Within Provisioning click on Get Started
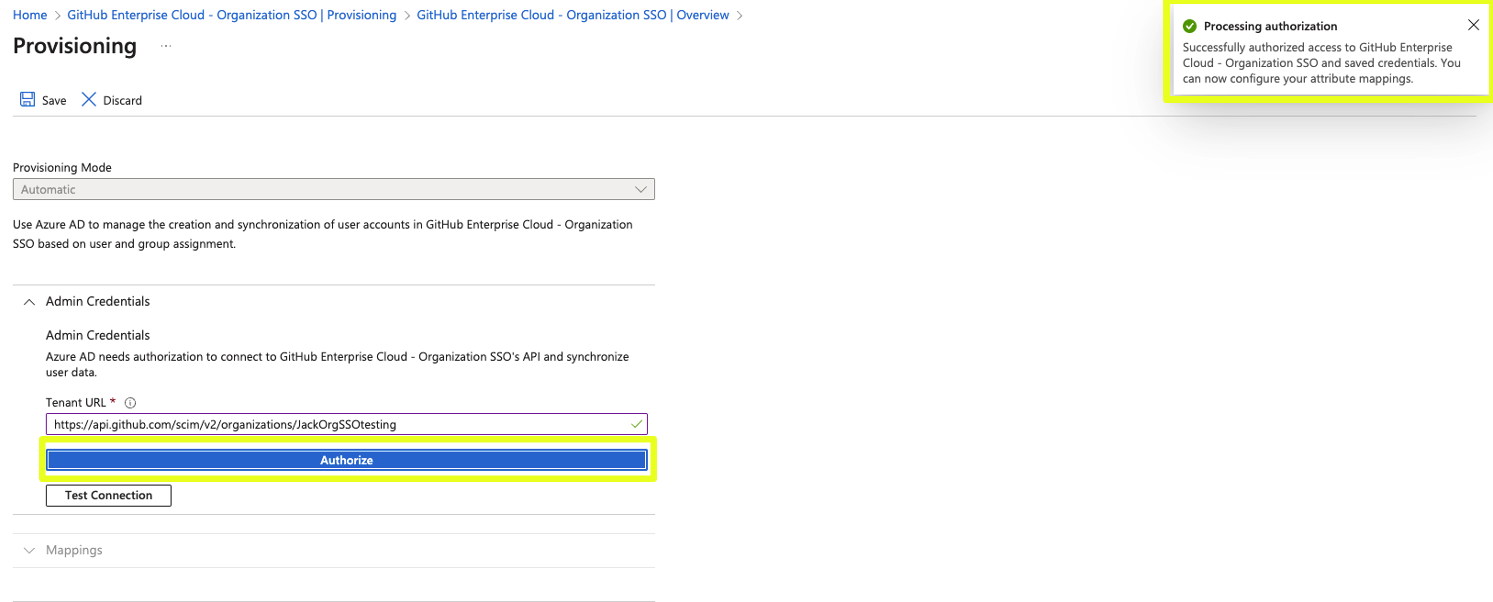
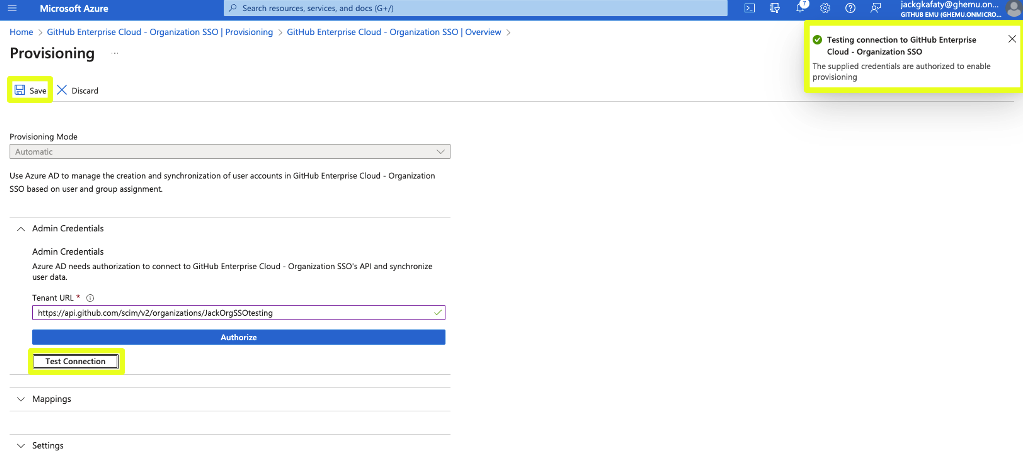
- On the Provisioning Settings set the following values:
- Provisioning Mode = Automatic
- Admin Credentials = https://api.github.com/scim/v2/organizations/YOUR_ORGANIZATION'S_NAME
- After a successful authorization you may proceed on Testing your Connection by clicking on Test Connection. Once completed you should see a pop-up on the top-right corner stating that the test was successful. Finally click on Save and navigate back to provisioning by clicking the Navigation hyperLinks located above provisioning
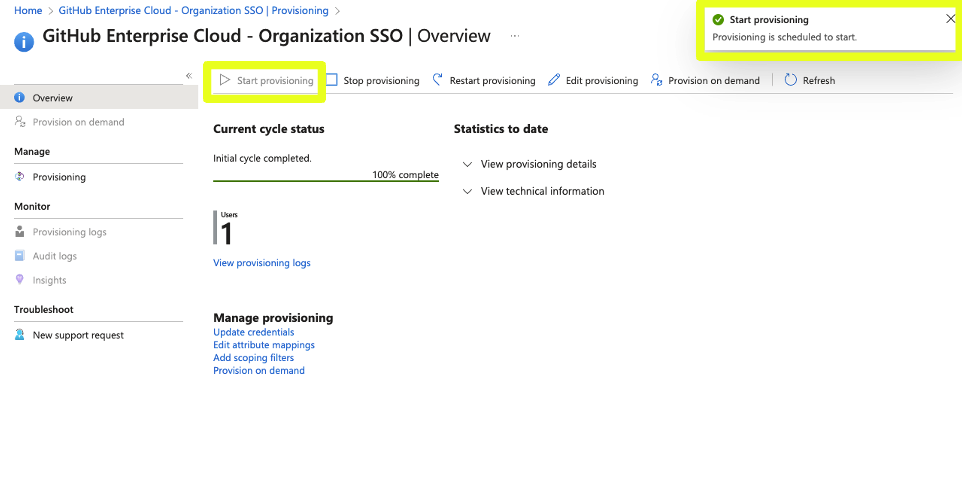
- Once you are redirected back to the Provisioning Overview Click on Start Provisioning. Afterwards you should see a successful confirmation message on the top right corner informing you that provisioning has started. Keep in mind that only the users added within Users and Groups will be provisioned at this time. Any other user added later on will be added based on the Hard-coded scheduled cron which runs every 45 minutes, this can not be changed. However you can skip the cron by clicking on Provision on demand, to provision users or groups immediately
Step 8 (Optional): Enforcing Single Sign-On
-
⚠️ WARNING ⚠️ Before Enforcing SSO we highly advice that you review the full impact this will have within your organization and its overall access. You can review specific details by reviewing "What is the overall impact when enforcing SSO?" within this document under Azure AD SSO Frequently Asked Questions
- Once your SAML configuration is completed click on Single Sign-on to SSO into GitHub Once done you will be able to enforce SSO
- Once completed click on Save

GitHub Enterprise Cloud | Enterprise-level Azure SSO Setup Step-by-Step!
Step 1 Adding the GitHub Enterprise Cloud Application from the Azure Enterprise application catalog
- Login to your Azure Portal, Make sure that you have Administrator permissions
- Access “Enterprise Applications”
- Within Enterprise Applications, Click on “+ New Application”
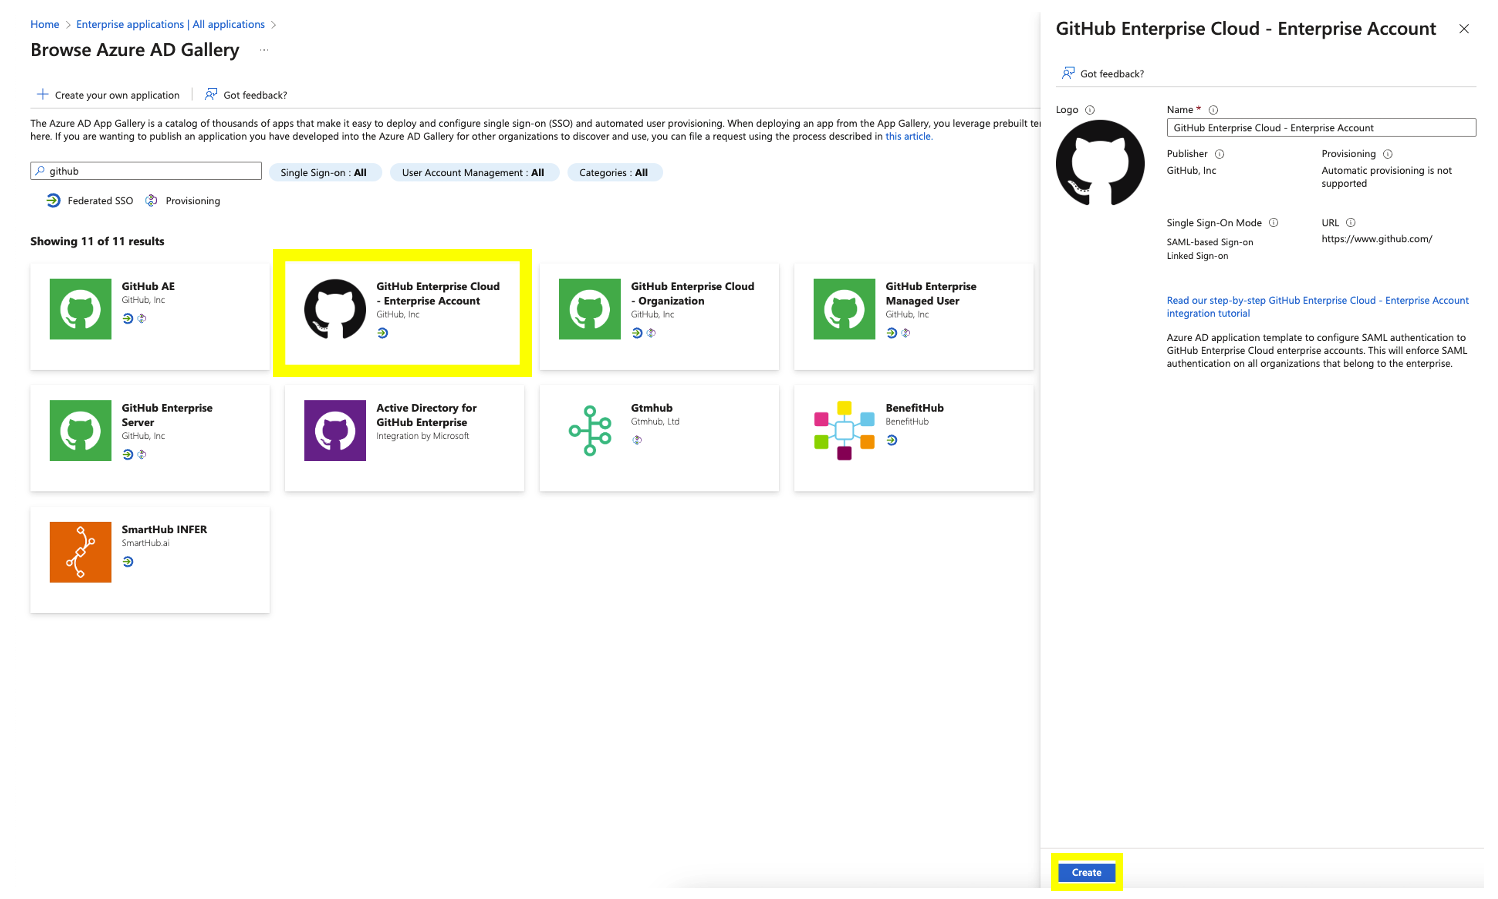
- Within the Azure AD gallery search for GitHub Enterprise Cloud - Enterprise account.
- Once Selected click “create” at the bottom left-side corner.
Step 2 Setting up SAML within the GitHub Enterprise Cloud application in Azure AD
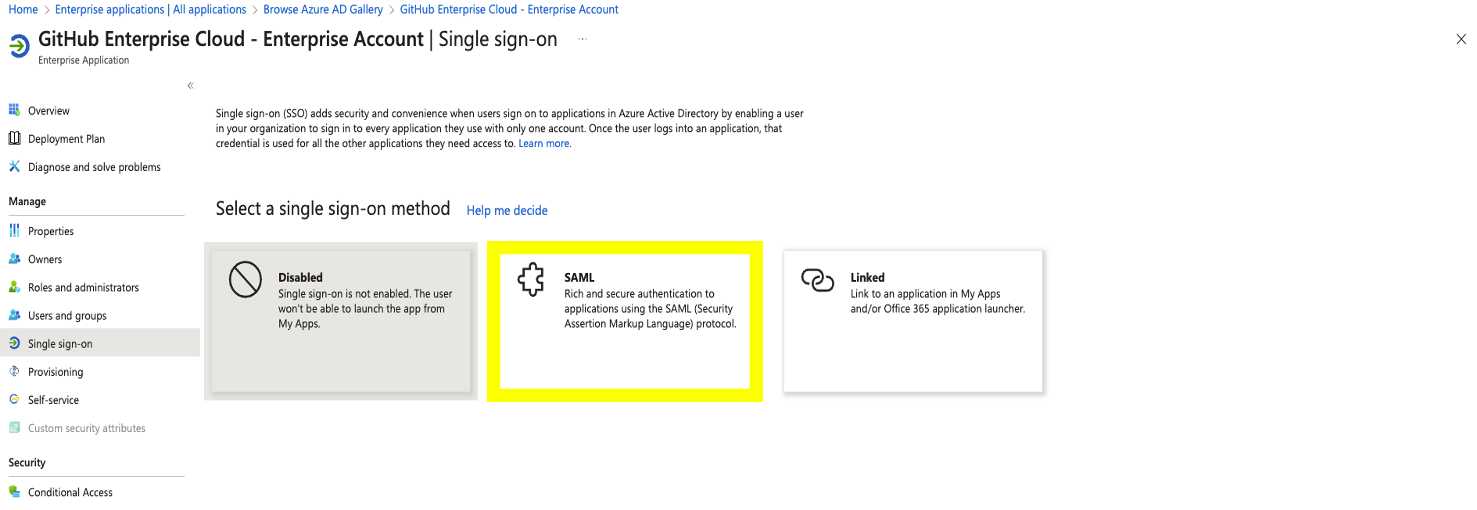
- Within the “GitHub Enterprise Cloud Enterprise Account App, on the left-menu bar select Click on Single Sign-On From within the Single Sign-On panel select SAML to begin the SAML configuration.
- Within the Single Sign-on select SAML as the Single Sign-on method.
- Within the SAML configuration click edit on the Basic SAML Configuration.
- Under the basic SAML configuration, make sure you enter the correct values for example:
- Identifier (Entity ID) = https://github.com/enterprises/Your_Enterprise_Name
- Reply URL= https://github.com/enterprises/Your_Enterprise_Name/saml/consume
- Sign on URL= https://github.com/enterprises/Your_Enterprise_Name/sso
⚠️NOTE: You might get a prompt to test the SAML configuration! Let's not do that now as it will fail. Remember we are still missing to configure SAML on GitHub.⚠️

- Under SAML Signing Certificate, download the "Base64 Certificate and open it using your code editor of choice. Keep it handy as we will need it later during this guide.
- Under Set up GitHub Enterprise Cloud - Enterprise Account, within the Azure AD SAML configuration copy the following values and keep them handy as we will also need them later on during this guide.
- Login URL
- Azure AD Identifier
- Logout URL

Step 3 Adding Users and Groups
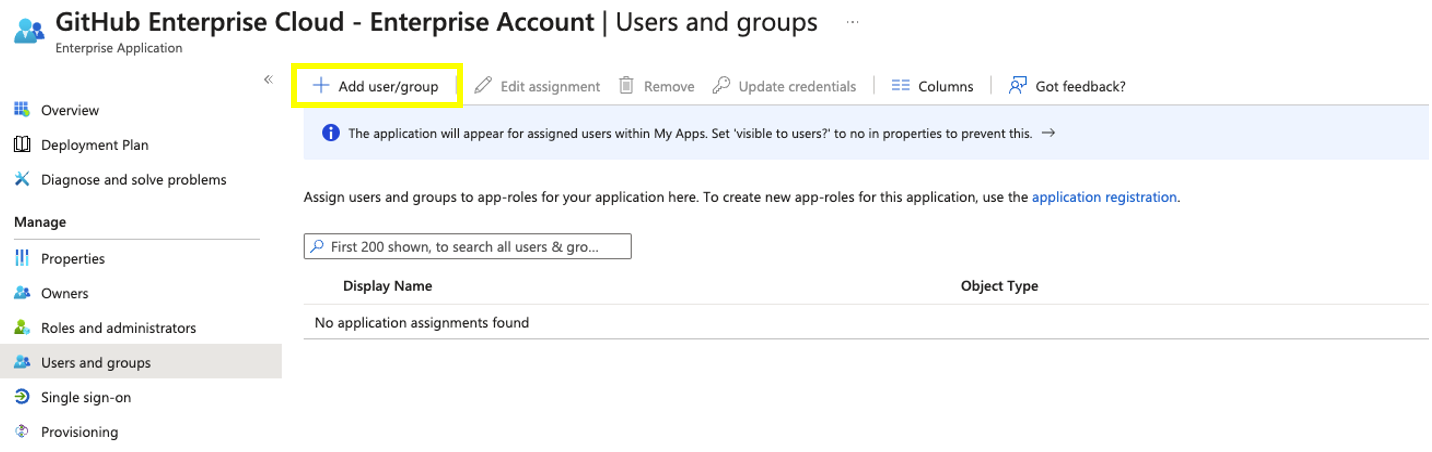
- Within the SAML configuration page on Azure AD, at left-side menu under "Manage" access "Users and groups”
- Click on Add user/group and proceed on adding your users or groups who will be authenticating via SAML in GitHub. It’s important that while doing this setup you must add your user and make sure your user has global administrator privileges in order to successfully complete the setup.
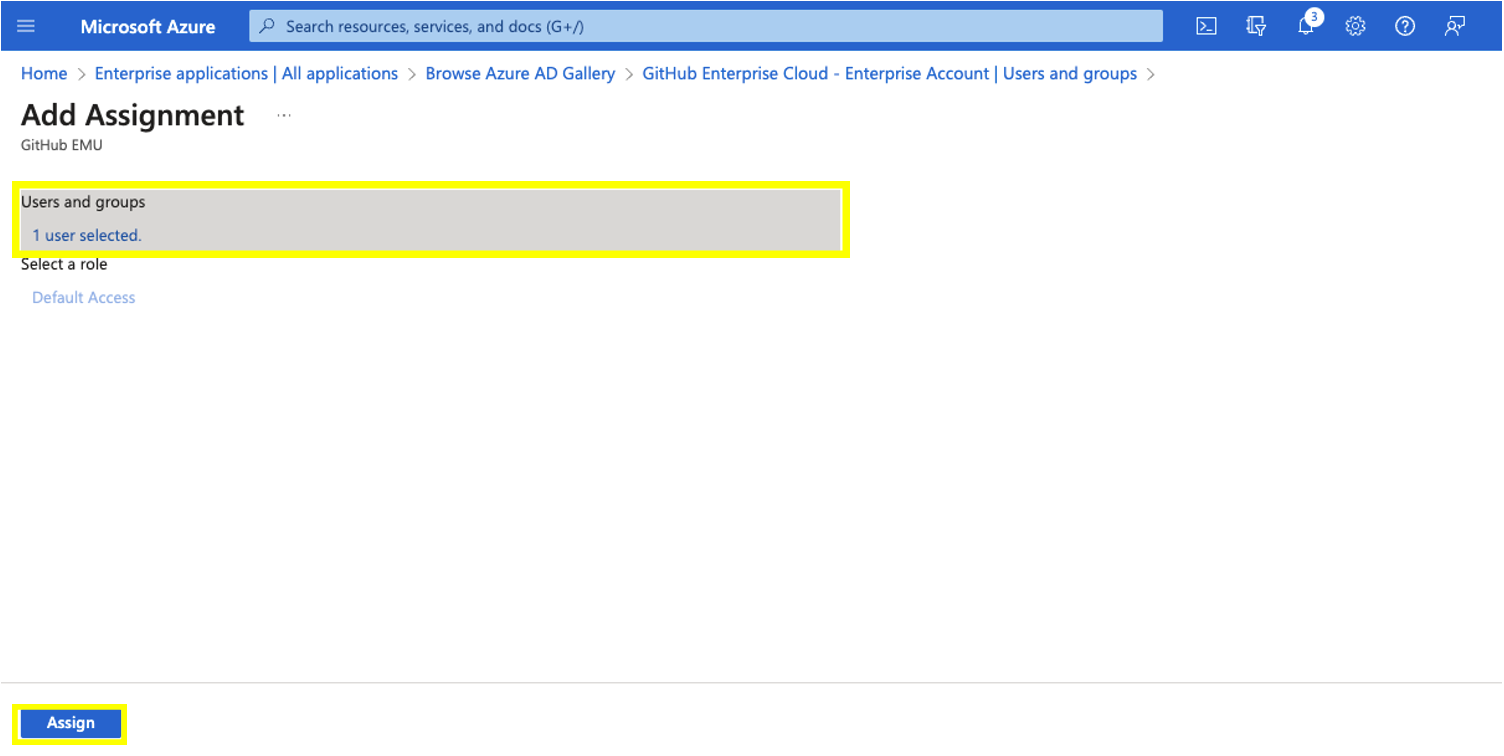
- To add users or groups, simple search for the name of the user/group you wish to grant access. Once done click Assign . There is no need to select any role as this will be defined directly on GitHub.

Step 4: Login and access the settings
- Login to your GitHub account, Please ensure you are an Enterprise owner.
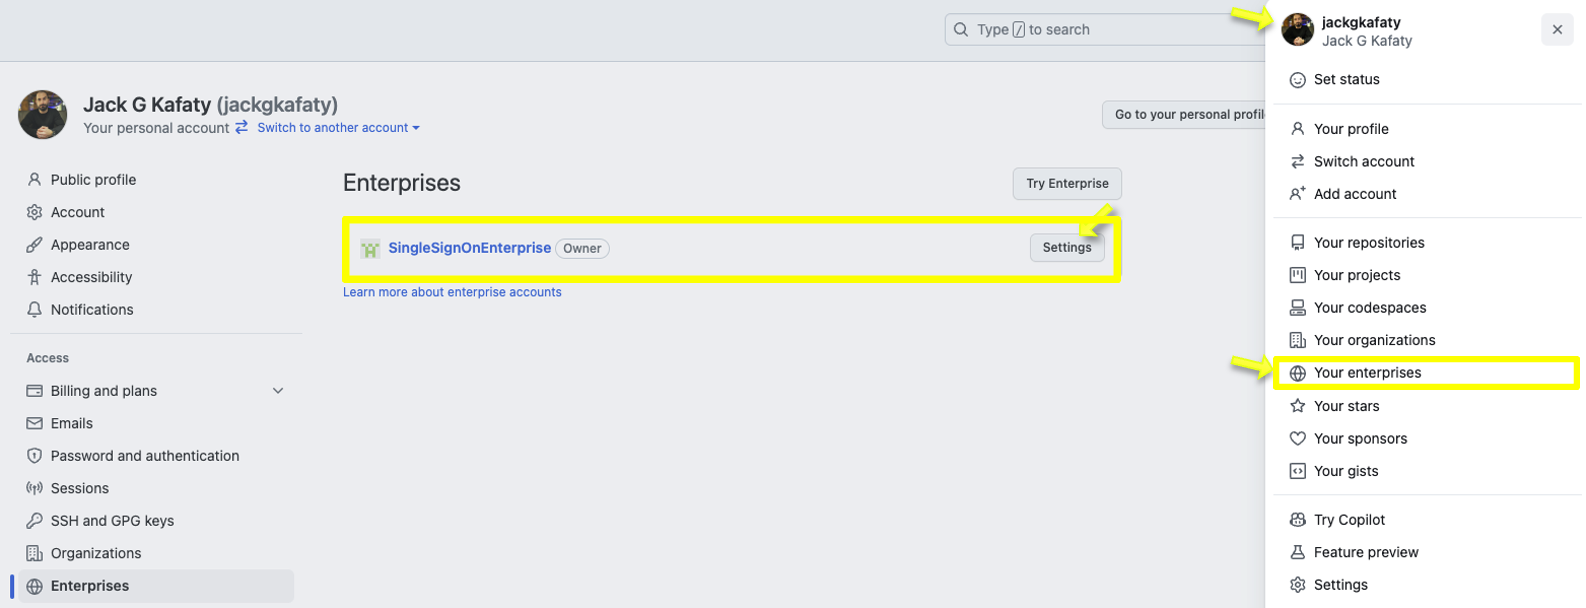
- Within GitHub on the top-right corner click on dropdown next to you profile image. Within the dropdown select Your Enterprises. Once done, you will be redirect to your profile's Enterprise access overview which will display all the Enterprises you have access too. Click on settings next to the Enterprise you will be integrating Azure SSO.
Step 5: Configuring SAML
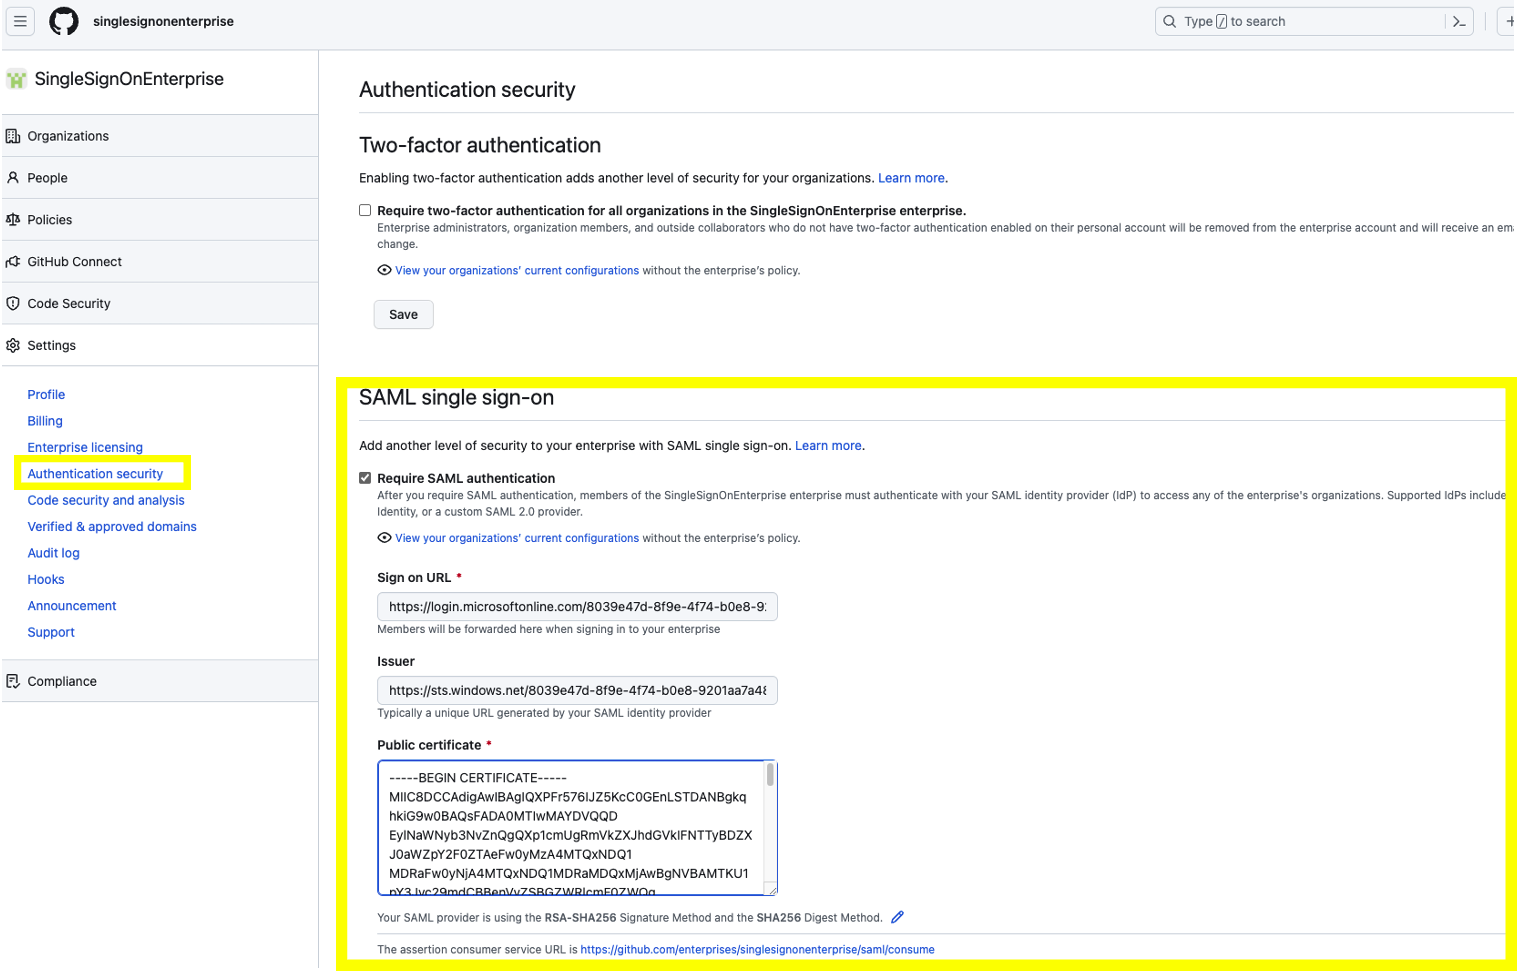
- Within your Enterprise's settings on the left-side menu under Settings click on Authentication Security. Afterwards click on Enable SAML authentication
- Once SAML is enabled proceed on filling out the information as follows:
- Sign on URL = Login URL (on Azure)
- Issuer = Azure AD Identifier (on Azure)
- Public Certificate = Base64 Certificate (on Azure)
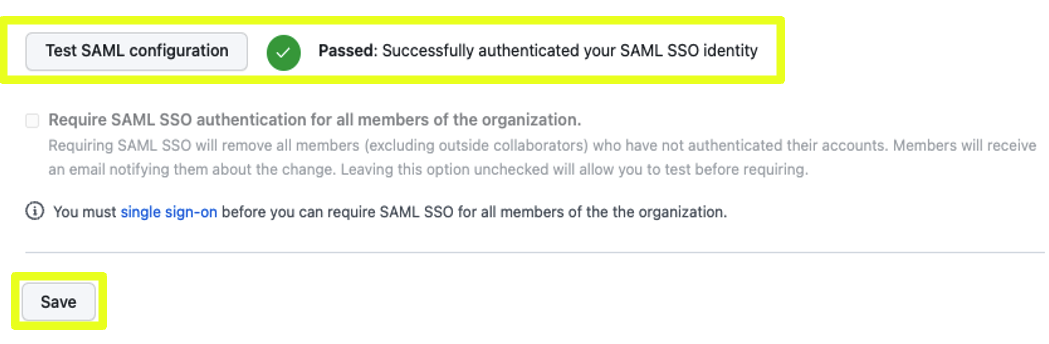
- Click on Test SAML Configuration and proceed on login to complete the setup.
- Once you have successfully authenticated via Azure's SSO you should see a positive message stating that you have successfully authenticated your SAML SSO identity. Click on Save! to complete your setup!
- After Click on Save! as a final step you will be requested to Download / Print / Copy your recovery codes. This codes are unique and can be used to regain access to your enterprise without SSO in the scenario you need to. Once you select an option you will be able to click on Enable SAML Authentication. From this point forward all users must authenticate via SAML to obtain access to your Enterprise and all Organizations within it. With the exception of Outside Collaborators unless you provision them as normal users.


Step 6 (Optional): Team Synchronization
- Once your SAML configuration is completed click on Single Sign-on to SSO into GitHub and proceed on enabling Team Sync by clicking on Enable for Azure AD
- After clicking on “Enable for Azure AD” you will be redirected to a screen to Enable Team Synchronization.
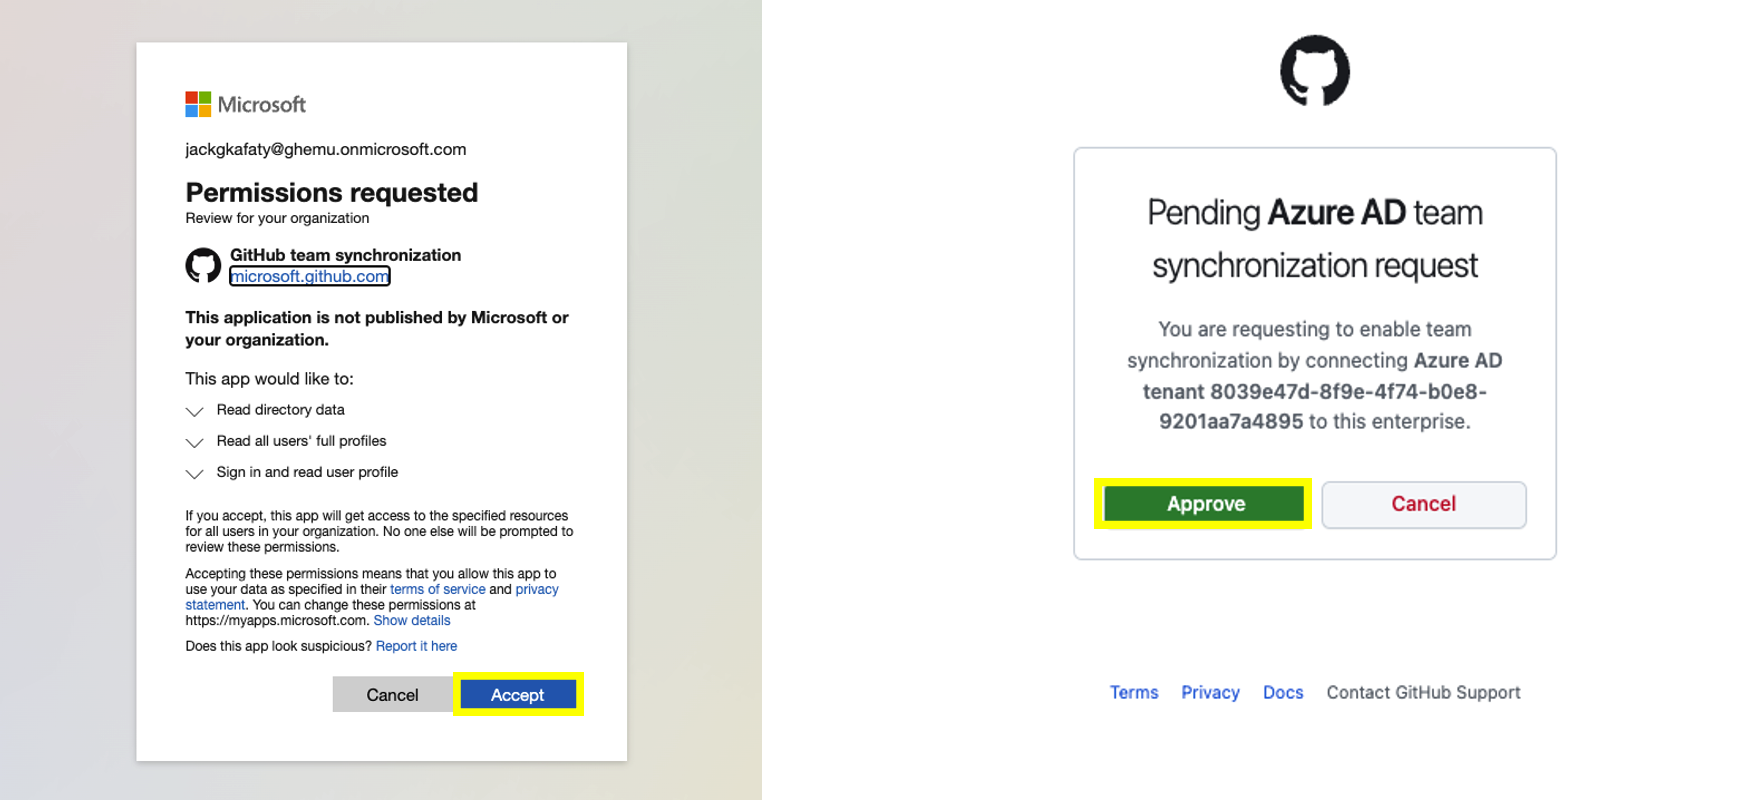
- You will be requested to Authenticate with your Azure credentials and grant permissions and finally to approve the synchronization request.
- Once completed, You will be redirected back to your Enterprise's SAML settings, and you will notice you will now see the option to disable team synchronization, meaning it has now been fully enabled.

- SCIM capabilities to provision and deprovision users is not supported when configuring SAML at the Enterprise Level. This is only supported at the Organizational Level. If you wish to provision and deprovision users from your IDP you must configure SAML and SCIM for each Organization within your Enterprise.
- SSO is enforced by default at the Enterprise Level, meaning that all users must authenticate via SAML to obtain access to your Enterprise and all Organizations within it. With the exception of Outside Collaborators unless you provision them as normal users.
Azure AD SSO Frequently Asked Questions
1. What will happen to existing users when I enable SSO?
After successfully enabling and configuring SSO and SCIM, existing members of the organization will be prompted to authenticate through SSO upon accessing the organization. It's imperative that all members comply with this requirement to link their GitHub account to their IDP account, ensuring that access is not lost when SSO is fully enforced. For further details refer to [Enabling and testing SAML single sign-on for your organization - GitHub Enterprise Cloud Docs](https://docs.github.com/en/enterprise-cloud@latest/organizations/managing-saml-single-sign-on-for-your-organization/enabling-and-testing-saml-single-sign-on-for-your-organization)
2. Can someone get on a call with me to achieve this setup?
Hands-on Keyboard or dedication session assistance is only offered to customers under our Premium Support Plan or customers who have opted for a white-glove Professional Service engagement . If you are interested in learning more about our Premium Support Plan or Professional Services please reach out to your GitHub Account Manager for pricing details. For Enterprise Customers without a Premium Support Plan or Professional Services engagement, please reach out to our GitHub Enterprise Support Team for assistance using the following [LINK](https://support.github.com/).
3. If I enable SSO at the Enterprise-level and later on add an organization, what will happen?
For details please refer to [Adding organizations to your enterprise](https://docs.github.com/en/enterprise-cloud@latest/admin/managing-accounts-and-repositories/managing-organizations-in-your-enterprise/adding-organizations-to-your-enterprise)
4. What is the overall impact when enforcing SSO?
Enforcing SAML means that all members of the organization will need to authenticate against your IDP to access the organization and its resources, Excluding outside collaborators , [Adding outside collaborators to repositories in your organization - GitHub Enterprise Cloud Docs](https://docs.github.com/en/enterprise-cloud@latest/organizations/managing-user-access-to-your-organizations-repositories/adding-outside-collaborators-to-repositories-in-your-organization) . It's crucial to note that enforcing SAML will have an impact on all SSH keys, PATs, and OAuth applications that were created, integrated, or configured before SSO was enabled. As well its important to highlight: - Users who did not link their GitHub account with your IDP will be automatically removed from the organization, hence will lose access to all resources and would need to be provisioned again. - Any CI/CD task that depends on a Personal Access Token that has not been authenticated against SSO will fail due to authentication failure. Hence causing your automation/pipeline to break. [Authorizing a personal access token for use with SAML single sign-on - GitHub Enterprise Cloud Docs](https://docs.github.com/en/enterprise-cloud@latest/authentication/authenticating-with-saml-single-sign-on/authorizing-a-personal-access-token-for-use-with-saml-single-sign-on) - Developers who use SSH keys to access resources via the GitHub CLI will not be able to access resources until their SSH keys are authenticated. [Authorizing an SSH key for use with SAML single sign-on - GitHub Enterprise Cloud Docs](https://docs.github.com/en/enterprise-cloud@latest/authentication/authenticating-with-saml-single-sign-on/authorizing-an-ssh-key-for-use-with-saml-single-sign-on) - 0Auth applications/Integration will break until they are reauthorized against SSO. [Authorizing OAuth Apps - GitHub Enterprise Cloud Docs](https://docs.github.com/en/enterprise-cloud@latest/apps/oauth-apps/using-oauth-apps/authorizing-oauth-apps) - Bots and service accounts that do not have external identities set up in your organization's IdP will also be removed when you enforce SAML SSO. For more details please refer to [Managing bots and service accounts with SAML single sign-on - GitHub Enterprise Cloud Docs](https://docs.github.com/en/enterprise-cloud@latest/organizations/granting-access-to-your-organization-with-saml-single-sign-on/managing-bots-and-service-accounts-with-saml-single-sign-on) For more details please review our official documentation on [Enforcing SAML single sign-on for your organization](https://docs.github.com/en/enterprise-cloud@latest/organizations/managing-saml-single-sign-on-for-your-organization/enforcing-saml-single-sign-on-for-your-organization) Note: The above impact will be the same when configuring SSO at the Enterprise Level
5. How can I see which users have linked their GitHub account with their Azure SSO ID?
Once your users have been informed and they have proceeded on linking their GitHub account with your IDP. You can download a report to validate which users have completed this step and which ones have not. It's important that you do this before enforcing SSO, as users who have not linked their account once SSO is enforced their user account will be removed from the organization:
- A. Access your GitHub Organization, please ensure you are the owner or admin otherwise you will not be able to see this report.
- B. Within the organization access the “People” tab
- C. Within the People tab click on Export and choose CSV.
- D. A CSV report will be generated and downloaded. After it has downloaded, open the report.
- E. In the report there are only 2 columns you should focus on, “Login” and “Saml_name_id”. The login column will display the users GitHub handle/username and the Saml_name_id will display their @companydomain.com email only if they have linked their GitHub account with your IDP. if they have not the Saml_name_id will not display
 For further information feel free to review our documentation on [Preparing to enforce SAML single sign-on in your organization - GitHub Enterprise Cloud Docs](https://docs.github.com/en/enterprise-cloud@latest/organizations/managing-saml-single-sign-on-for-your-organization/preparing-to-enforce-saml-single-sign-on-in-your-organization)
6. What are Team Sync's Limitations?
Team Sync is a feature that allows you to sync your IDP group to a GitHub team. Think about it as a 1-1 mapping 1 IDP group per GitHub Team. For more information on its capabilities feel free to review our documentation on [Synchronizing a team with an identity provider group - GitHub Enterprise Cloud Docs](https://docs.github.com/en/enterprise-cloud@latest/organizations/organizing-members-into-teams/synchronizing-a-team-with-an-identity-provider-group)
As per its limitation it important to highlight the following:
- Nested groups are not supported by Team Sync. Parent teams cannot synchronize with IdP groups. If the team you want to connect to an IdP group is a parent team, we recommend creating a new team or removing the nested relationships that make your team a parent team
IDP groups with more than 5,000 members are not supported.
- Maximum number of members in a GitHub organization: 10,000
- Maximum number of teams in a GitHub organization: 1,500
- Once a GitHub team is connected to an IdP group, your IdP administrator must make team membership changes through the identity provider. You cannot manage team membership on GitHub Enterprise Cloud or using the API.
- By default, team synchronization does not invite non-members to join organizations, which means that a user will only be successfully added to a team if they are already an organization member.
- The person has already logged in with their personal account on GitHub Enterprise Cloud and authenticated to the organization via SAML single sign-on at least once to link their account.
- Only IDP members with linked accounts are able to be provisioned
7. How frequent are user provisioned via SCIM?
User/Group provisioning is done on a fixed Hard-Coded interval of 40 Minutes. If you need to provision a user/group immediately you can do so by clicking on Provision on demand within the provisioning Overview panel in Azure AD.
8. Error AADSTS650056: Misconfigured application, How do I resolve it?
``` AADSTS650056: Misconfigured application. This could be due to one of the § following: the client has not listed any permissions for 'AAD Graph' in the requested permissions in the client's application registration. Or, the admin has not consented in the tenant. Or, check the application identifier in the request to ensure it matches the configured client application identifier. Or, check the certificate in the request to ensure it's valid. Please contact your admin to fix the ``` If you are receiving the error message above, it means that either:
- You may encounter an error if you don't have Global Admin rights to the Azure tenant where you are integrating. Please review the requirements at the start of the guide to resolve this issue.
- Double-check your configuration on step 2.4 to ensure that you have inputted the correct values:
- Identifier (Entity ID) = https://github.com/enterprises/Your_Enterprise_Name
- Reply URL = https://github.com/enterprises/Your_Enterprise_Name/saml/consume
- Sign on URL = https://github.com/enterprises/Your_Enterprise_Name/sso
- At a GitHub level, you are not using the correct URLs under Single Sign-On. Please revisit in the guide Step 5.2 to ensure you are mapping the values correctly.
- Sign on URL = Login URL (on Azure)
- Issuer = Azure AD Identifier (on Azure)
- Public Certificate = Base64 Certificate (on Azure)
9. I'm unable to integrate Azure AD SSO I keep on getting errors
Please reach out to our support team at [GitHub Enterprise Support](https://support.github.com/) and provide them with: - Screenshot of the issue or error message. - Screenshot of your Azure AD SAML configuration. - Screenshot of your GitHub SSO configuration. - Screenshot of the application you selected during our setting. - Let them know if you are integrating SSO at the organizational level or the Enterprise level.
