Getting Started: GitHub Enterprise for EDUs
Quickstart: GitHub Enterprise Setup
Steps for setting up your GitHub Enterprise account.
Step 1: Accept the Invitation to Your New GitHub Enterprise Account
- This invitiation is sent to the email address you provided.
Step 2: Add a Backup Enterprise Owner to Your Enterprise Account
- Go to:
- Enterprise → People (left sidebar) → Administrators (left sidebar) → Invite admin (top right)
- GitHub Docs:
Step 3: Set Up SAML Single Sign On (SSO)
- Go to:
- Enterprise → Settings (left sidebar) → Authentication Security → SAML Single Sign-on
- Best Practices
- Set up SSO at the Enterprise Level.
- For more information, see Best Practices for Educational Institutions.
- GitHub Docs:
Step 4: Download SAML SSO Recovery Codes
- Go to:
- Enterprise → Settings → Authentication Security → Save Your Recovery Codes (under SAML Single Sign-on)
- GitHub Docs:
Step 5: Require SAML SSO Authentication
- Go to:
- Enterprise → Settings → Authentication Security → SAML Single Sign-On → Require SAML Authentication
- Info:
- Once SSO is set up and required:
- Enterprise members must login via your IdP to access their organization's resources.
- Enterprise members must configure their SSH keys and PATs for SSO with your enterprise.
- Some GitHub Apps may require an active SSO session for authorization.
- Once SSO is set up and required:
- GitHub Docs:
Step 6: Add a Verified Domain to Your Enterprise (Optional)
- Go to:
- Enterprise → Settings → Verified and Approved Domains &rarr Configure & Verify the Domain
- Info:
- Verified domains are verified via your DNS provider.
- Setting up a verified domain adds a verified badge to the institution's URL and email address displayed on the public facing profile pages of all organizations that belong to the Enterprise where the organization uses the institution's URL as the organization URL.
- GitHub Docs:
Step 7: Restrict Email Notifications to Verified/Approved Domains (Optional)
- Go to:
- Enterprise → Settings → Verified and Approved Domains → select Restrict email notifications to only verified and approved domains
- Info:
- Both verified and approvided domains can be used to restrict email notifications to specified domains for faculty, staff, and students. Unlike verified domains, approved domains do not need to be verified via a DNS provider.
- GitHub Docs:
Step 8: Set Policies & Settings on the Enterprise
- Go to:
- Enterprise → Policies → review each policy
- Enterprise → Settings → review each setting
- Best Practices
- Allow organization admins to configure their own Policies and Settings for all but the paid features.
- To do this, set policies to "No Policy".
- To start, disable all paid features.
- Paid features include Actions, GitHub Advanced Security (under Code Security), Codespaces, and Copilot.
- Paid features can be enabled for selected organizations, and Cost Centers and Budgets can be created to limit spending and manage payment for these organizations.
- Set the Actions Workflow Permissions to read and write.
- To do this, go to: Enterprise → Policies → Actions → Workflow Permissions (bottom of the page) → select Read and write permissions
- For additional information, see Best Practices for Educational Institutions.
- Allow organization admins to configure their own Policies and Settings for all but the paid features.
- GitHub Docs:
Step 9: Add an Organization to the Enterprise for Your GitHub Admin/Management Team
- To invite an existing organization to join the Entperprise, go to:
- Enterprise → Organizations → Invite Organization (button in the upper right corner)
- If the team needs a new organization, go to:
- Enterprise → Organizations → New Organization (button in the upper right corner)
- Info:
- This organization will be used by your GitHub Admin/Management team, i.e., a central IT team that will manage the GitHub Enterprise and administer GitHub as a Service for the rest of your EDU community.
- This team may already have an existing GitHub organization. If so, that organization can be moved into the enterprise. Otherwise, you can create a new organization.
- Best Practice
- Review these docs before inviting an organization into your enterprise:
- GitHub Docs:
Step 10: Implement GitHub as a Service for your EDU Community
- Review the sections below: Overview: What's in a GitHub Enterprise? and Quickstart: GitHub as a Service
Overview: What's in a GitHub Enterprise?
An intro to the Enterprise account, Organizations, Repositories, Teams, and Classrooms
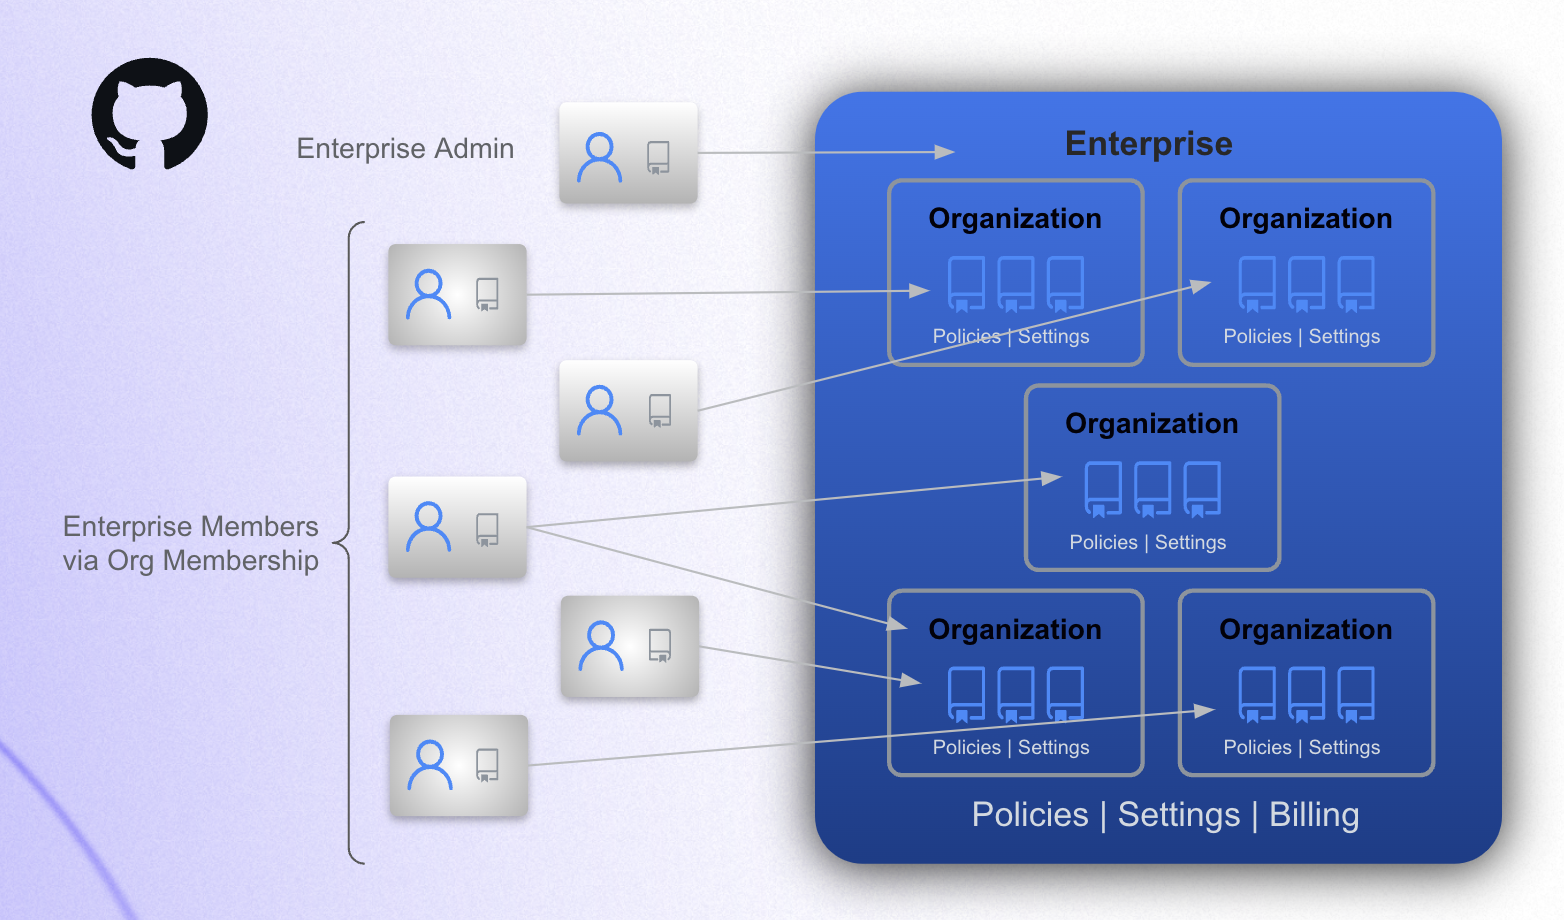
Enterprise Account
The enterprise account provides a single point of visibility, management, and enforcement of policies and settings for your institutions's GitHub presence.
-
Overview
- An enterprise contains organizations where people collaborate on coding projects.
- Enerprise admins control high level policies & settings for the organizations.
- Enterprise admins can also manage paid features and set spending limits for organizations.
- People consume an enterprise license by virtue of their membership in an organization that belongs to the enterprise.
- GitHub Docs:
-
What's in an Enterprise Account?
- Organizations.
- Policies & Settings
- Security Insights (Dependabot & Advanced Security)
- GitHub Connect (connects Server instances to Cloud instances for schools using GitHub Enterprise Server in addition to GitHub Enterprise Cloud).
- Audit Log
- Enterprise Admins
- List of Non-Admin Enterprise Members (Note: all non-admin members are members via their membership in an organization.)
- GitHub Compliance Reports
Organizations
An organization is where a group of people, such as an IT team, department, class, or research group, collaborate on code.
-
Overview
- Each organization can have a distinct set of members.
- Each organization has it's own repositories and teams.
- Organizations can have a few to a few thousand repositories and many teams.
- Repository access within an organization is limited via individual user or team permissions.
- Organizations can also have classrooms where professors, TAs, and students interact.
- GitHub Docs:
-
What's in an Organization?
- Repositories
- Classrooms
- Copilot License Assignment
- Projects
- Packages
- Discussions
- Teams
- Security Insights (Dependabot & Advanced Security)
- Org Level Insights
- Audit Log
- Members
- Policies & Settings
- Repository Rulesets (org wide)
Repositories
A repository is where people collaborate on code.
-
Overview
- There are three types of repositories.
- Private - only accessible to members of the org.
- Internal - accessible to members of all orgs in an enterprise (used for innersource).
- Public - can be read or forked by anyone on the internet.
- Repositories can be filtered by things like type, language, and license.
- Repositories can also be categorized with custom properties for easy filtering by property.
- Repository access is managed via teams (see next section).
- Rulesets control how users interact with repository branches and tags.
- GitHub Docs:
- There are three types of repositories.
-
What's in a Repository? (Code! but there's more 🙂)
- Code
- Pull Requests
- Issues & Projects (project management)
- Wikis
- Actions (CI/CD)
- GitHub Advanced Security Alerts
- Repo Insights
- Repository Rulesets
- Codespaces
Teams
A team is a group of organization members with role based access to organization settings and/or repositories.
-
Overview
- Teams are used to control repository and organization access permissions.
- Teams are used for communication within GitHub (e.g., notifying a team that a particular PR needs attention).
- GitHub Docs:
-
What's in a Team?
- Members
- Repository Access Controls
- Project Access Controls (Note: Projects are used to organize work to be done by a team.)
- Organization Role Controls
Classrooms
A classroom is a place where teachers, TAs, and students interact on GitHub during a class.
-
Overview
- Organizations can have one or more Classrooms.
- Classrooms are used to assign and grade student work.
- GitHub Docs:
-
What's in a Classroom?
- Roster of Students
- Individual and/or Group Assignments
- Assignment Deadlines
- Template Repositories
- Autograding via Automated Specs & Feedback
- Connection to a Learning Management System (LMS)
Quickstart: GitHub as a Service
A guide to managing GitHub as a Service for your EDU community.
Intro to GitHub as a Service
GitHub is a service that you'll provide to your educational community via your GitHub Enterprise account.
Overview
-
Groups within your EDU community will use organizations within your GitHub Enterprise account to collaborate on coding projects or develop code related curriculum.
-
Although each educational institution is different, such groups often include:
- Software Engineering or IT Teams
- Departments (e.g., Computer Science or Chemistry)
- Graduate Student Research Groups
- Professors and TAs Teaching Classes
- Extra Curricular Student Groups
Benefits of Providing GitHub as a Service
- Ensure all members of a GitHub organization belong to the EDU community.
- Manage billing via a central account with Cost Centers & Budgets for each organization.
- Implement global policies & settings as needed to ensure secure coding practices across your EDU coummunity.
What's involved in managing GitHub as a service?
With GitHub as a Service, a central IT team accepts and fulfills requests for GitHub organizations.
What will my team need to do to manage GitHub as a service?
- Develop and maintain a process for accepting requests for organizations.
- Create GitHub organizations within the enterprise account.
- Invite requestors to join their organization as an organization admin.
What other tasks might my team do?
Depending on your institutional requirements, your team may also:
- Implement and maintain a process for approving requests for GitHub organizations.
- Restrict organization access to particular GitHub features via enterprise level policies and settings.
- Configure Cost Centers, Budgets, and billing details for requested organizations.
- Remove inactive enterprise members from existing organizations.
- Remove inactive organizations from the enterprise.
- Set global policies that apply to all organizations within the enterprise.
- Monitor enterprise activity via the enterprise Audit Log.
- Monitor code security via the enterprise Code Security dashboards.
- Stand up GitHub server instances for research groups with high compliance requirements.
Quickstart Steps: Managing GitHub as a Service
Managing GitHub as a Service will require implementing the following steps or something similar. The drop downs below include information about each step as well as considerations and best practices for implementation.
Step 1: Accept Requests for Organizations
- Create and implement a process via which members of your EDU community can request GitHub organizations in your enterprise.
- Many EDUs use ServiceNow or other ticketing systems to accept and track requests.
-
Best Practices
-
Info to Collect in a Request
Note: This list is a recommendation. You may decide that you need to collect addtional or different information.
Info Notes Required to Set Up the Organization in GitHub University Department Organization Admin Name Organization Admin Email The organization admin will be invited to join the org via their email or GitHub handle (see Step 6). ☑️ Organization Admin GitHub Handle The organization admin will be invited to join the org via their email or GitHub handle (see Step 6). Reason the Organization is Needed Features Needed on the Organization Include a list of paid features that can be permitted or blocked with enterprise level settings. If permitted, payment methods and spending limits are set at the enterprise level. Paid features include features such as Advanced Security, Actions, GitHub Copilot, and Codespaces. Organization Name ☑️ New or Existing Organization Some groups will already have an existing GitHub organization that they want to add to the enterprise. In such cases, the organization can be invited to join the enterprise. In all other cases, a new organization will need to be created. Compliance Requirements Most EDUs allow organization admins to configure the settings on their organization to meet their compliance requirements. Whether a GitHub Server Instances is Needed to Meet the Compliance Requirements Some EDUs have research groups that require high compliance environments and cannot use GitHub Enterprise Cloud. In such cases, research groups will set up a GitHub server instance that is hosted inside their high compliance environment. Name & Email of Person Who Will Maintain the Server Instance (if one is needed) Some EDUs have a central team that helps set up and maintain server instances when needed. Other EDUs provide the server license (available in the GitHub Enterprise) but leave it up to the research group to set up their own server instance. Additional Organization Admin Emails This is not required to create the organization, but best practice is to have multiple organization admins. The person who creates the organization will be added automatically as an organization admin. Additional Organization Admin GitHub Handles This is not required to create the organization. Member Emails Some EDUs do not collect a list of organization members and instead allow organization admins to manage membership. This can be easier on the central IT team that manages GitHub as a Service. As long as SSO is configured at the enterprise level, only EDU community members will be able to join an organization, and enterprise admins can still remove inactive members from the organization.
-
Step 2: Approve Requests for Organizations
- Create and implement a process for approving requests.
-
Best Practices
- Many EDUs use their ticketing system to approve and track requests.
Step 3: Add Organizations to the Enterprise
-
Create a New Organization
- Go to:
- Enterprise → Organizations → New Organization (upper left)
- Note: Creating an organizatin must be done via the UI.
- Go to:
-
Invite an Existing Organization
- Please follow this guide: Consolidating Organizations into One GitHub Enterprise Account
- Note: Creating an organizatin must be done via the UI.
- GitHub Docs:
Step 4: Configure Enterprise Level Policies for the Organizations
- Go to:
- Enterprise → Policies
-
Best Practices
-
Policy Configuration
Note: This list is a recommendation. You may decide that you need to configure different or additional policies and settings.
Feature Policy Recommended Setting Location Notes Actions Enablement Enable for Specific Organizations Enterprise → Policies → Actions (top of page just under Policies heading) Enabling for specific organizations allows you to set payment methods and spending limits for those organizations that are prepared to pay for Actions usage. All other organizations will not have access to Actions. Alternatively, enable Actions for all organizations and set spending limits to $0. If spending limits are not set, and the organization uses Actions, Actions usage will be billed to the enterprise. Actions Workflow Permissions Read and write permissions. Enterprise → Policies → Actions (scroll to the very bottom of the page) Since enterprise policies override organization policies, this should be set to read and write, to ensure that those organizations can use the GITHUB_TOKEN in their Actions workflows. Advanced Security GitHub Advanced Security Availability Allow for Selected Organizations Enterprise → Policies → Code Security (scroll all the way to very bottom of the page) Allowing for specific organizations allows you to pay for only those organizations that should have GitHub Advanced Security. Note: GitHub Advanced Security will be billed to the enterprise. GitHub Copilot Copilot Enablement Allow for Specific Organizations Enterprise → Policies → Copilot (mid page) Allowing for specific organizations allows you to set payment methods and spending limits for those organizations that are prepared to pay for GitHub Copilot Business Licenses. All other organizations will not have access to Copilot Business licenses. Alternatively, enable Copilot for all organizations and set spending limits to $0. If spending limits are not set, and the organization uses Copilot Business, Copilot usage will be billed to the enterprise. Note: Copilot Pro licenses are free to verified students and teachers/professors via their personal GitHub accounts. Reach out to your GitHub rep to learn more about Copilot license types. GitHub Copilot Suggestions Matching Public Code (Duplication Detection Filter) Blocked Enterprise → Policies → Copilot → Policies (tab toward the top of page) → Suggestions Matching Public Code (scroll down) Set this at the enterprise level, as it's required by some clauses in the GitHub and Microsoft contracts for GitHub Enterprise Cloud using GitHub Copilot Business licenses. Codespaces Codespaces Enablement Allow for Specific Oganizations Enterprise → Policies → Codespaces Allowing for specific organzations allows you to set payment methods and spending limits for those organizations that are prepared to pay for Codespaces. Other Policies No Policy Enterprise → Policies AND Enterprise → Settings Setting "No policy" allows organization admins to set the policies for their organization, giving them maximum flexibility. Note: Please review all other policies and settings to ensure 'No Policy' is appropriate for your EDU community. Notes:
- If paid features are enabled for all organizations and spending limits are NOT set to $0, charges incurred will be billed to the enterprise. When enabled, Advanced Security is always billed to the enterprise.
- After a set amount of free usage, Git LFS and Packages are also paid features.
- Please review the GitHub docs for more information about GitHub Enterprise policies.
- Please review the GitHub docs or talk to your GitHub rep for more information about billing.
-
- GitHub Docs:
Step 5: Create Cost Centers & Budgets for Organizations
- To add a Cost Center, go to:
- Enterprise → Billing and Licensing → Cost Centers
- To add a Budget for the Cost Center, go to:
- Enterprise → Billing and Licensing → Budgets and Alerts
-
Additional Info
-
Cost Centers
- Cost Centers are used to manage payment methods and budgets organizations, reposotiries, or users.
- Cost Centers can be configured with an Azure Subscription ID for payment.
-
Budgets
- Budgets are used to set spending limits and alert people when spending is approaching the limit.
- Budgets are assigned to the enterprise, organization, repository, or Cost Center.
-
-
Best Practices
-
Cost Center & Budget Configuration
- Configure a Cost Center for any organization that will use paid features.
- Configure a Budget for any organization that will use paid features.
- Work with the organization admin to determine:
- who should be alerted when the organization is reaching it's spending limits.
- whether usage should be stopped when the spending limit is reached.
- Note: Cost Centers are required if setting an organization specific payment method. If a Budget is set and associated with an organization rather than a Cost Center, any usage the organization incurs will be billed to the Enterprise.
-
Step 6: Invite Organization Admins to Join Their Organizations
- To invite org admins from the GitHub UI, go to:
- Enterprise → Organizations → Select the Organization → People → Invite Member
- After the admin accepts their invitation, update their role by going to:
- Organization → People → Three Dots (right) → Change Role → Select Owner
- To invite org admins via the GitHub API, see these docs:
- Create an Organization Invitation (also see Best Practices in this section)
-
Additional Info
- Organization admins and members can be invited to join an organization via the UI or API.
- When inviting users via the API, you can specify their role in the request.
- Once invited, organization admins and members will receive an email.
- When users accept the invitation:
- If they already have a GitHub personal account:
- They'll log into that account and then into the Enterprise with SSO to access the organization resources.
- If they do NOT have a GitHub personal account or are NOT logged in:
- They'll be prompted to login or create an account.
- Once they've created the account, they'll log into the Enterprise with SSO to access the organization resources.
- If they already have a GitHub personal account:
- Organization admins and members can be invited to join an organization via the UI or API.
-
Best Practices
-
Automated Invites
- Use GitHub Actions to automate the process of inviting organization admins.
- If managing member invitations on behalf of the org admin, automate this process as well.
- See GitHub Terraform Provider to use or as an example.
-
Step 7: Monitor & Maintain Enterprise Organizations and Members
-
Review the Audit Log
- To view the Enterprise Audit Log, go to:
- Enterprise → Audit Log
- To set up Audit Log Streaming, go to:
- Enterprise → Audit Log → Log Streaming
- To access the Audit Log via the API, see these docs:
- To view the Enterprise Audit Log, go to:
-
Remove Inactive Members from Organizations
- To remove inactive members from organizations via the API, see these docs:
-
Best Practices
-
Audit Log Streaming & Automated Member Management
- Set up audit log streaming to and alerting from a SIEM to monitor GitHub usage across your enterprise.
- Set up an automated process to remove inactive members from your enterprise.
- Remove members after 6-12 months of inactivity.
- Example Action for Removing Inactive Members: Cleaning Up Organization Members
- Remove inactive organization from your enterprise.
- Remove organizations after 12-18 months of inactivity.
- Organizations may be inactive when they do not have any members other than admins and/or do not contain any repos.
- Check with the org admins to ensure the organization can be removed.
-
- GitHub Docs:
Note: If you are setting up a dual presence, with both standard and Enterprise Managed Users (EMU) enterprises, please reach out to your GitHub rep for additional information about EMUs.