GitHub Enterprise Cloud Enterprise Managed Users - OKTA Single Sign-On (SSO) Integration Guide

Made by Jack G Kafaty Senior Solutions Engineer @GitHub
Requirements
Before you start integrating Okta with your GitHub Enterprise Cloud - Enterprise Manage User tenant, Its important that your review the following requirements to ensure you have a successful setup. If you do not see any settings for your organization or enterprise make sure you have owner rights.
-
You have a GitHub Enterprise Cloud Enterprise Managed User Account
-
You have the credentials for the Admin login for your Enterprise Managed Users Enterprise
-
You have an Okta Single Sign-on subscription and you have enabled SCIM capabilities.
-
You have Super Admin / Org Admin Rights for your Okta organization
Recommendations - 👀 You might want to give this a read
-
⚠️ IMPORTANT ⚠️ For this setup on the GitHub side of things MUST be done using an incognito window / private browser. If you do not want to do this using an incognito / private browser, Please logout from GitHub.com completely. Once done access your GitHub Enterprise Managed User tenant using the direct URL, such as: https://github.com/enterprises/(YOUR_ENTERPRISE_MANAGED_USER_ENTERPRISE_NAME) and login with the admin account
-
Validate that you have access to the admin account for your GitHub Enterprise Cloud Enterprise Managed Users tenant, This is NOT your normal GitHub account, This login had to be sent to you from support@github.com. The username for such account look as the following : EmuName_admin
-
⚠️ IMPORTANT ⚠️ Please use exclusively the following Okta application from the App Catalog - GitHub Enterprise Managed User. This is the only application that will allow you to configure the correct SAML attributes and have SCIM capabilities (provisioning and deprovisioning capabilities) for your GitHub Enterprise Cloud Enterprise Managed Users tenant.
-
Please follow the steps as they are, failure to do so will result in multiple errors, invalid configurations and overall could increase the complexity of your setup.
Official & Helpful Documentation
GitHub Enterprise Managed Users - Document Hub
- Using Enterprise Managed Users for IAM
- Configuring SAML single sign-on for Enterprise Managed Users
- Configuring OIDC for Enterprise Managed Users
- Configuring SCIM provisioning for Enterprise Managed Users
- Managing team memberships with identity provider groups
Okta setup guides
- How to Configure SAML 2.0 for GitHub Enterprise Managed User
- Configuring SCIM provisioning for Enterprise Managed Users with Okta
Step by Step Guide!
Welcome to GitHub Enterprise Cloud - Enterprise Managed Users

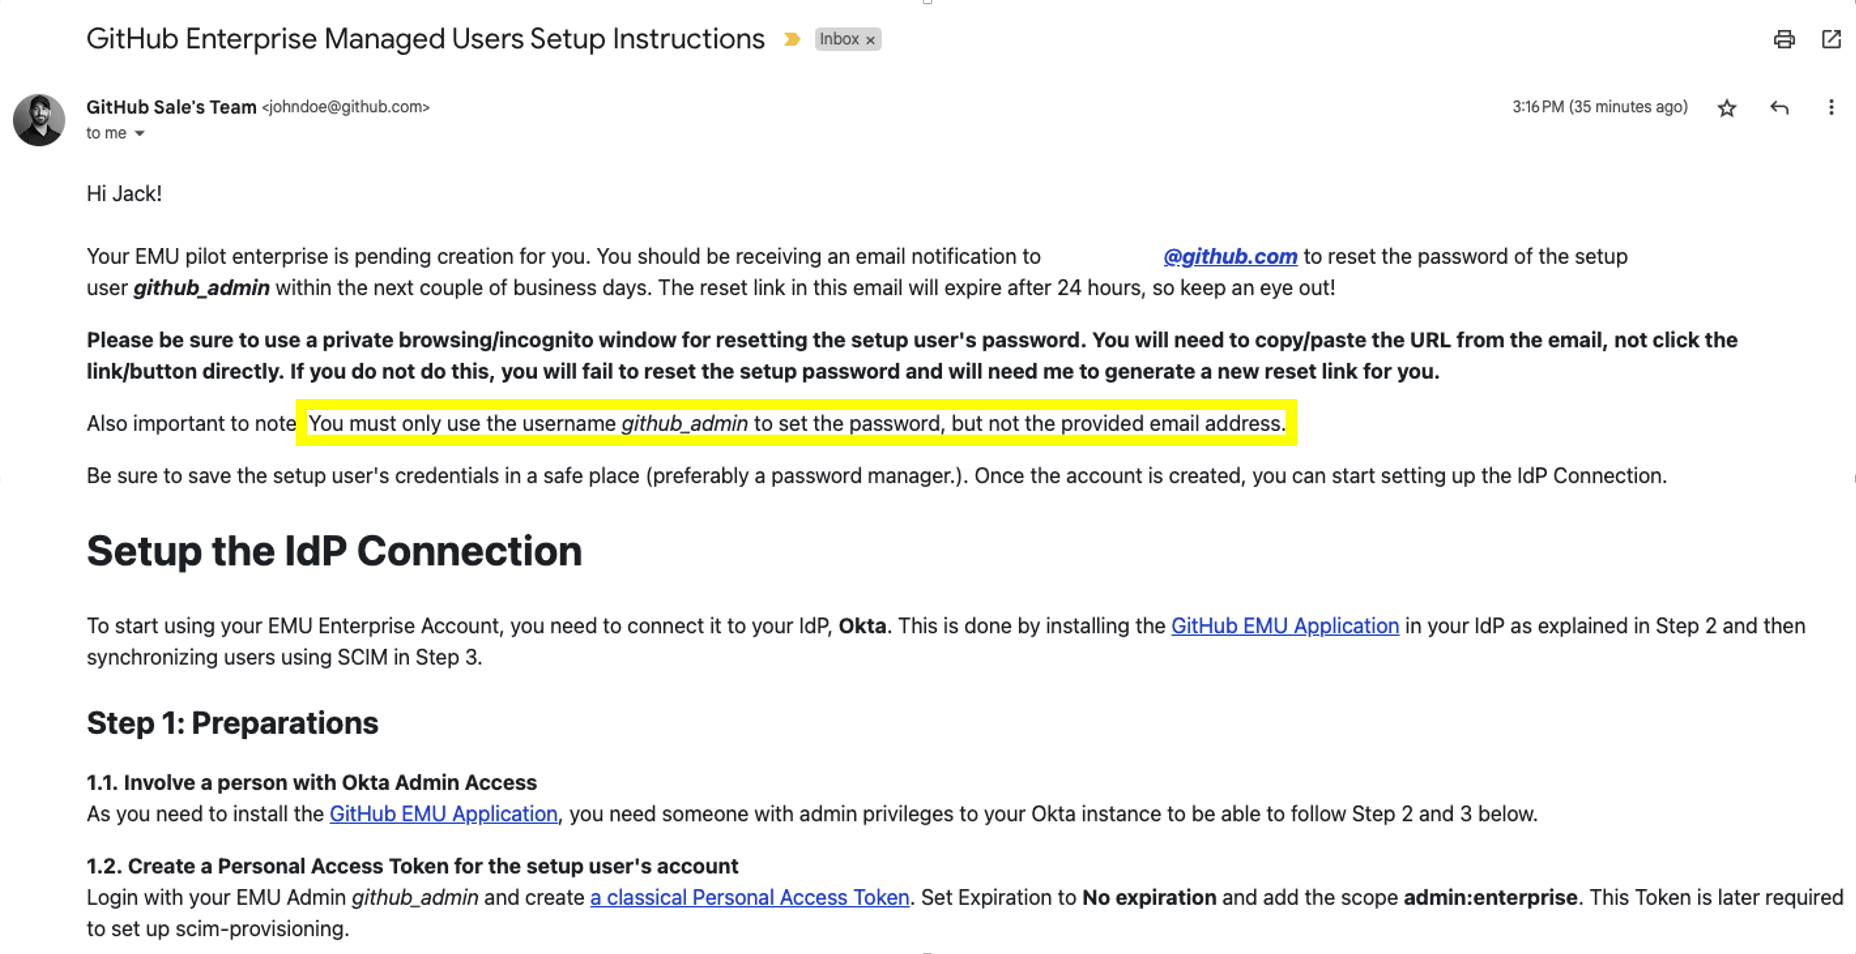
Step 1: Welcome to GitHub Enterprise Cloud - Enterprise Managed Users Email
- Once your GitHub Enterprise Cloud - Enterprise Managed User tenant is created you will receive an email containing detailed instructions on setup your enterprise and integrate your IDP. The instructions provided are basically the steps that we will be following in this guide. However from this email you need some important information which are highlighted below:
- Admin Username: You will need this to access your GitHub Enterprise Cloud - Enterprise Managed User tenant and integrate your IDP.
- Enterprise-Name: This is mainly for reference
- Enterprise-URL: This is the direct URL to access your GitHub Enterprise Cloud - Enterprise Managed User tenant
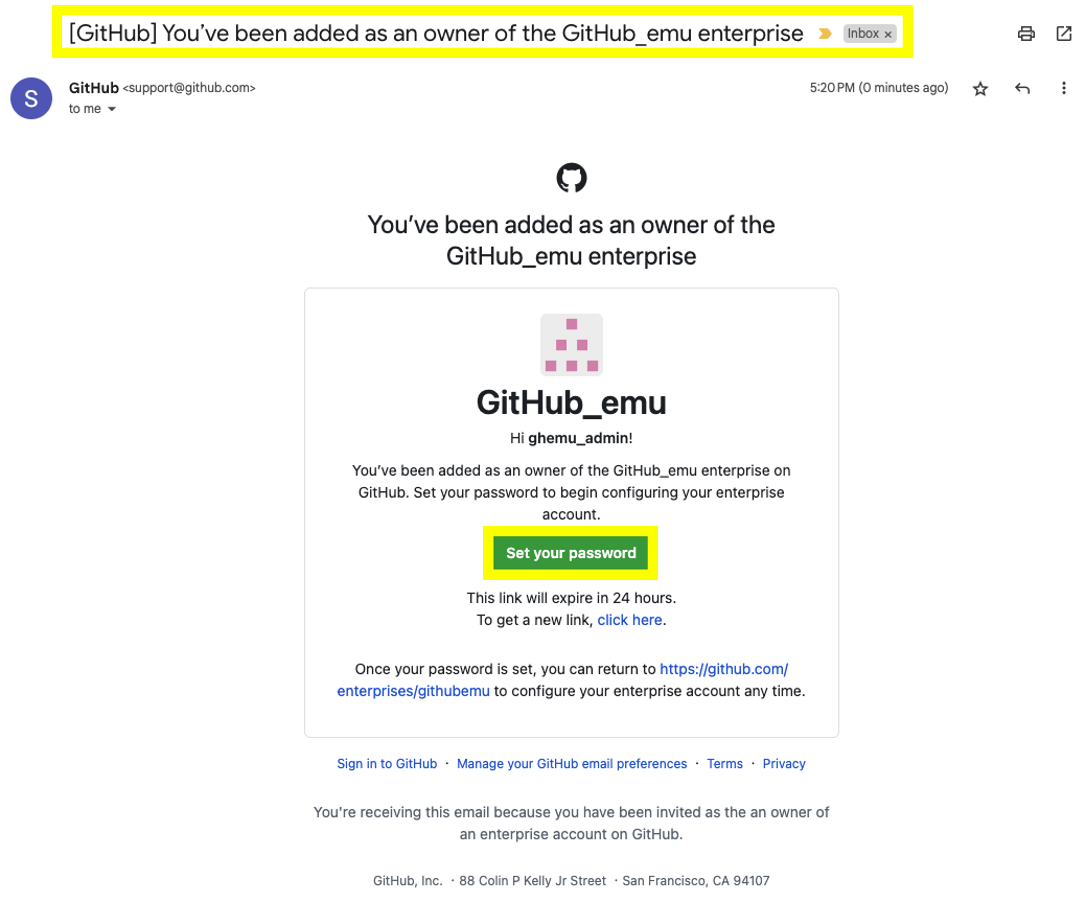
- You should also see a second email sent by support@github.com with the subject [GitHub] You've been added as an owner of the (Your_EnterpriseName) enterprise. This email contain a a direct link to set the password for your Enterprise Managed Users - Admin account
⚠️ IMPORTANT ⚠️- This link will expire in 24 hours from the moment you receive the email.
- We strongly recommend that you right-click the set your password button and copy the link within.
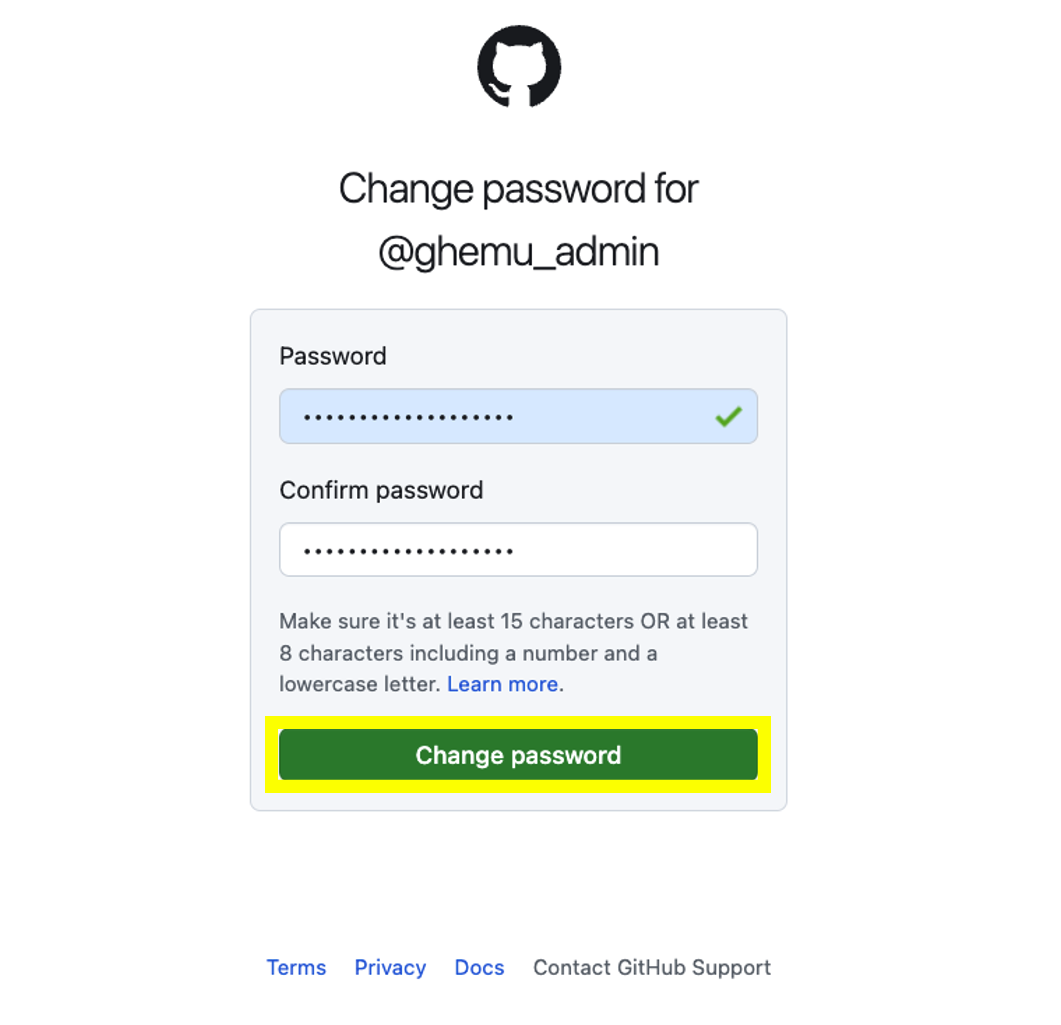
- Once you have copied the link open a private/incognito window and paste the link there to access it and reset the admin's account password
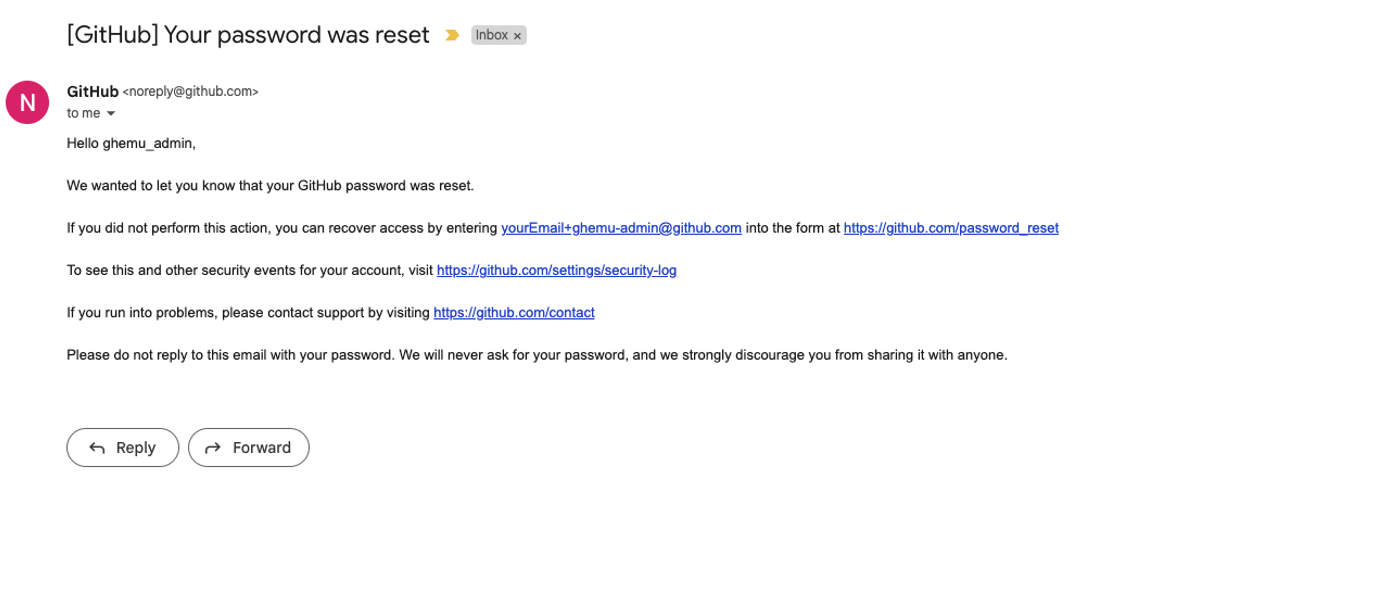
- After changing your admin's user password you will receive a confirmation email from noreply@github.com with the subject [GitHub] Your password was reset This is just informative and no action is needed at this time.
- At this point you are ready to access your GitHub Enterprise Cloud - Enterprise Managed Users tenant
Integrating SAML and SCIM
Step 2: Accessing your Managed Users Enterprise
- In a private or incognito browser access your GitHub Enterprise Cloud - Enterprise Managed Users tenant by using the URL provided on the setup instructions email located under Enterprise-URL
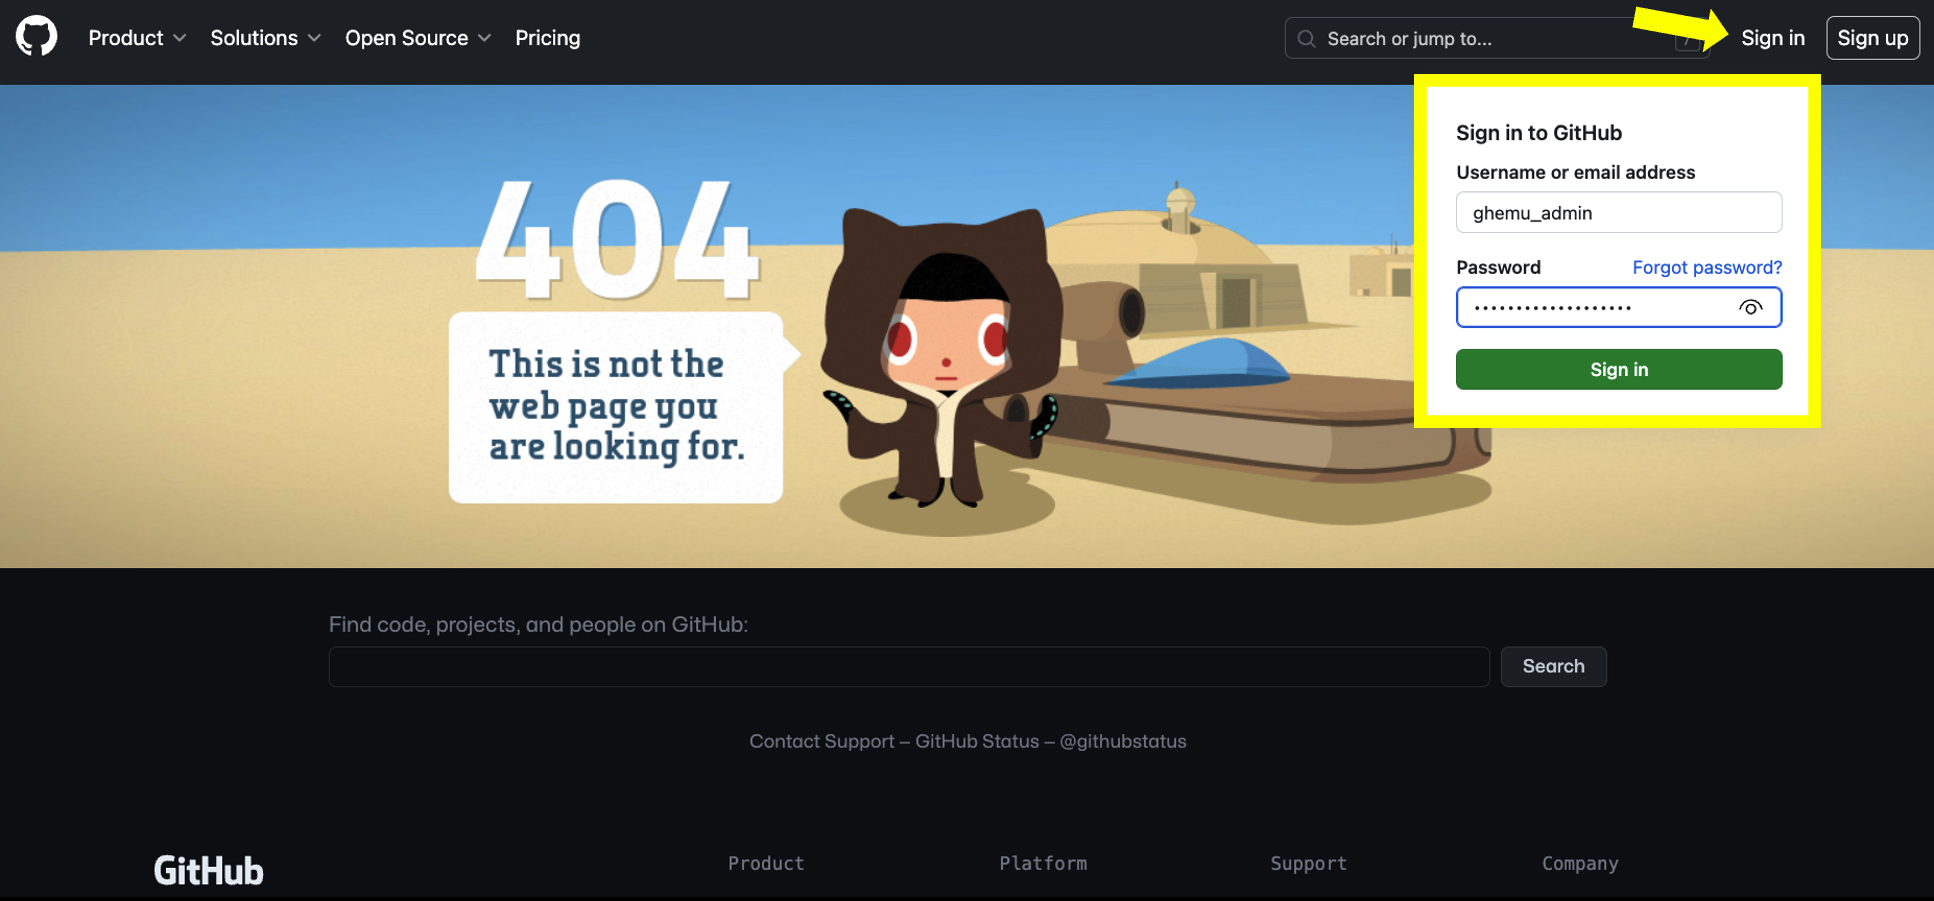
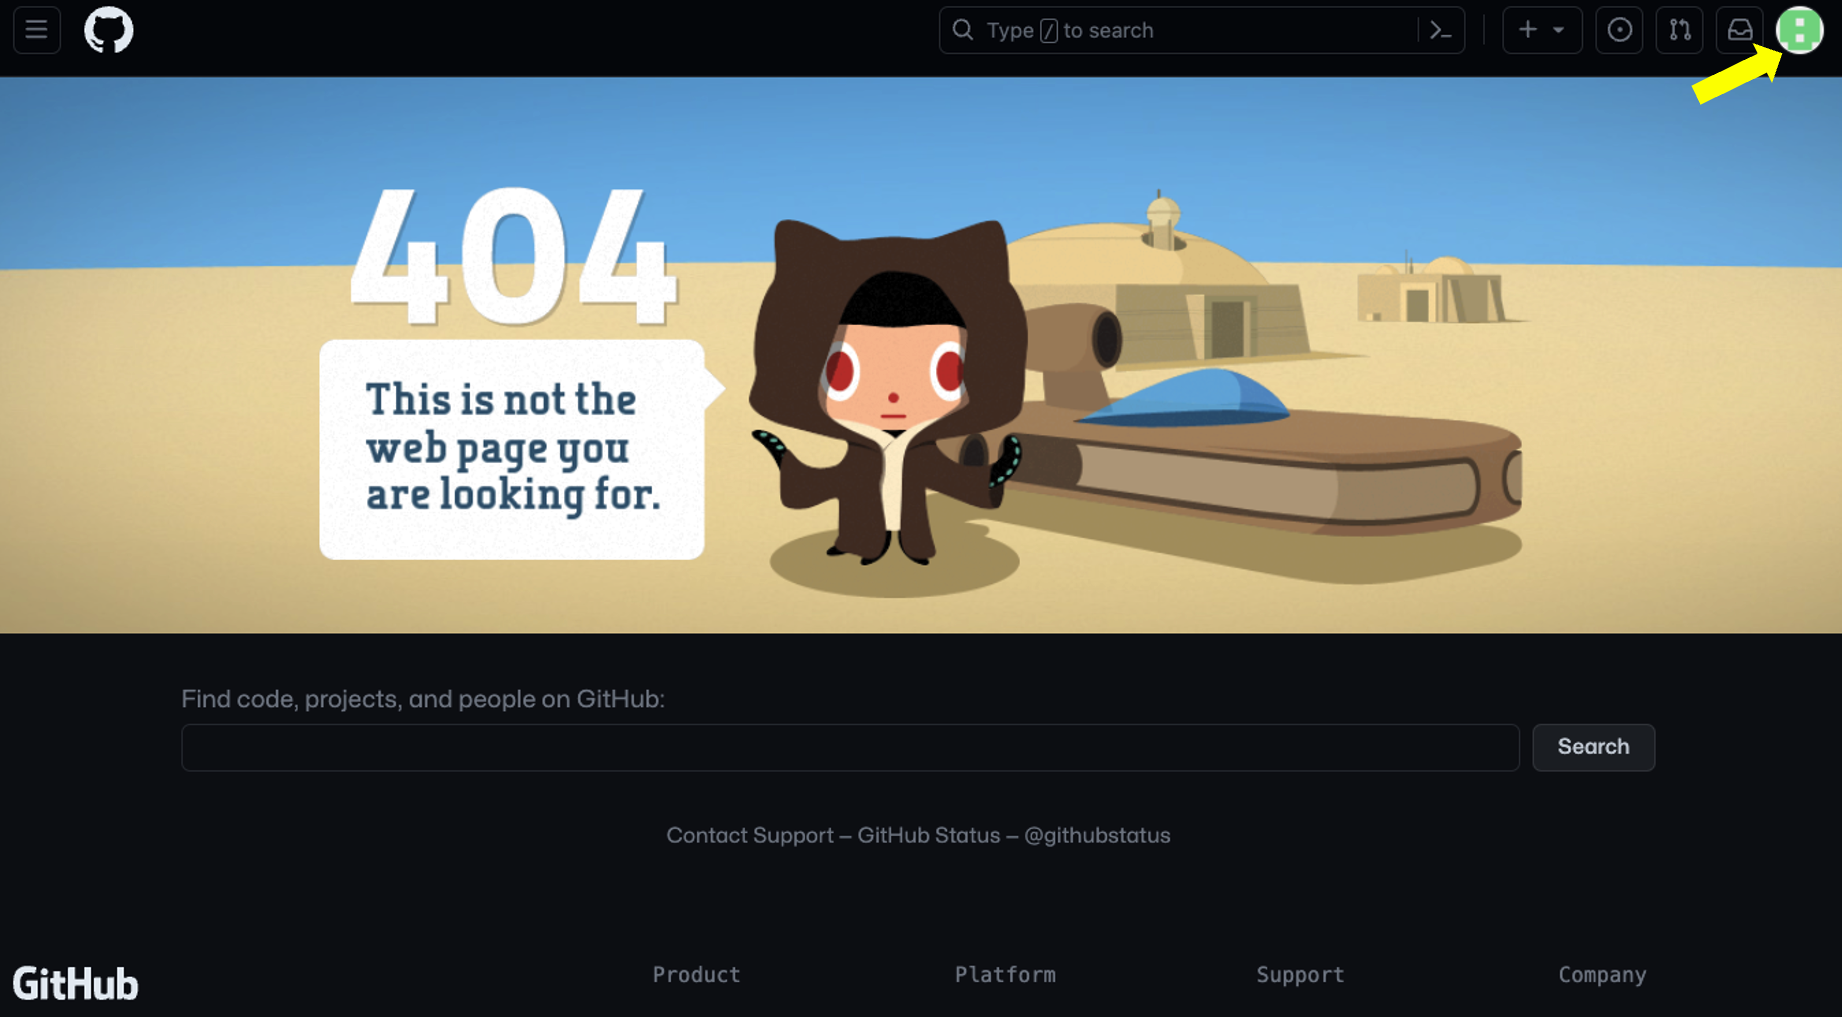
- Once done you may see a landing page with the message 404 This is not the web page you are looking for. Don't worry this is expected. Proceed on clicking the Sign In button, located on the top-right corner or center of the screen depending if this is the first time you are accessing your enterprise or if you are returning to continue your setup.
- You should see a login pop-up appear, please proceed on inputting your admin credentials Do not enter your GitHub account credentials as this will not work. You will only be able to access at the moment using the admin username provided on your setup instructions email and using the password you set when you reset the password for the the Enterprise Managed Users admin account. .
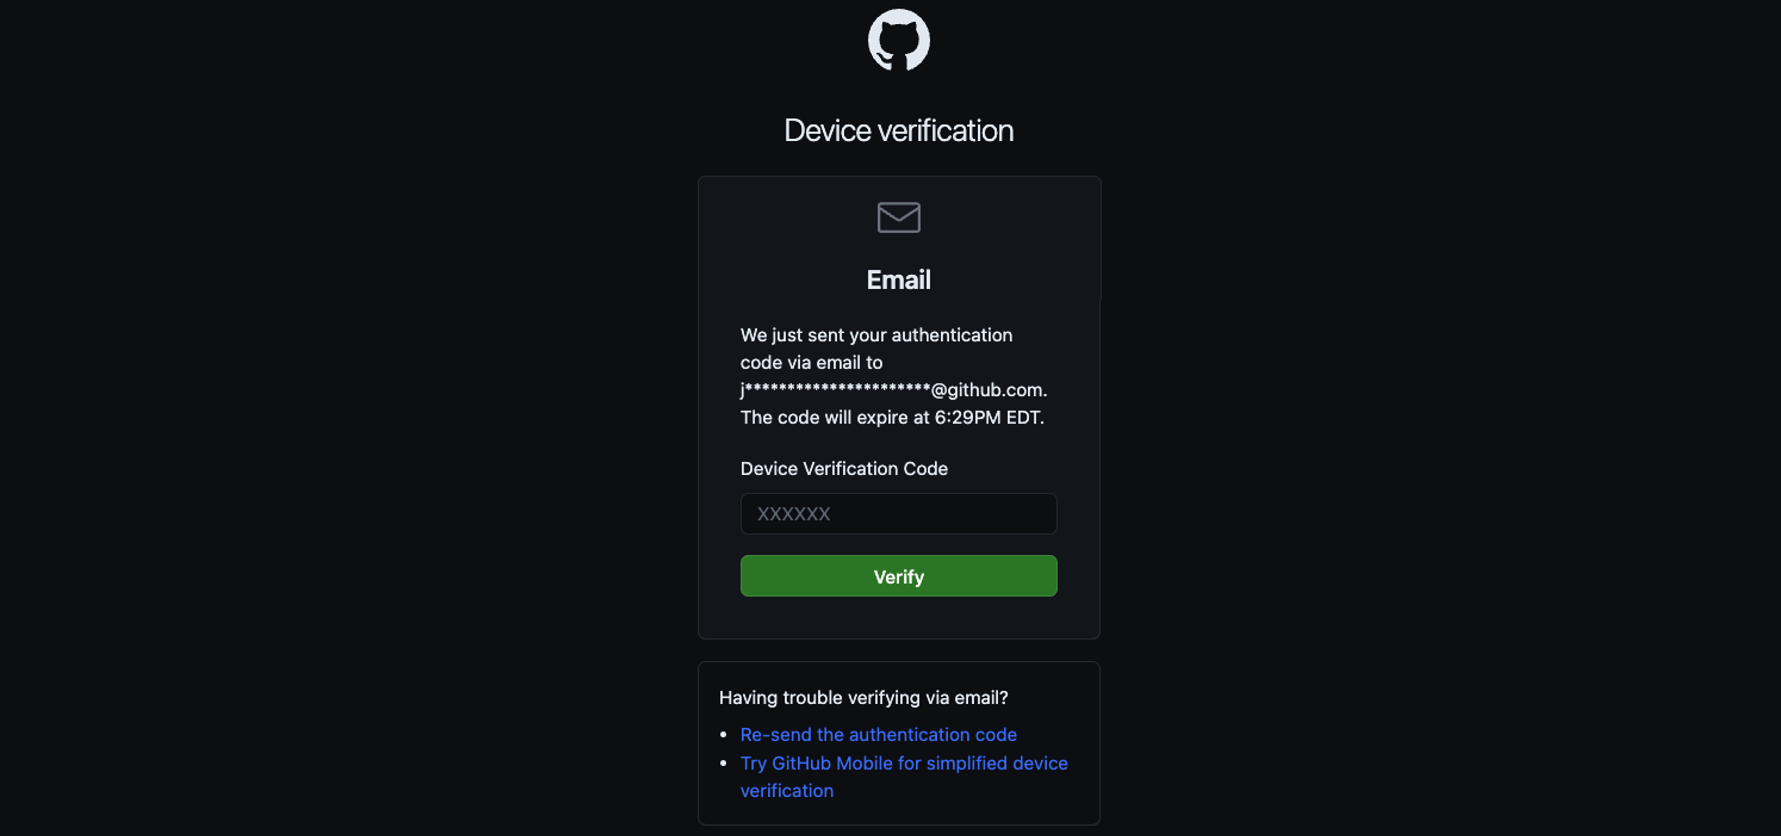
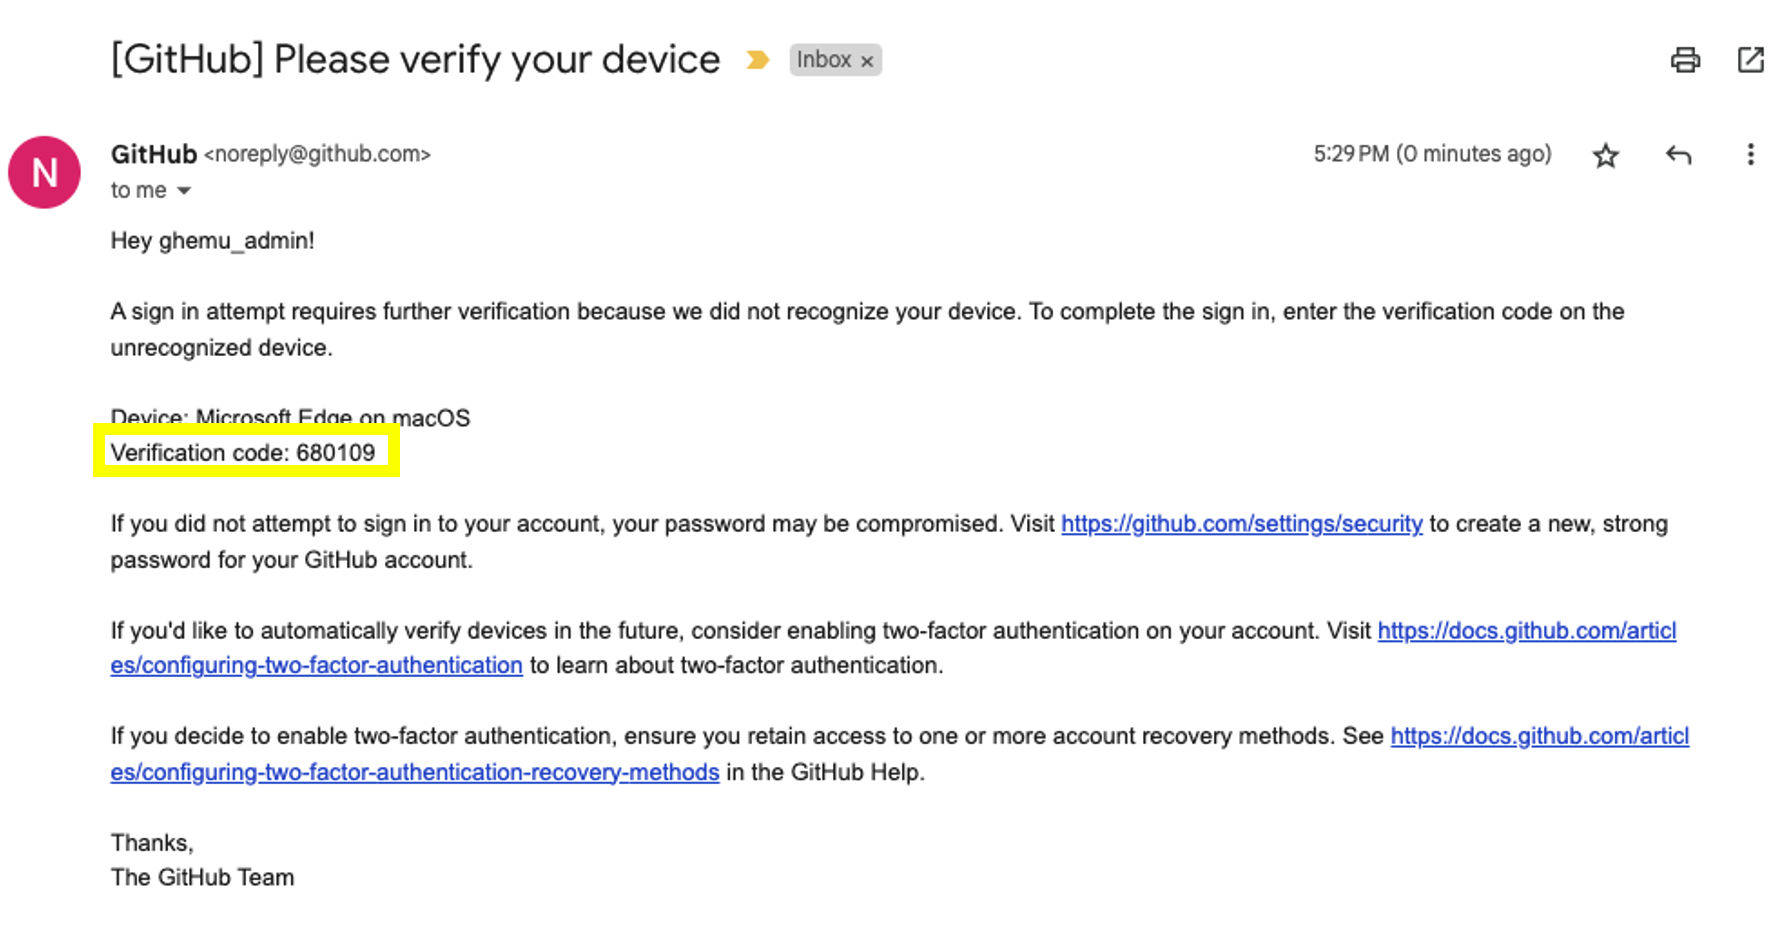
- Once done you will be taken to a second factor authentication screen which will require you to input a device verification code. This code will be sent to the same email in which you received your admin user password reset link and your setup instructions. Input the verification code from the email into GitHub's device verification and click on verify
- After your verification code is accepted you will be logged in, However it might not seem that way because the UI might display 404 This is not the web page you are looking for screen.The view/landing page depends on if you have already logged in once but did not setup Single Sign On or if its the first time you are accessing your Enterprise tenant. However, if you already logged in once and are returning to complete your setup notice on the top-right corner it no longer shows Sign In but you do see a green 8-bit profile icon! Click it First time accessing your Enterprise view.

Returning to complete your setup Enterprise view.
Step 3: Generating a dedicated Personal Access Token for SCIM provisioning
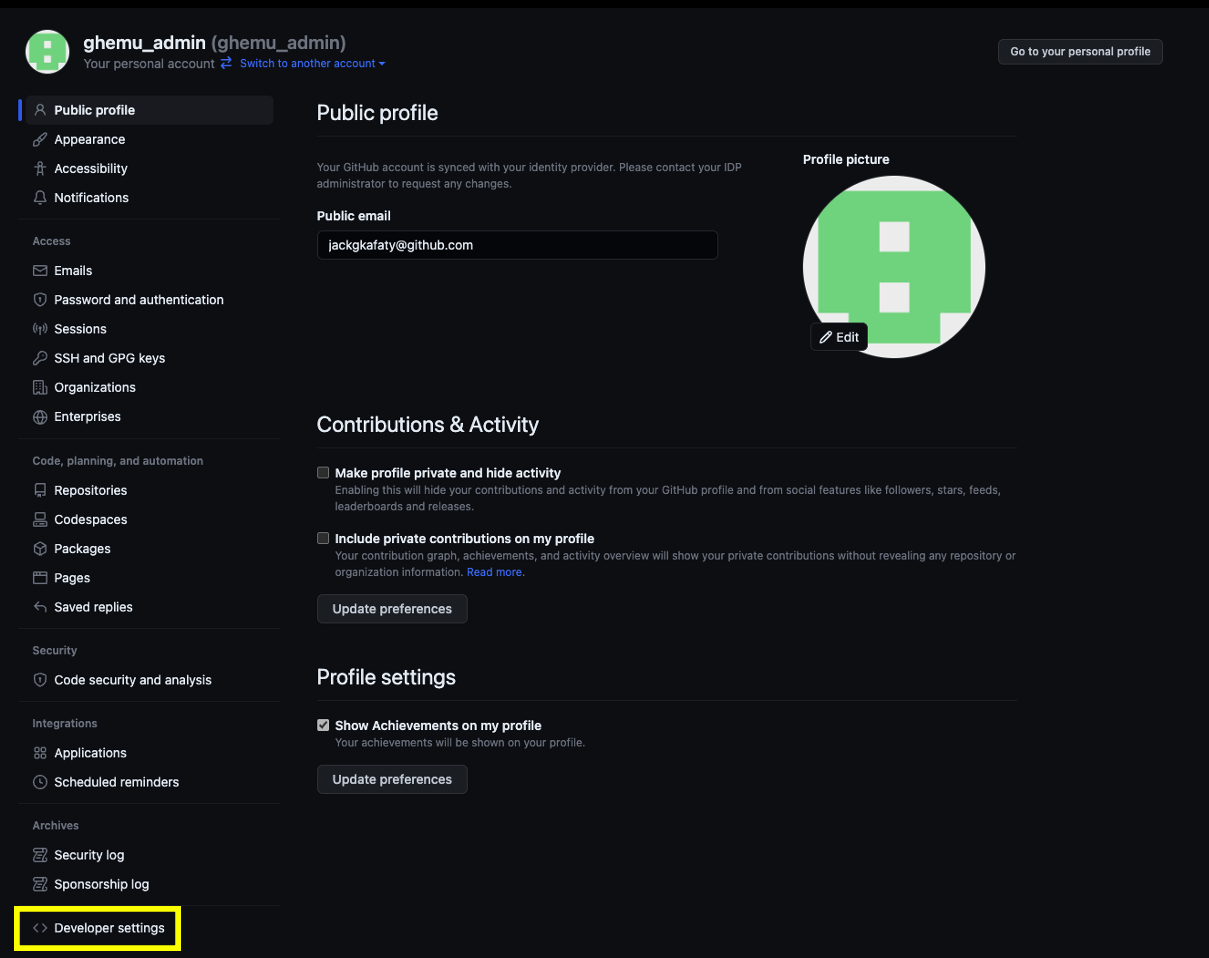
- If your are accessing your Enterprise tenant for this first time, your default view once logged in should be your Enterprise tenat's Overview page. If you are returning to complete your setup, after you login you will see the 404 page. Disregarding if you are returning to complete your setup or accessing your tenant for the first time the following steps remain the same.Within the Admin user's profile right-hand menu bar click on Settings.
First time accessing your setup - View
Returning to complete your setup - View

- Within the Admin user's profile settings access Developer Settings, located at the bottom-left corner
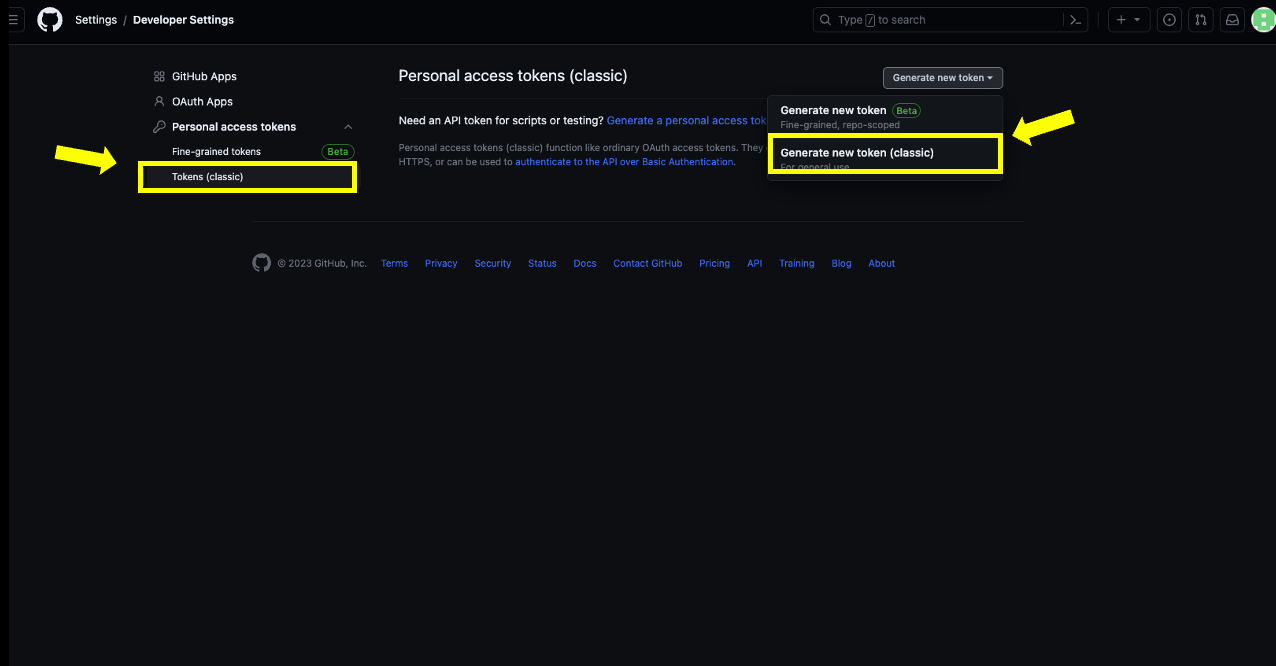
- In the Developer settings click on Personal Access Tokens and then on Tokens Classic followed by Generate a new token located on to the top right-corner and from that dropdown select Generate New token (Classic)
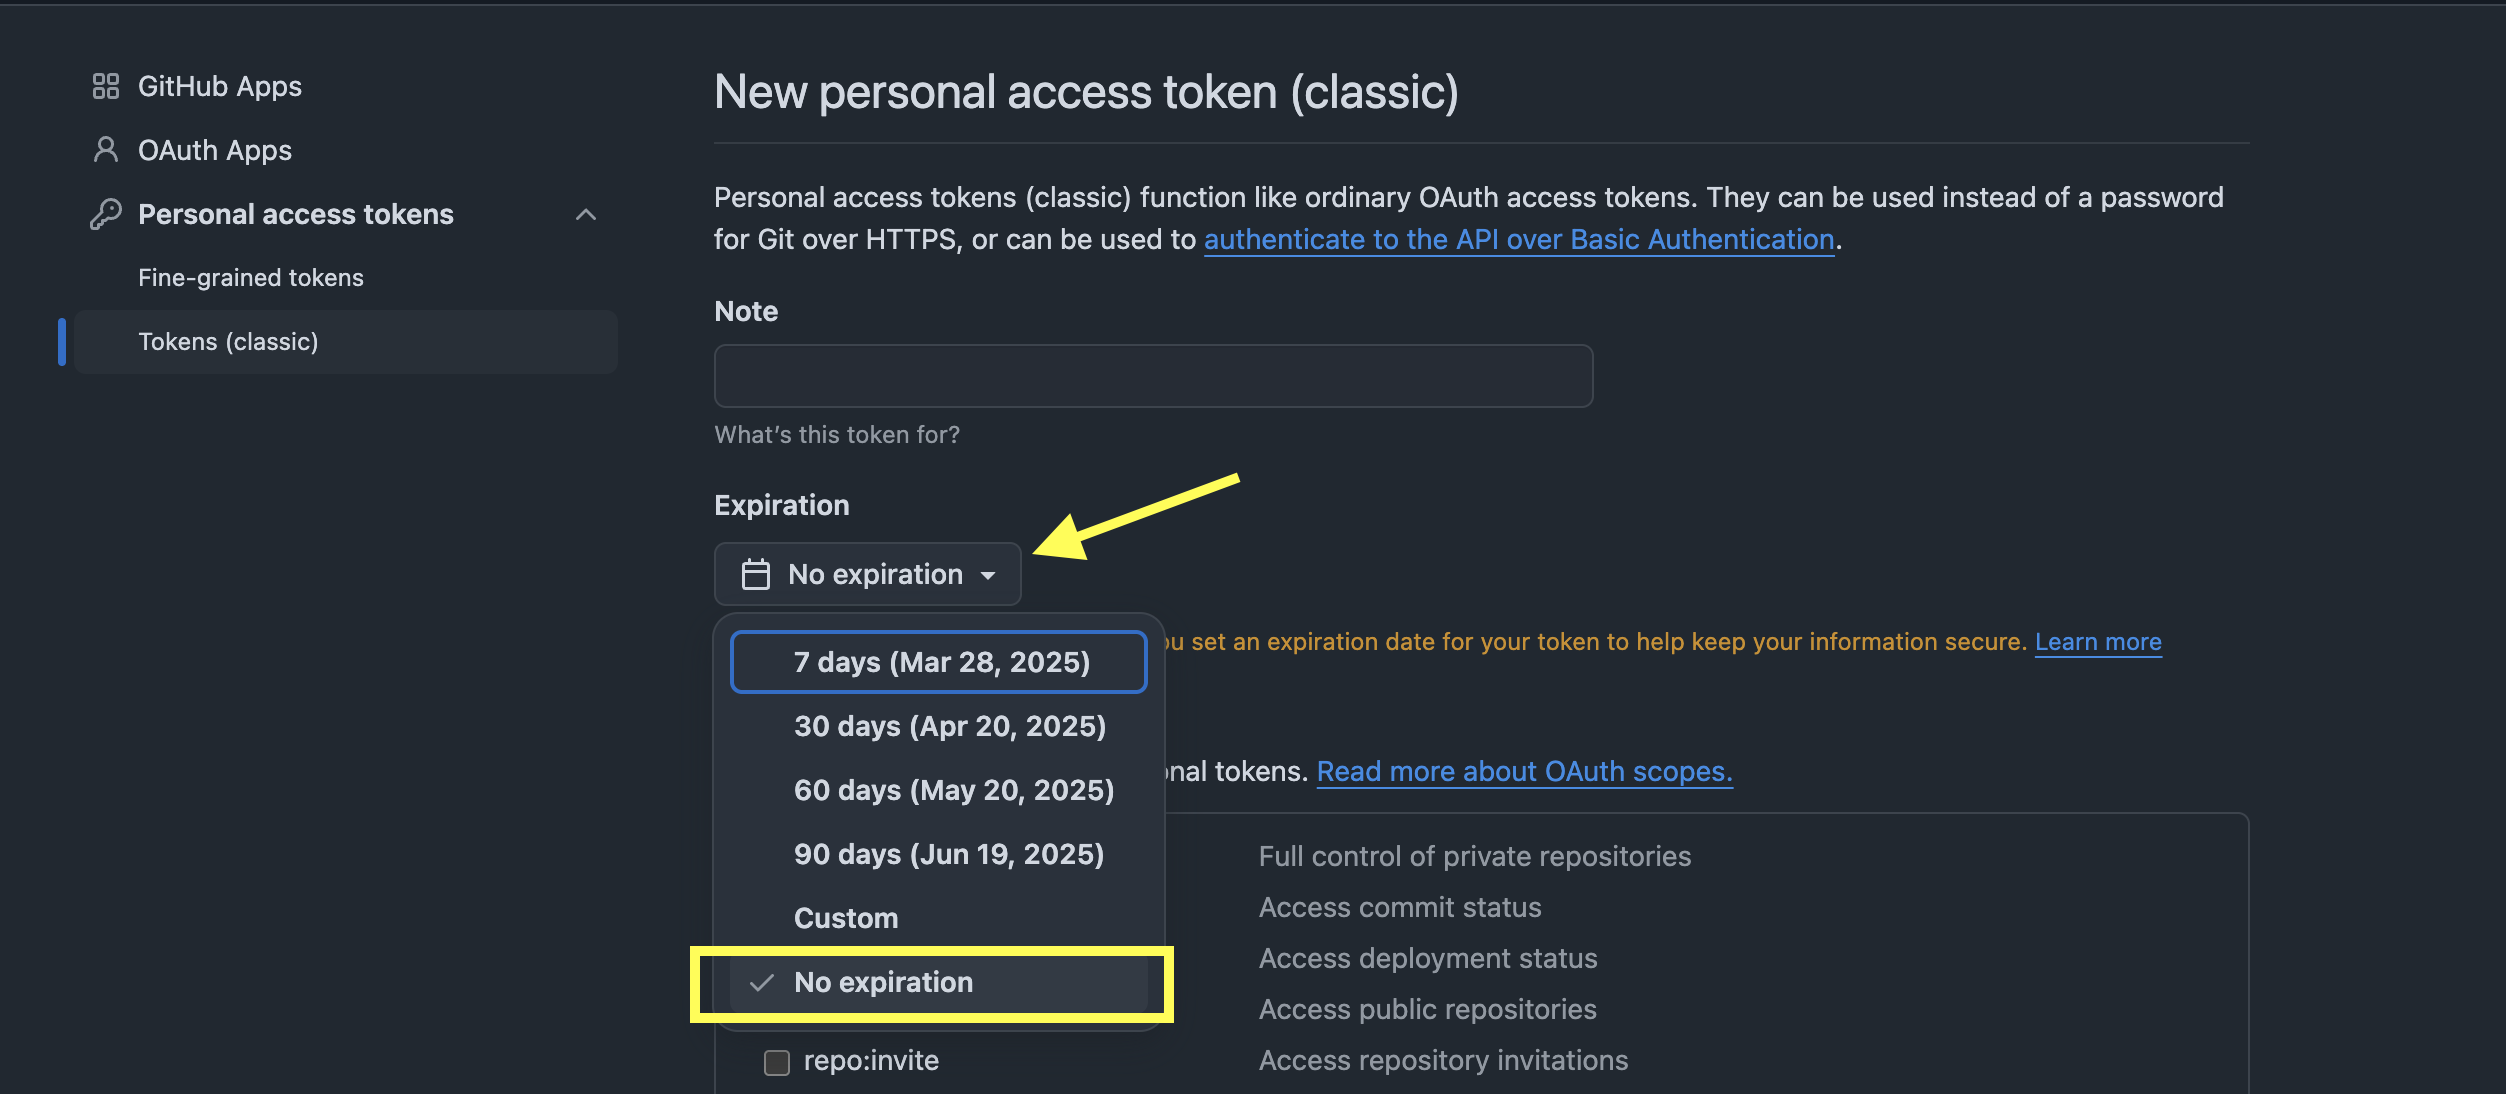
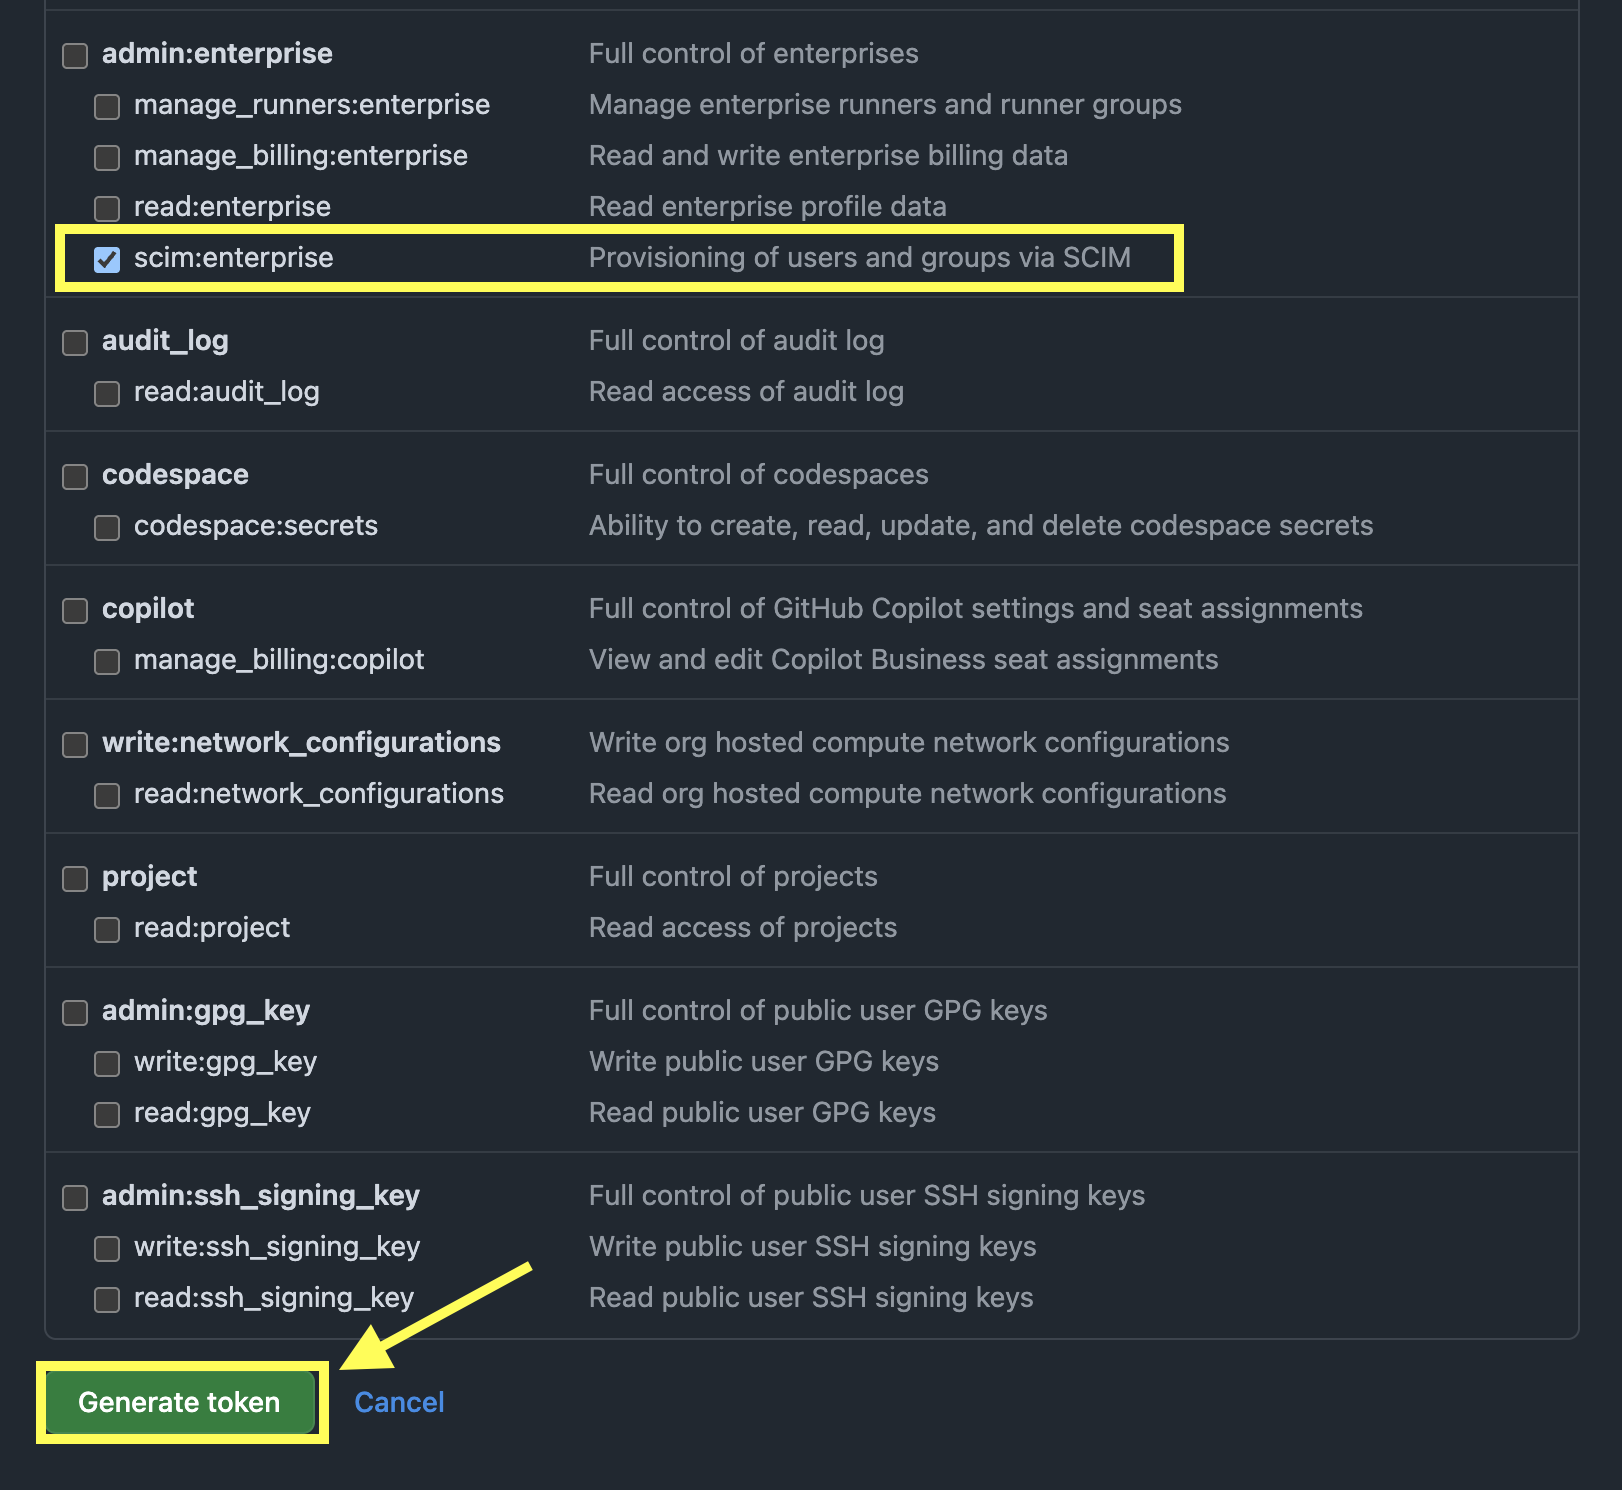
- Select No expiration in the Expiration Drop Down.
- Scroll down and locate scim:enterprise and click on the checkbox to select it. Once done click on Generate Token
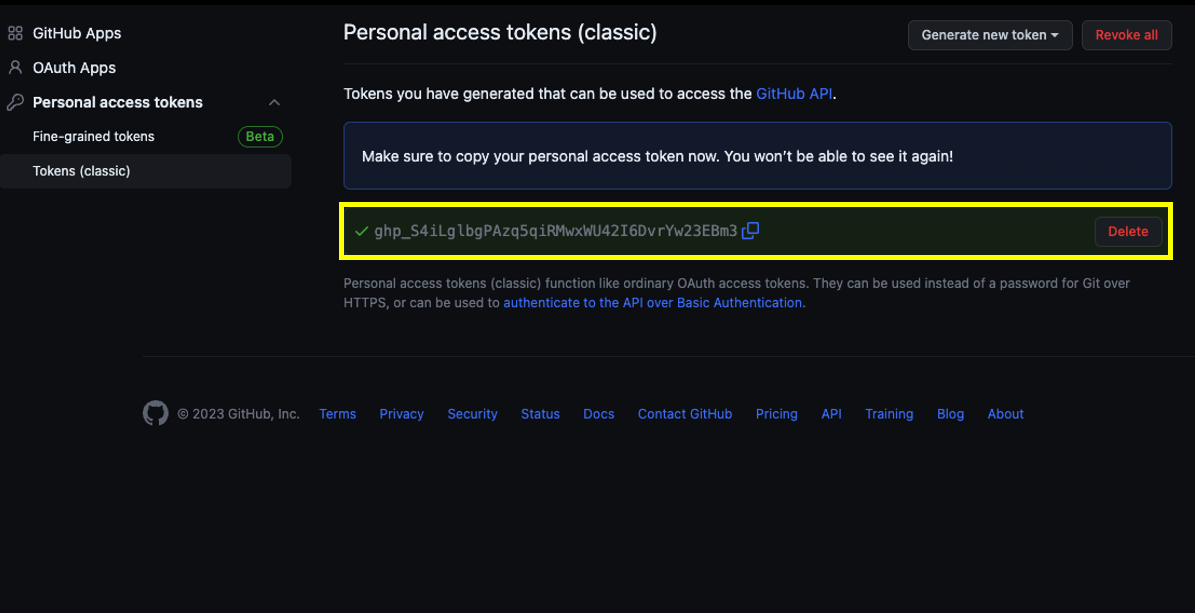
- Once done your token will be generated Copy/store this token in a safe place , this token will not show up again. If you lose this token you will need to generate a new one. After copying/storing your token feel free to exit the Admin user's developer settings.

Step 4: Adding the GitHub Enterprise Managed Users Application from the Okta App Catalog
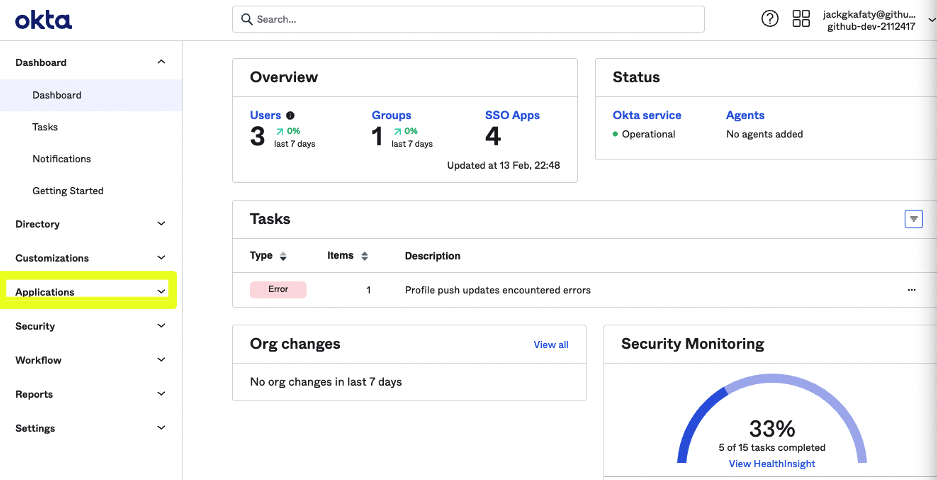
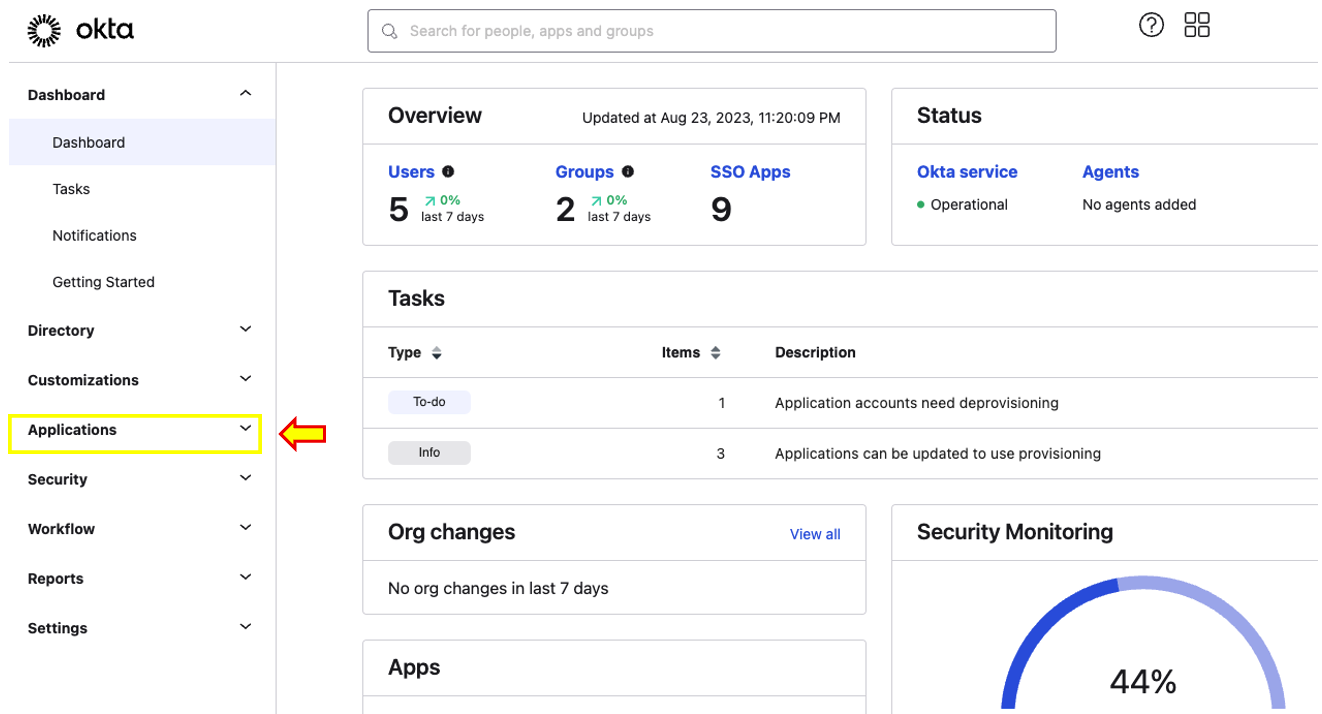
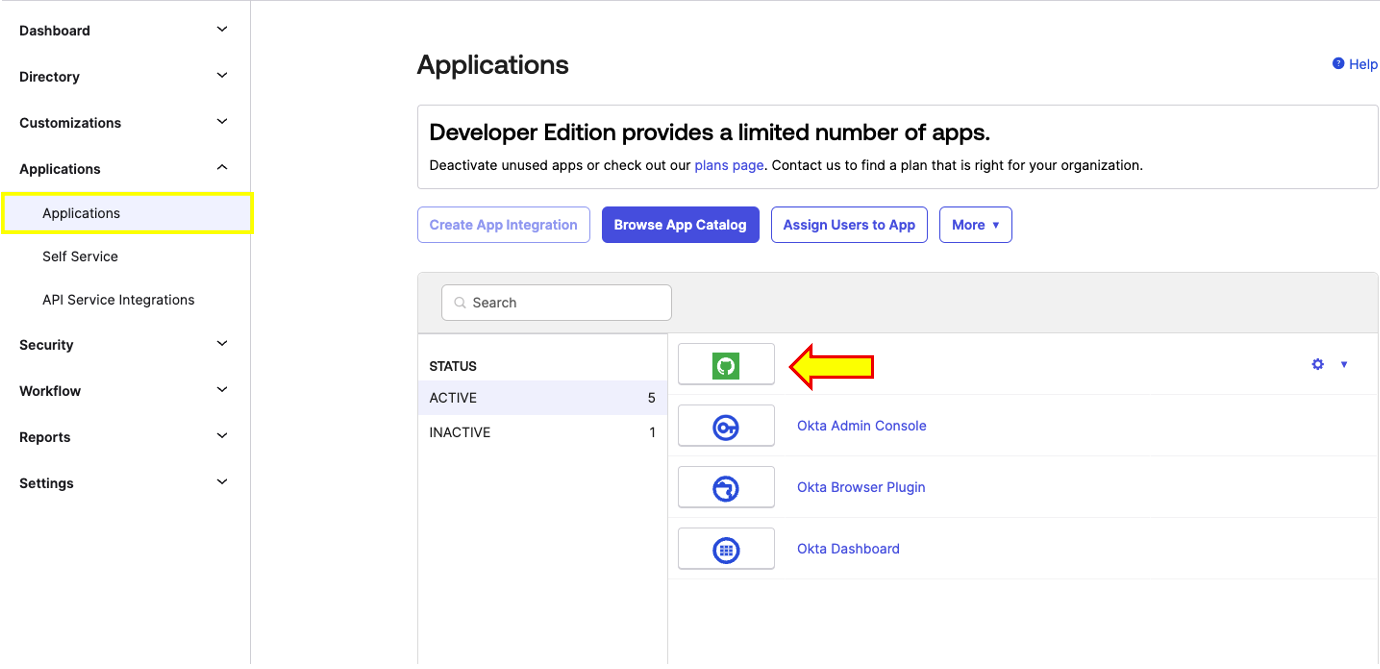
- Login to your Okta's Organization Admin portal with sufficient Administrator permissions. Access Applications from the left-side menu bar.
- In the Browser App Catalog, search for GitHub Enterprise Managed Users, select it and click on Add Integration.
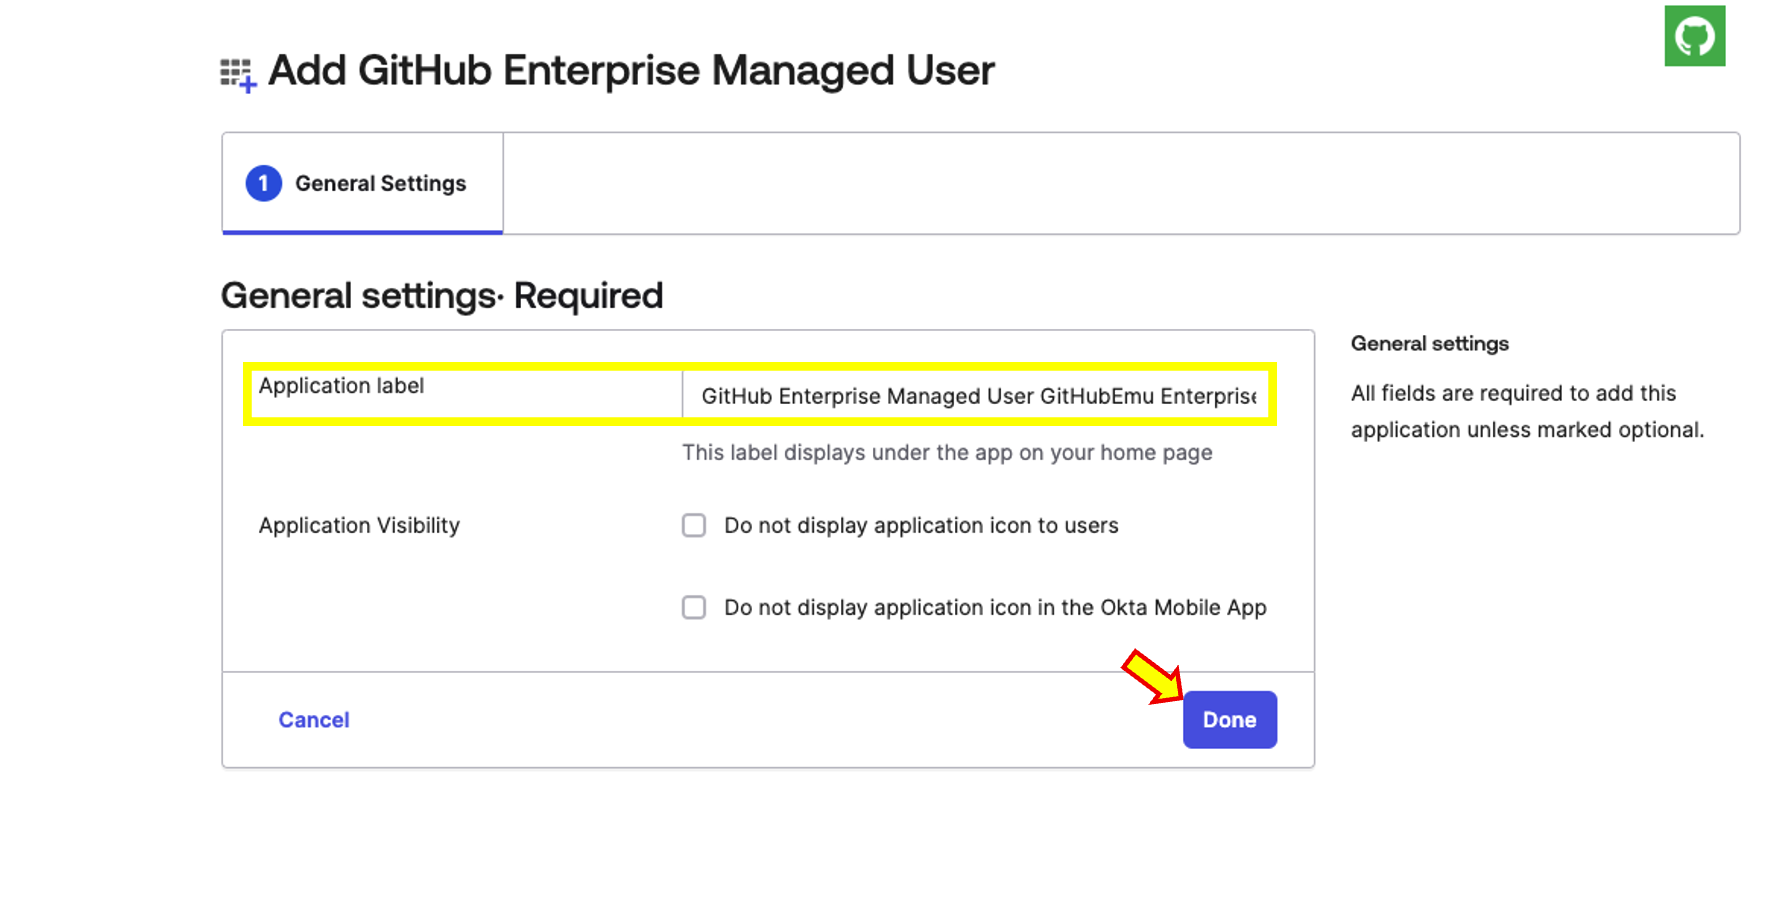
- Under General Settings, add the name of your GitHub Enterprise under Application Label to identify it within your Okta applications and click Done.


Step 5: Setting Up SAML within your Okta Enterprise Managed Users Application
- Login to your Okta's Organization Admin portal with sufficient Administrator permissions. Access Applications from the left-side menu bar.
- In the Browser App Catalog, search for GitHub Enterprise Managed Users, select it and click on Add Integration.
- Under General Settings, add the name of your GitHub Enterprise under Application Label to identify it within your Okta applications and click Done.
- Within the application access the Single Sign On taband click on Edit
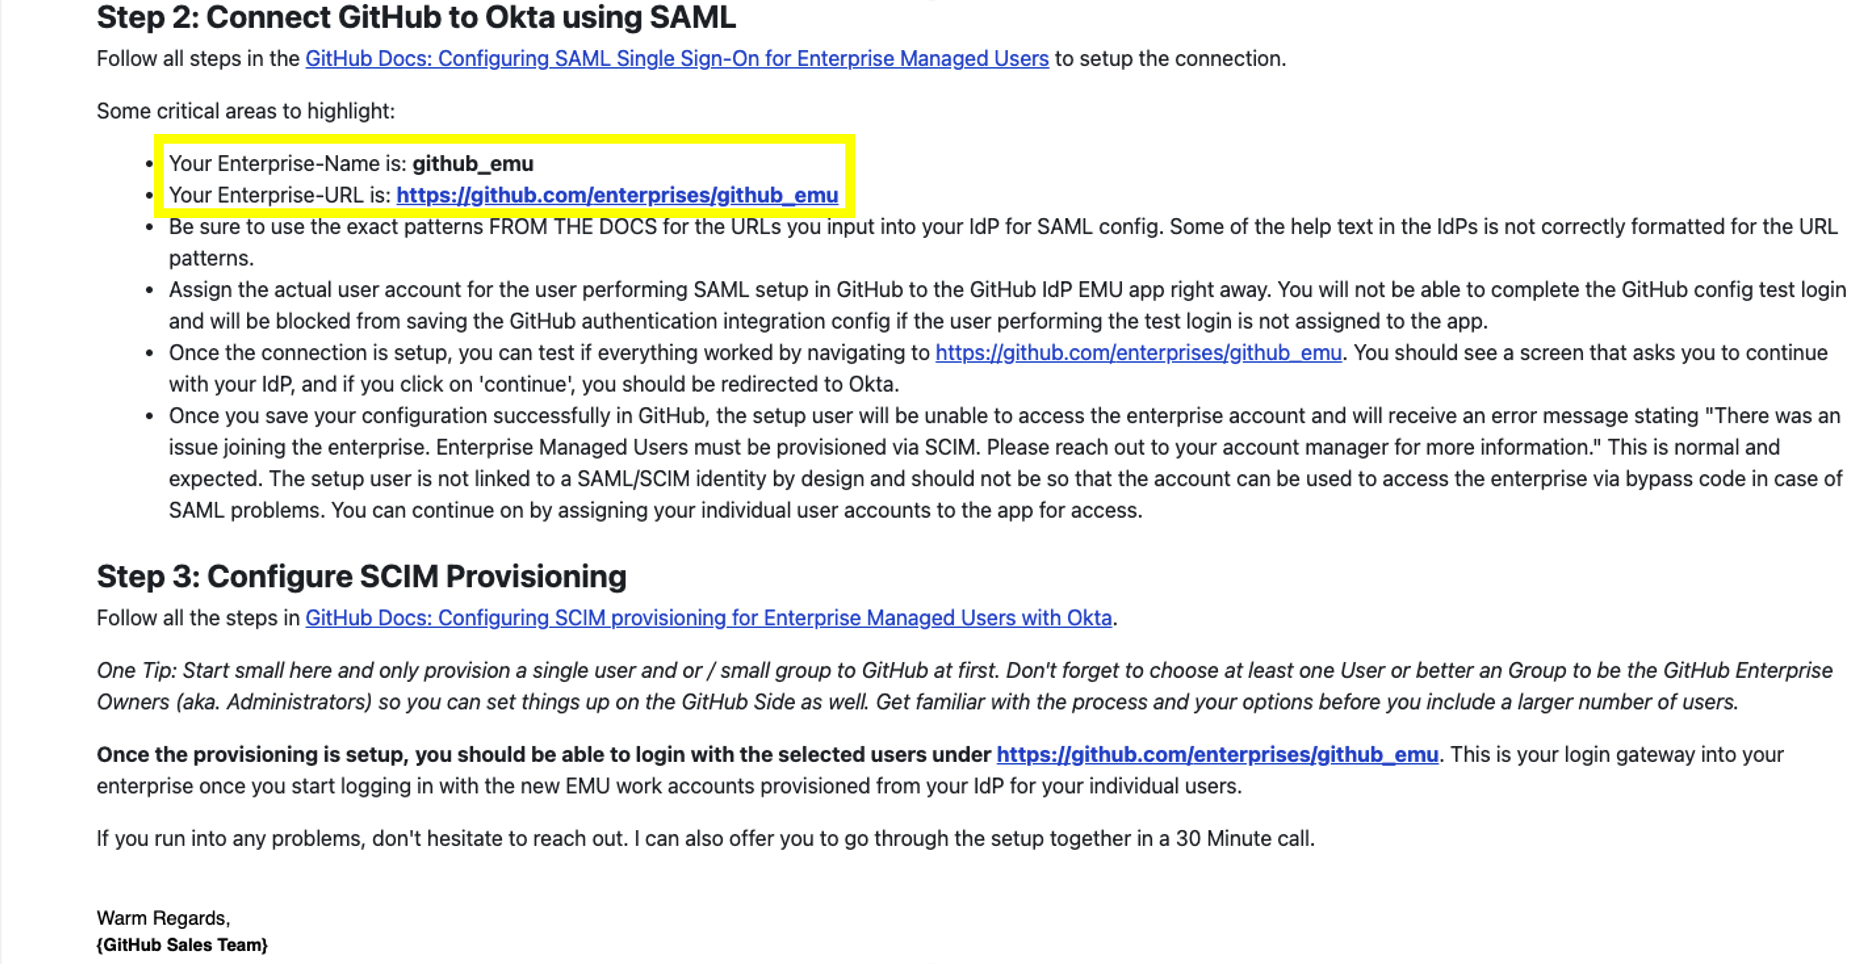
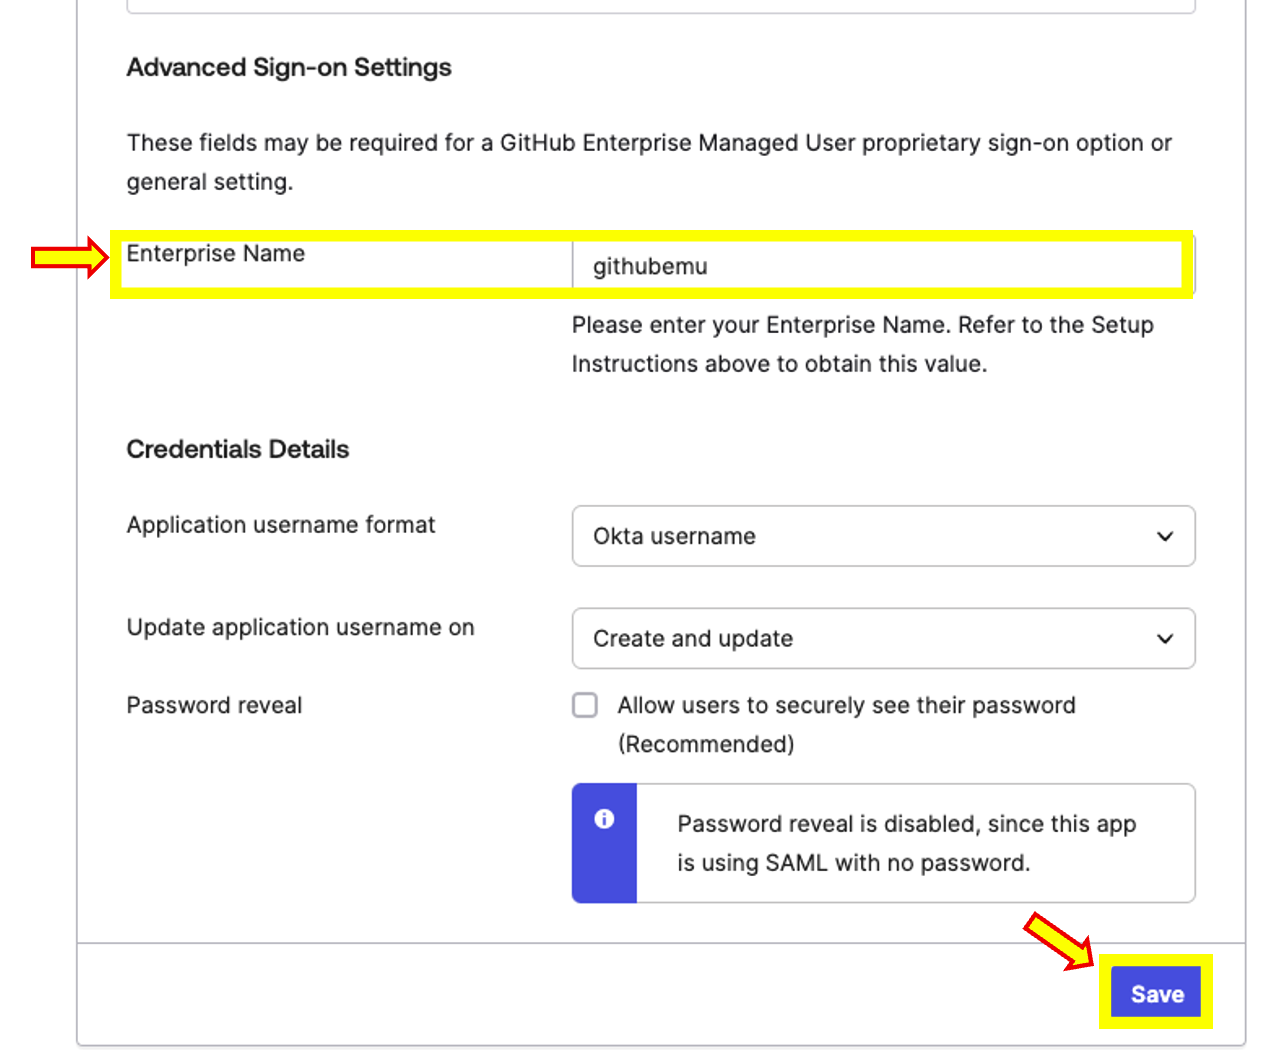
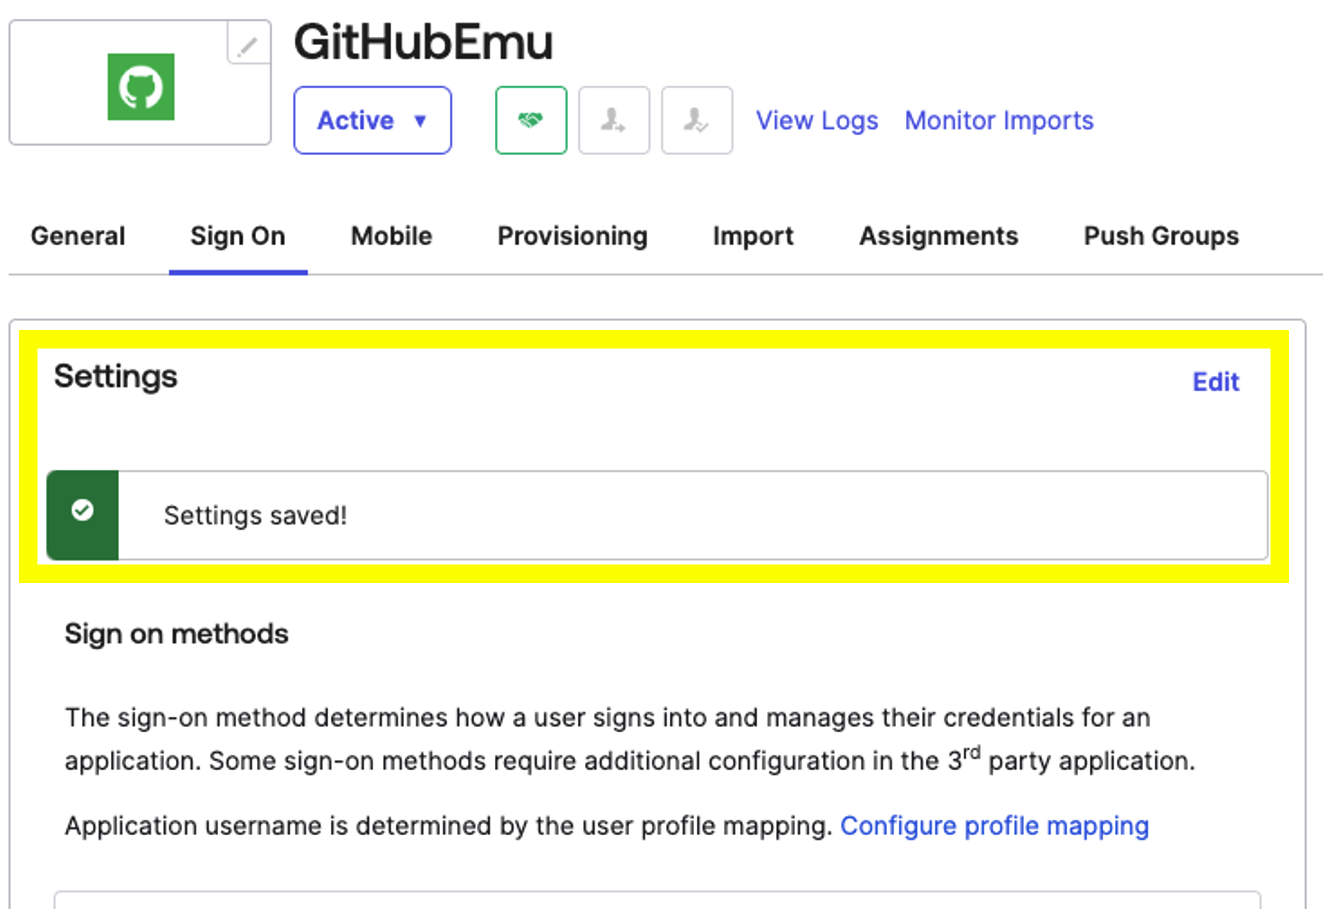
- Scroll down to Advanced Sign-On Settings and add your GitHub Enterprise Cloud Enterprise Managed Users tenant's Name under Enterprise Name This information can also be found within the setup instruction email under Enterprise-Name once done click on save
- After saving the settings you should see a successful confirmation message Settings Saved
- Access the Assignments taband proceed on adding your user accountThe least amount of permissions you must have is Org Admin at an Okta level
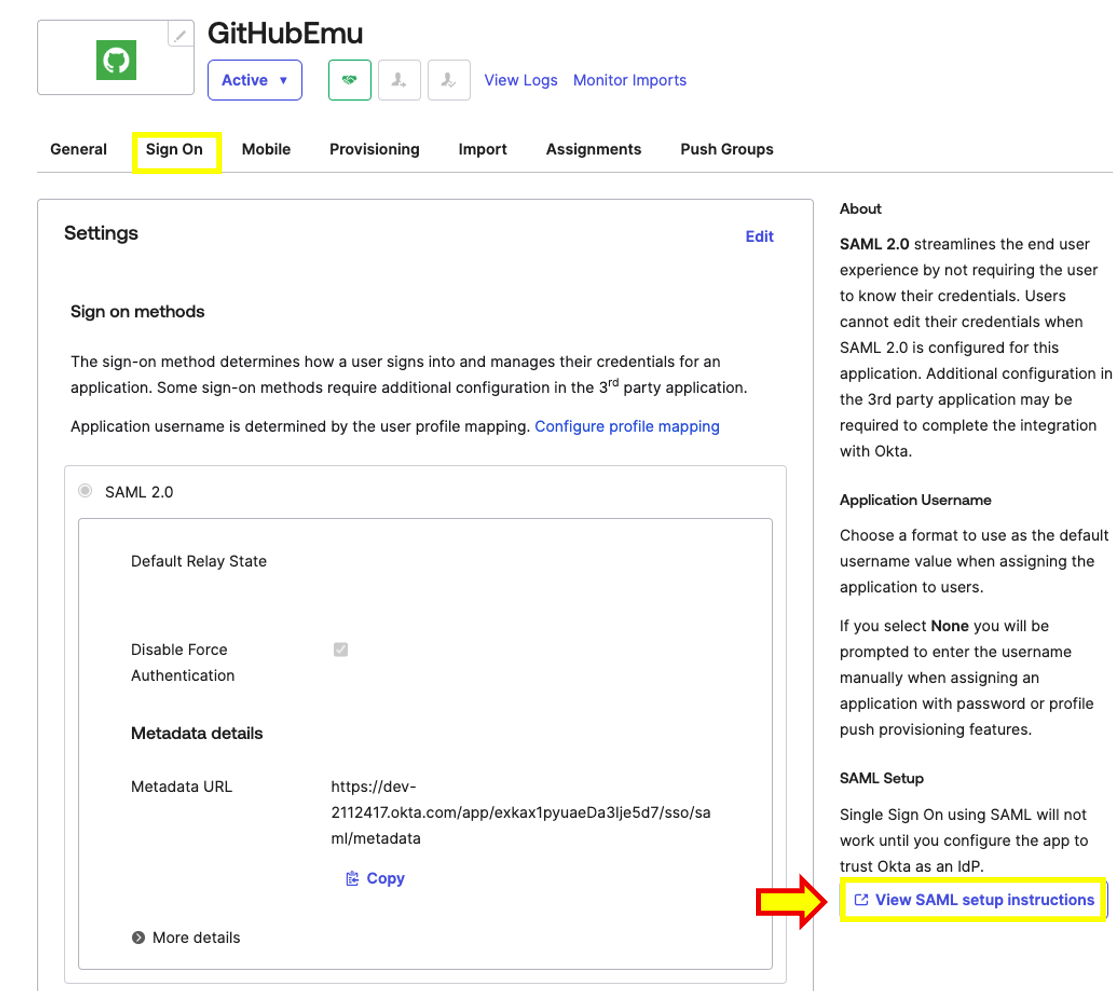
- Access the Sign On Taband on the right side informational panel you should see a hyperlink view SAML setup Instructions Click it
- Within the SAML Setup Instructions, scroll down to step #5 and copy in a notepad the following value listed below as we will need them later on.

Step 6: Enabling and configuring SSO in GitHub
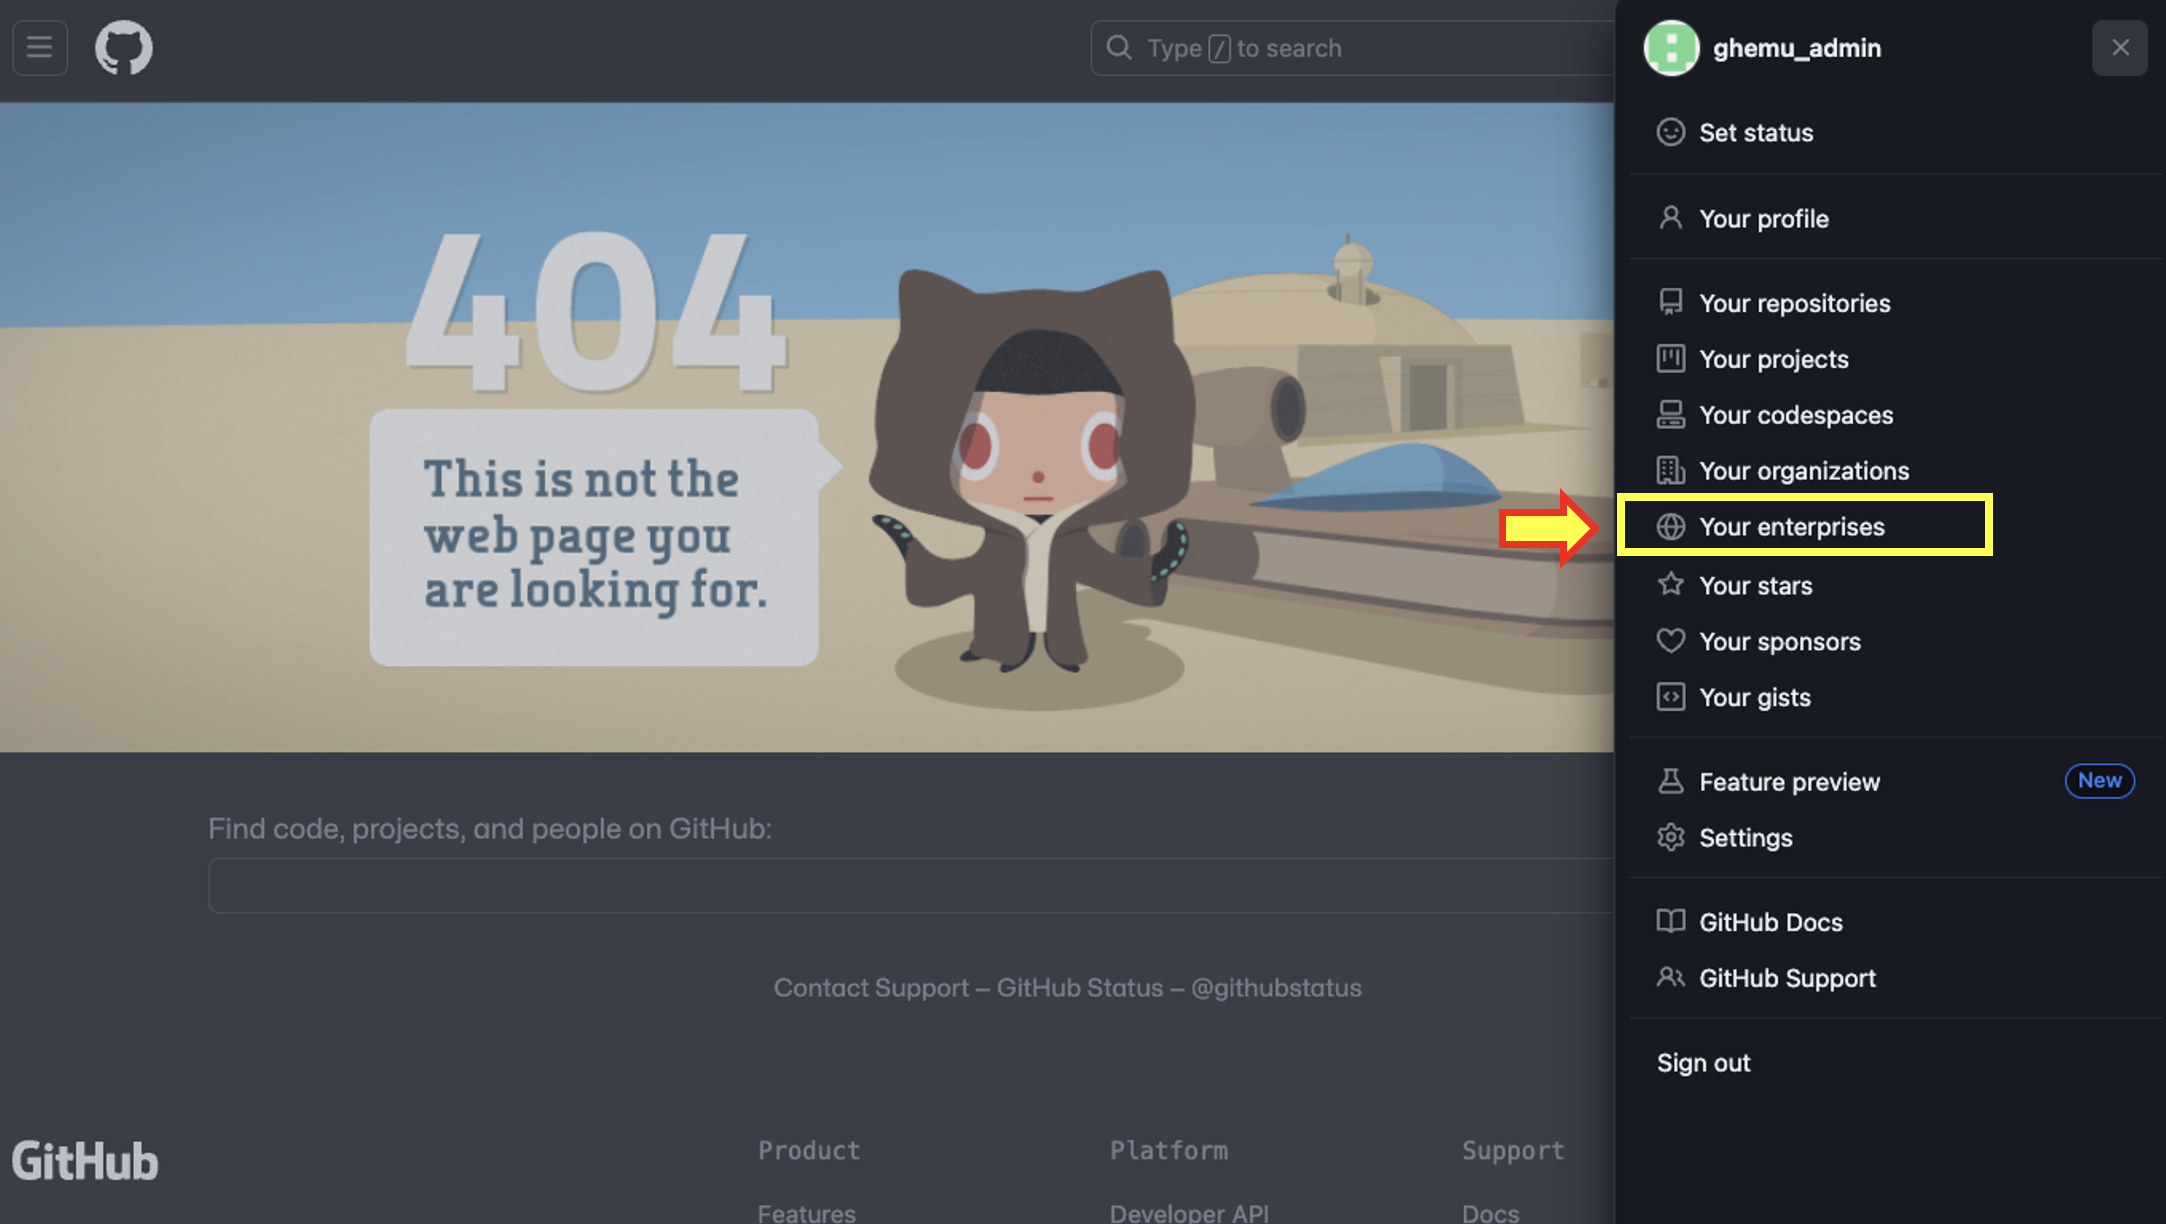
- Access your Admin user's profile menu by click on the top-right 8-bit profile image. Within the menu click on Your Enterprises.
- Once done you should be taken back to your Enterprise tenant's Overview landing page.
- In your Enterprise Overview located at the left-side menu panel click on Identity Provider and from the expanded menu click on Single sign-on configuration ( should be selected by default) Within the Single sign-on configuration panel, proceed on selection the option that fits your needs. For this guide we will be selecting SAML single sign-on . To proceed click on Add SAML configuration .
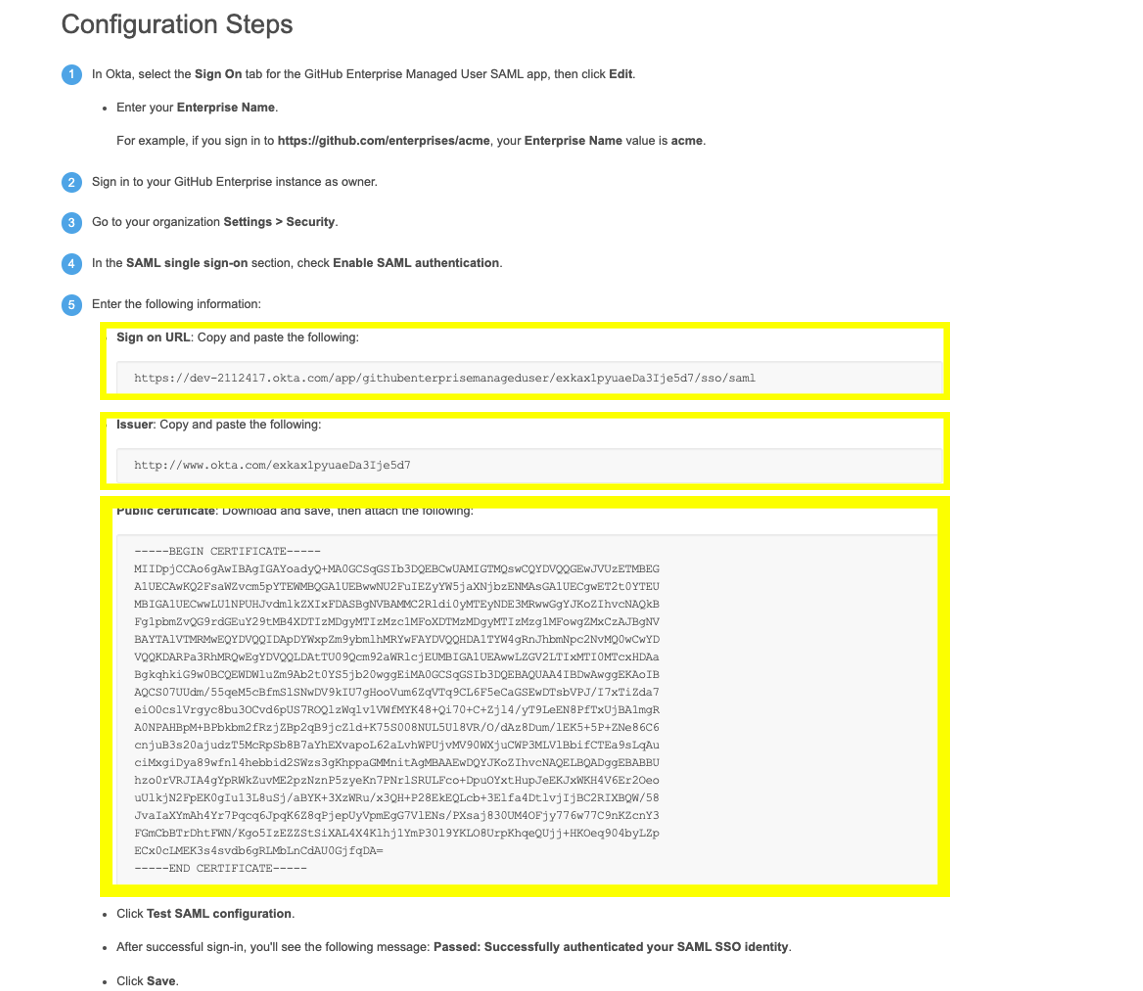
- Within the SAML configuration panel you will need to fill out the required information with the values obtained from the previous step when setting up SAML in Okta. Which provided you the values below for your application:
- Sign On URL
- Issuer
- Public Certificate
- Once you complete filling out the needed information to setup SAML click on Test SAML Configuration You will be redirected to Okta to login. Please login using the account that was assigned on previous steps within this guide.
- After successfully authenticating against Okta / Azure AD you should see a banner on top displaying the message Your SAML provider settings have been validated. Remember to save your changes and right next to Test SAML Configuration you should see Passed successfully authenticated your SAML SSO identity
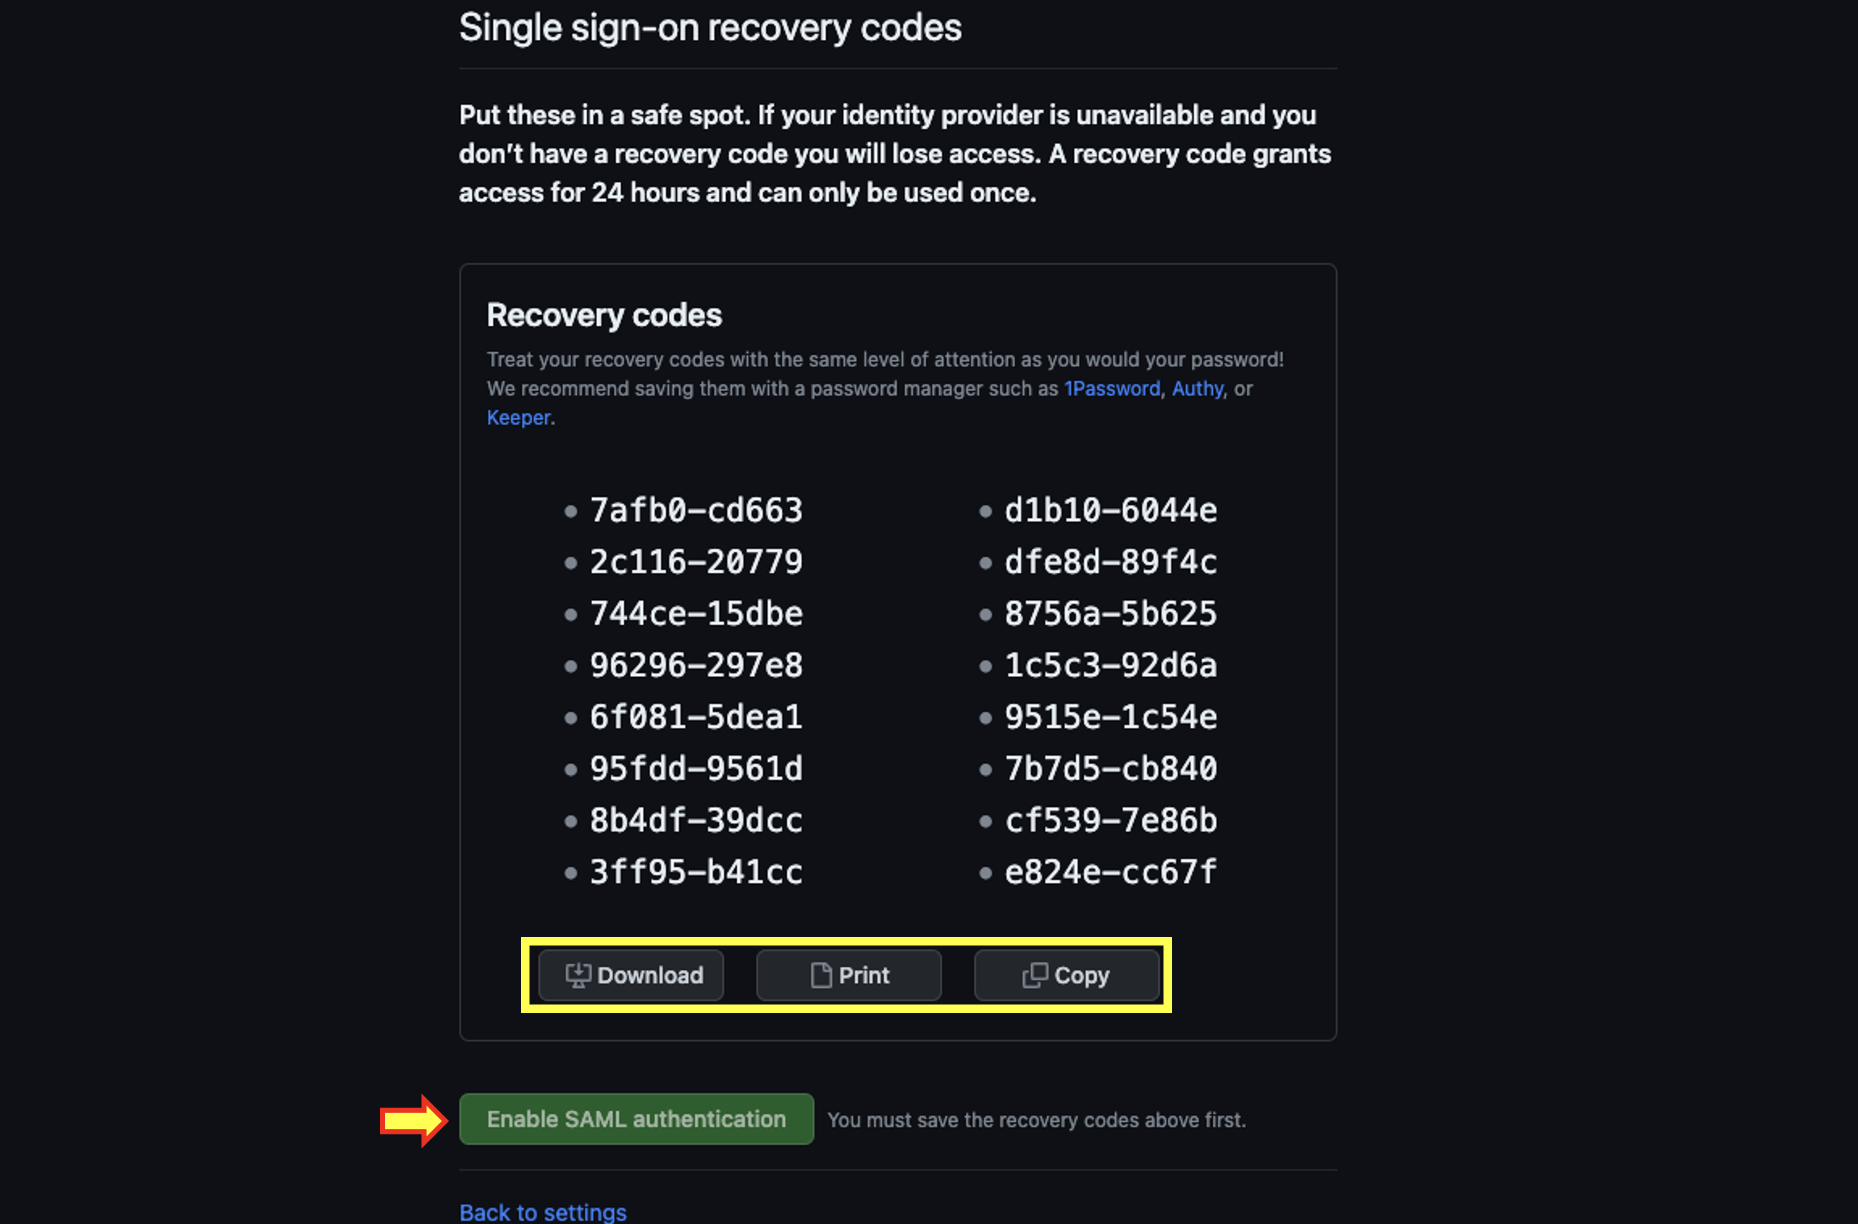
- At this point click on Save SAML Settings to save your changes. Once done you will be redirected to store your Single Sign-On recovery codes Please save them as you might need them at a future time. Once you click on either Download / Print/ Copy The Enable SAML authentication Will become available. When it does please click on it to enable SAML and proceed further.
Single Sign-On is enabled but we are not done!
After your store your recovery codes you will be redirected to your Single sign-on configuration page will you will now see SAML Single -sign-on ON .

Step 7: Configuring SCIM in Okta for user/group provisioning and deprovisioning
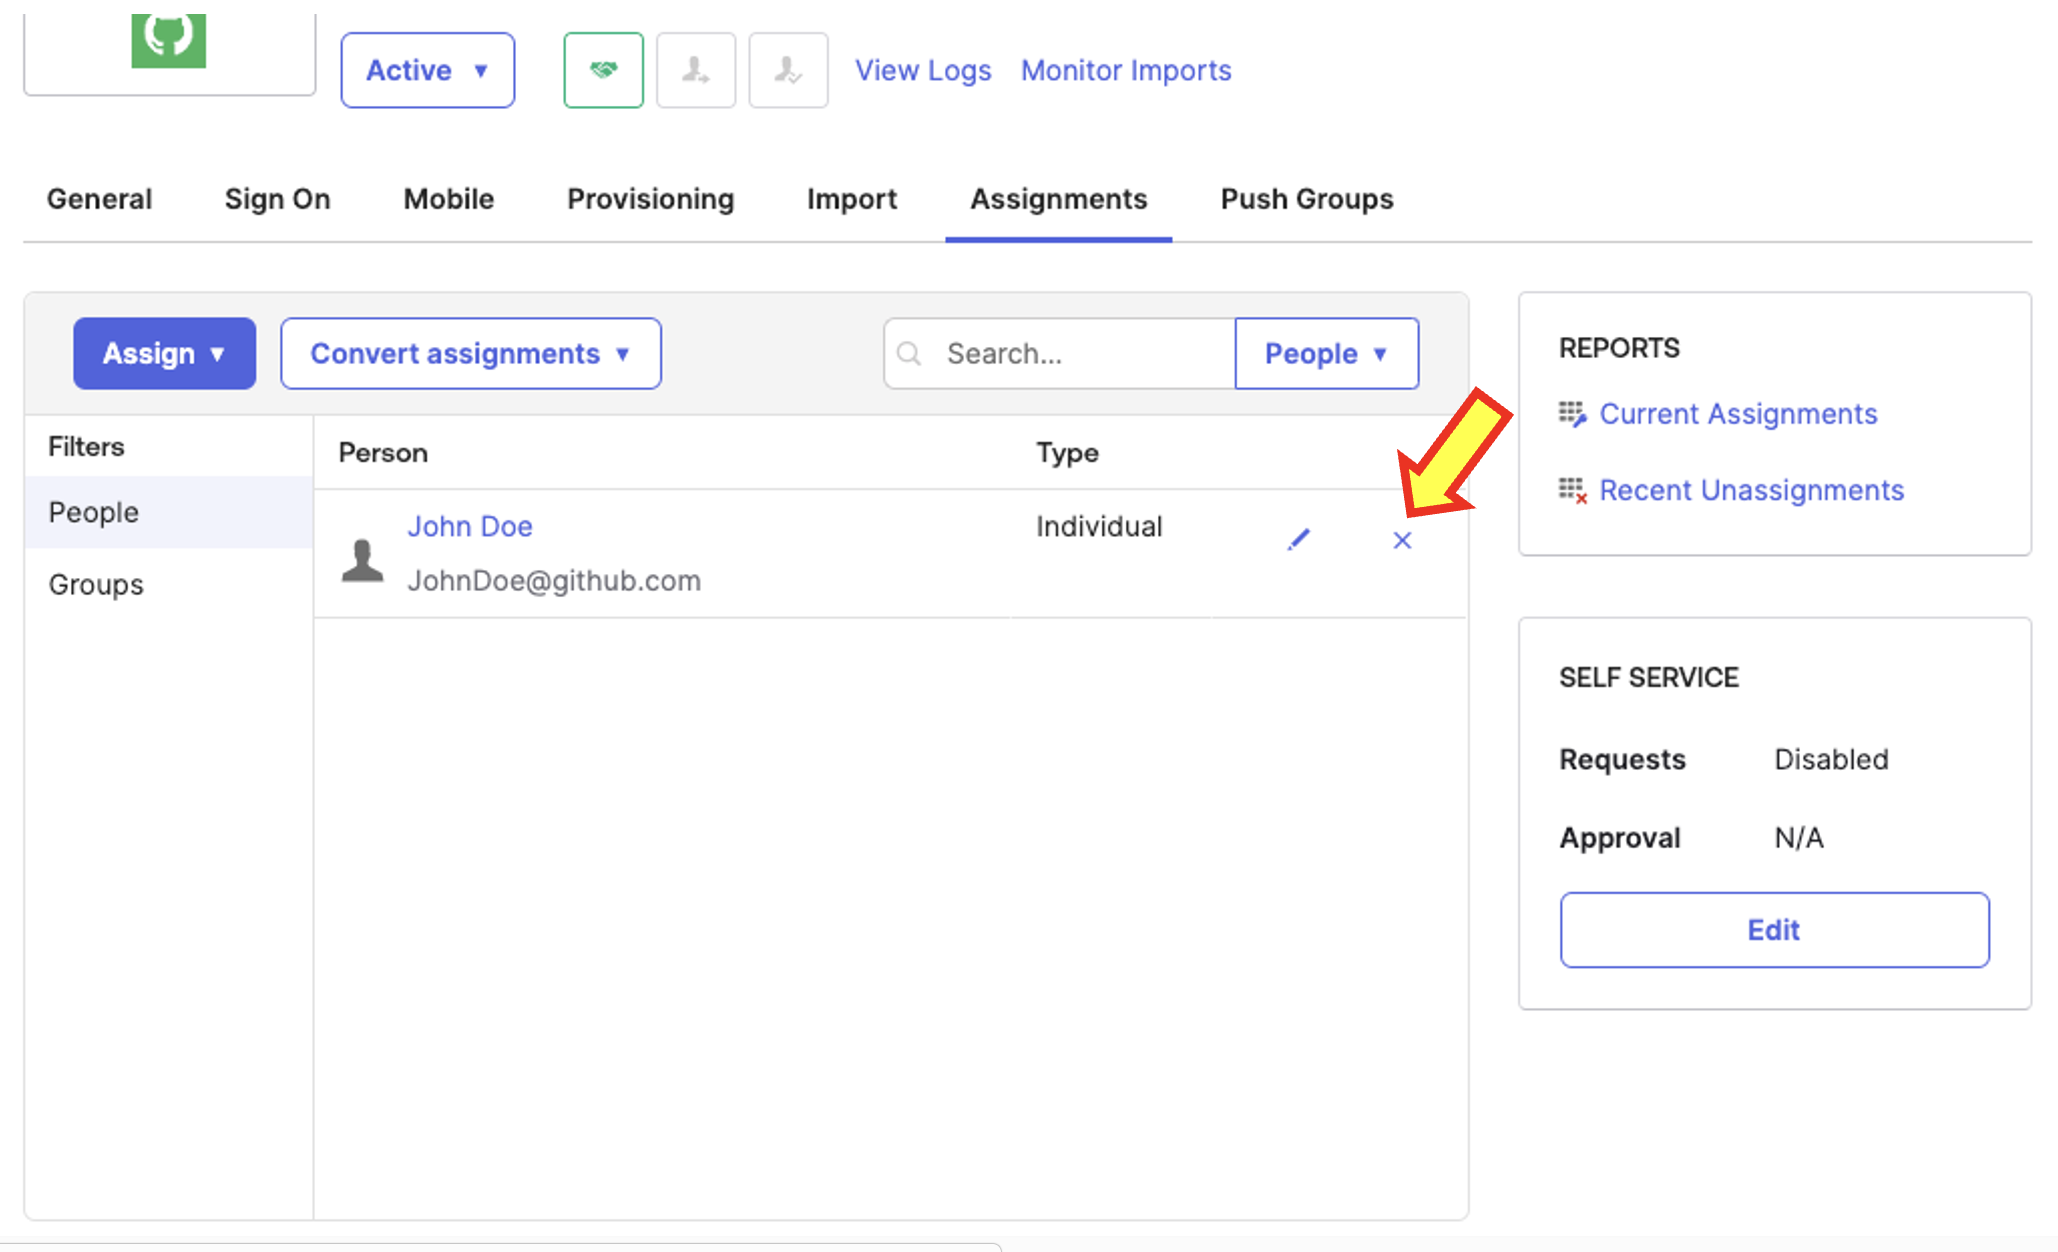
- Let's head back to Okta and access the GitHub Enterprise Managed Users application you integrated in Step 4: Adding the GitHub Enterprise Cloud Enterprise Managed Users Application from the Okta App Catalog.
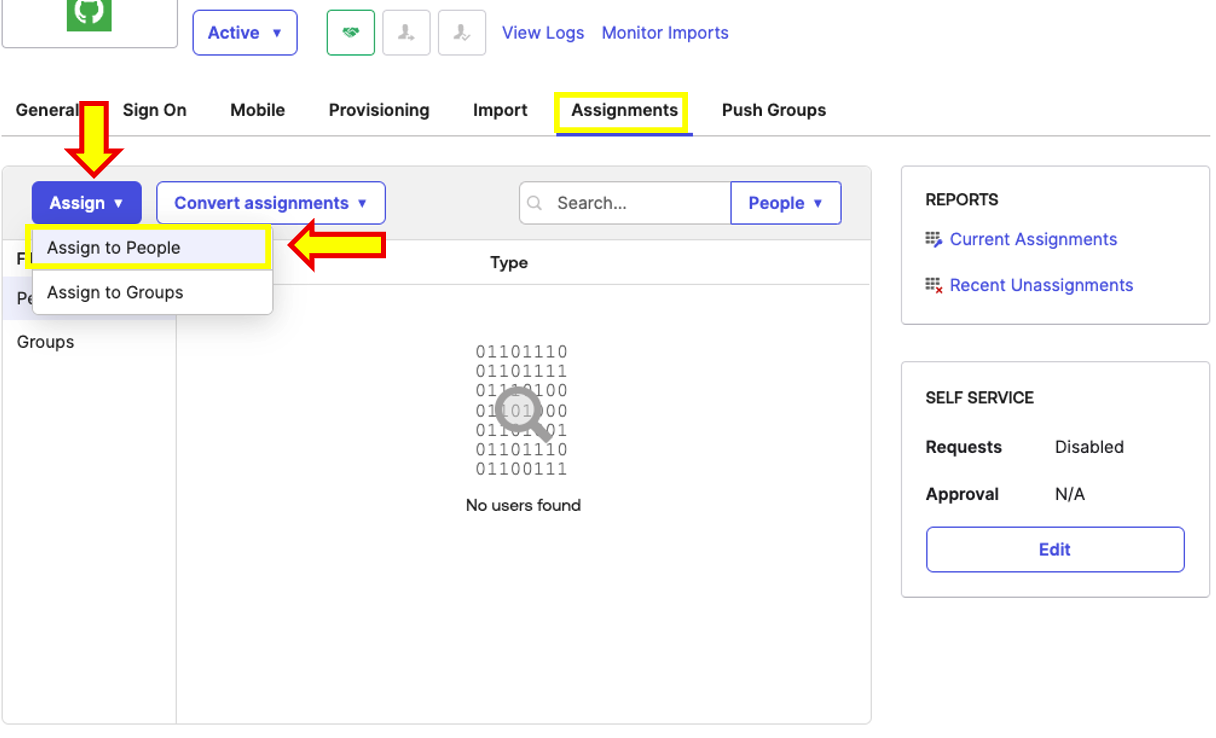
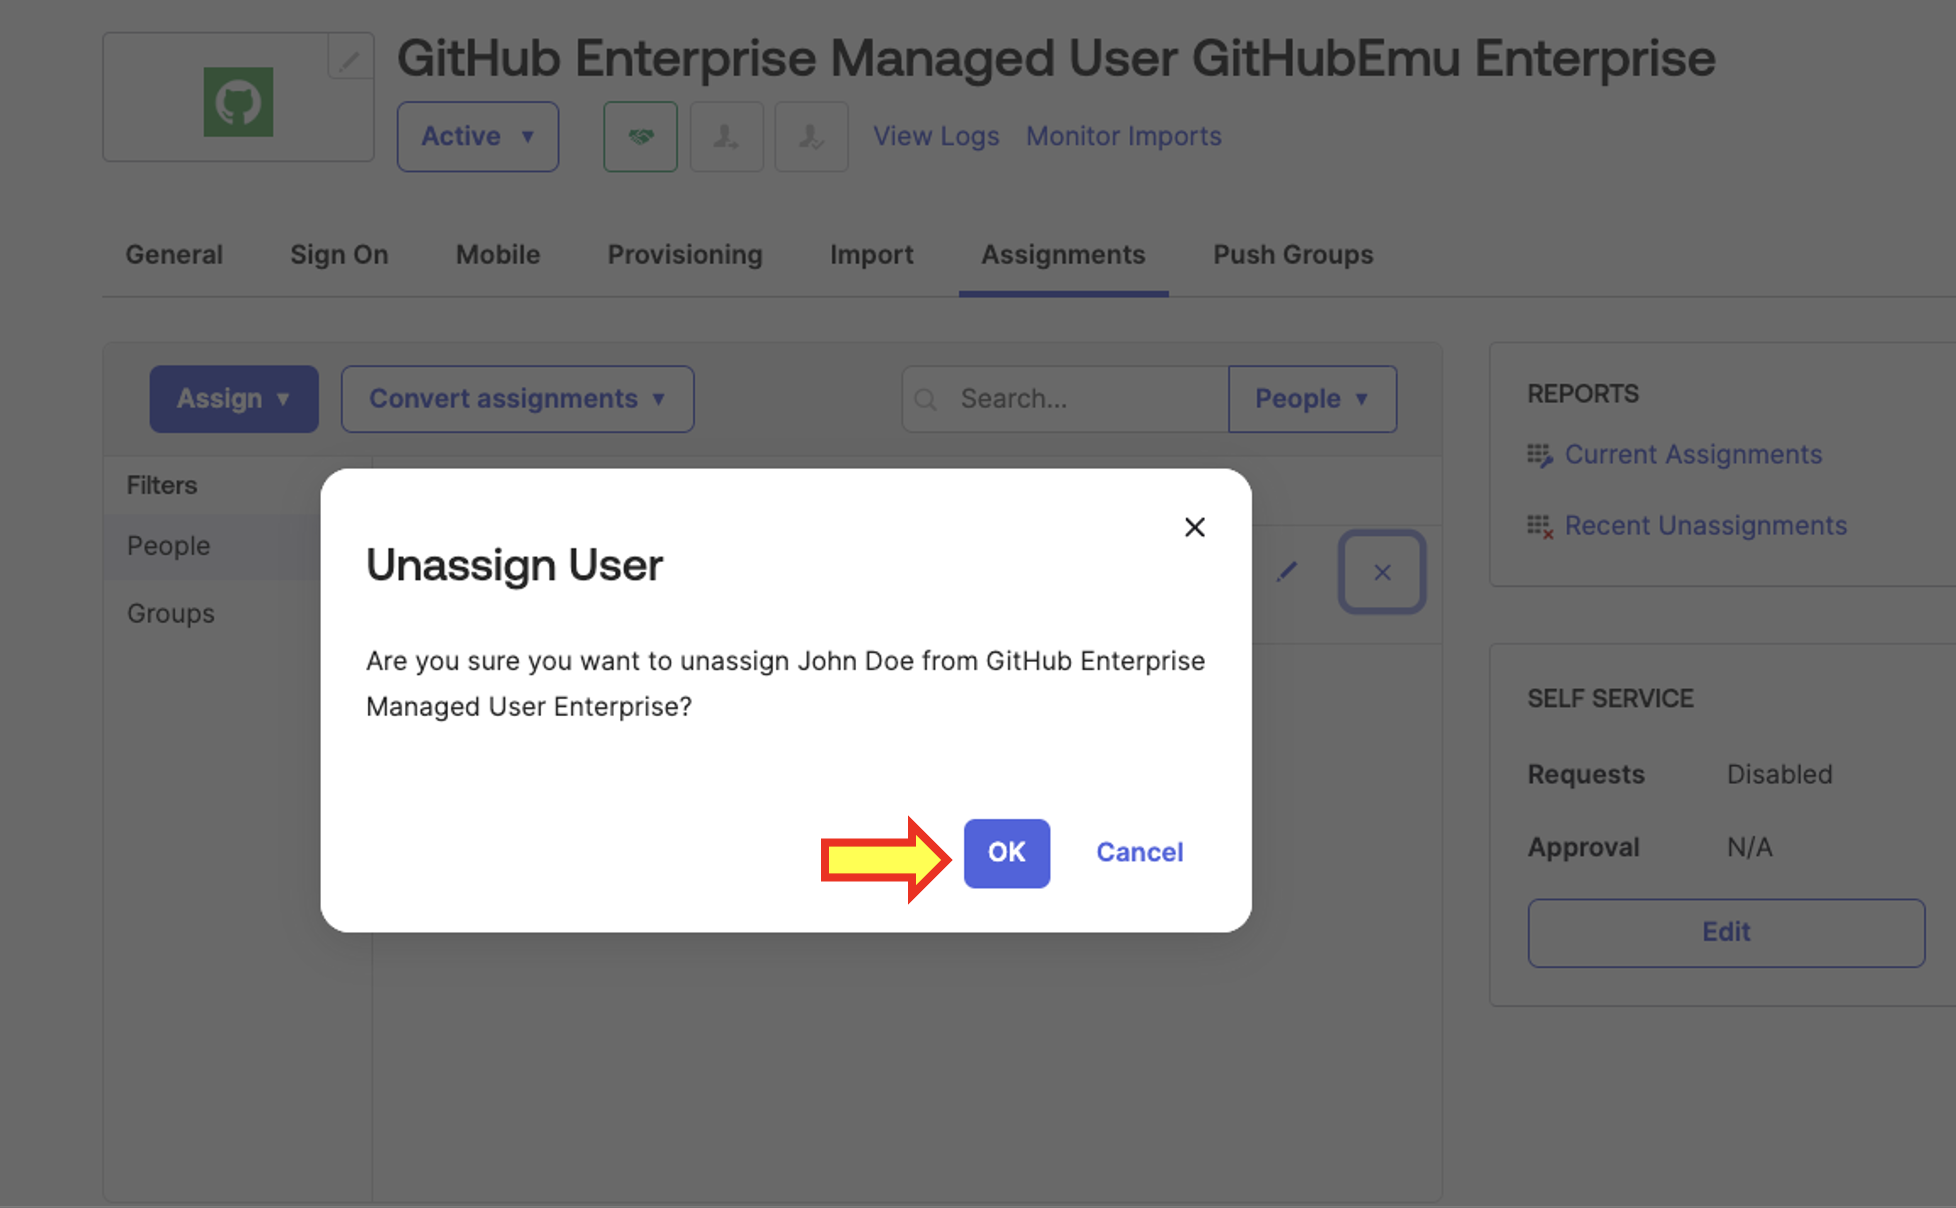
- Once you are within the application, click on the Assignments Tab and let's remove your user. Yes, we need to remove it so that it can be provisioned via SCIM! Once you click on the "x" to remove the user, click Ok on the pop-up to confirm.
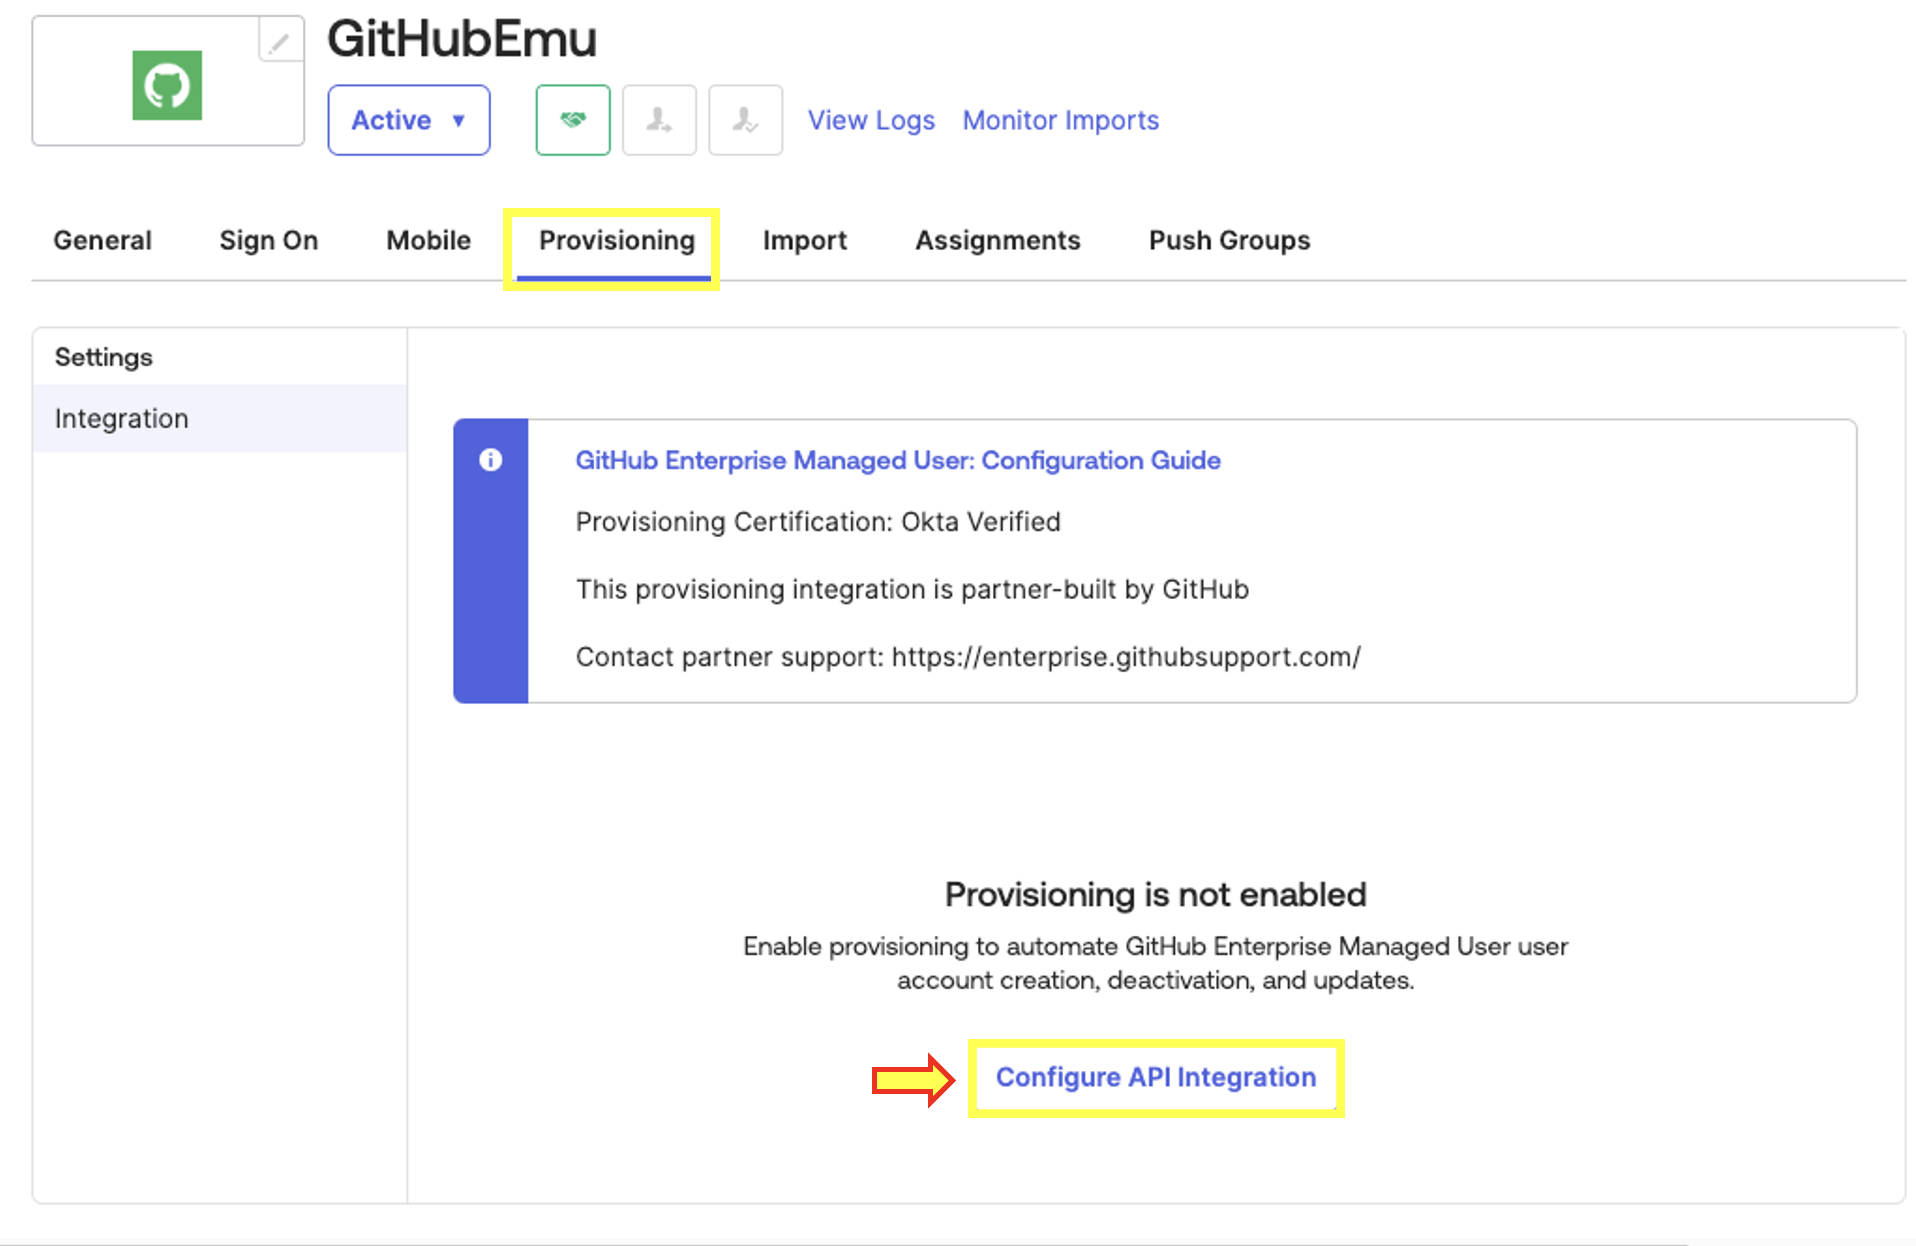
- Once you have removed your user, go to the Provisioning tab and click on Configure API Integration.
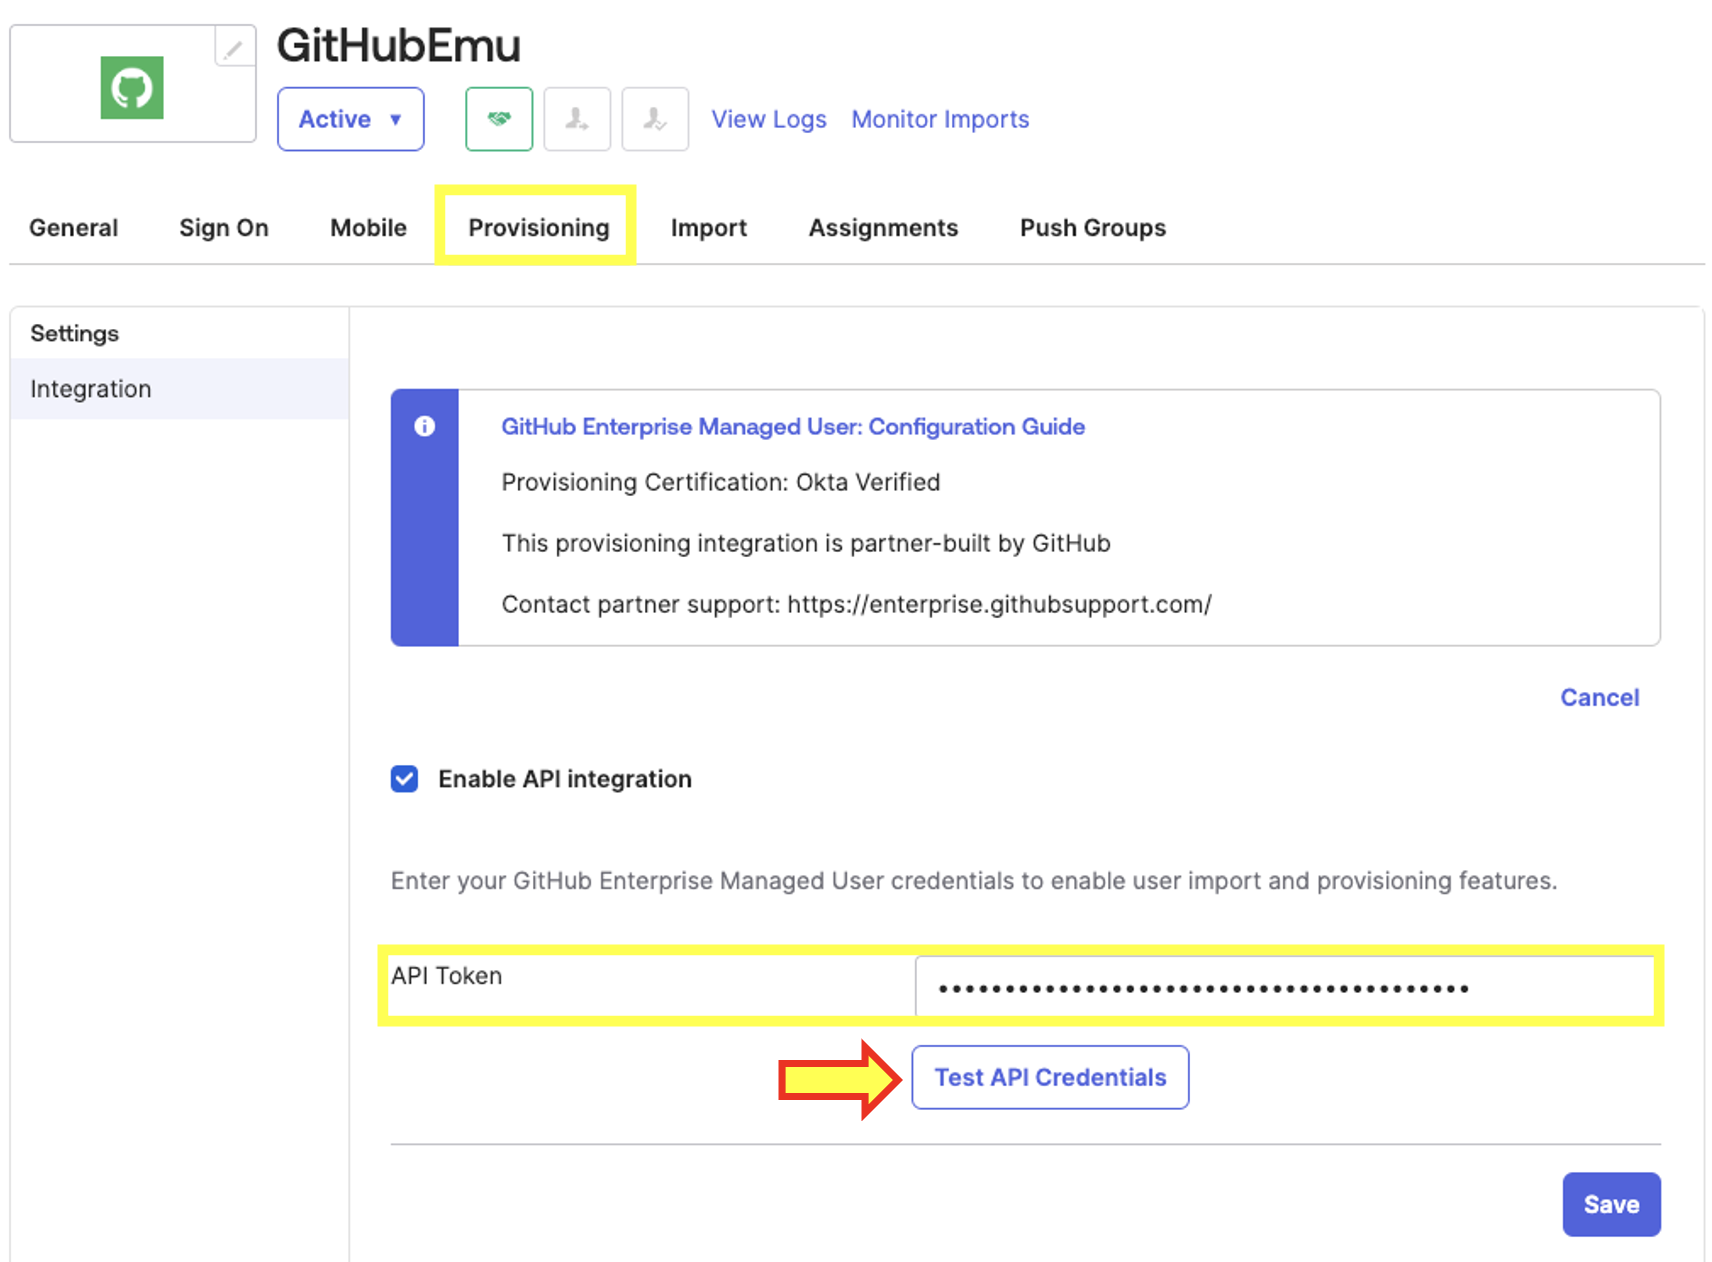
- You will be requested to input an API Token. This is actually the Personal Access Token you created in Step 3: Generating a dedicated Personal Access Token for SCIM provisioning. Once added, click on Test API Integration.
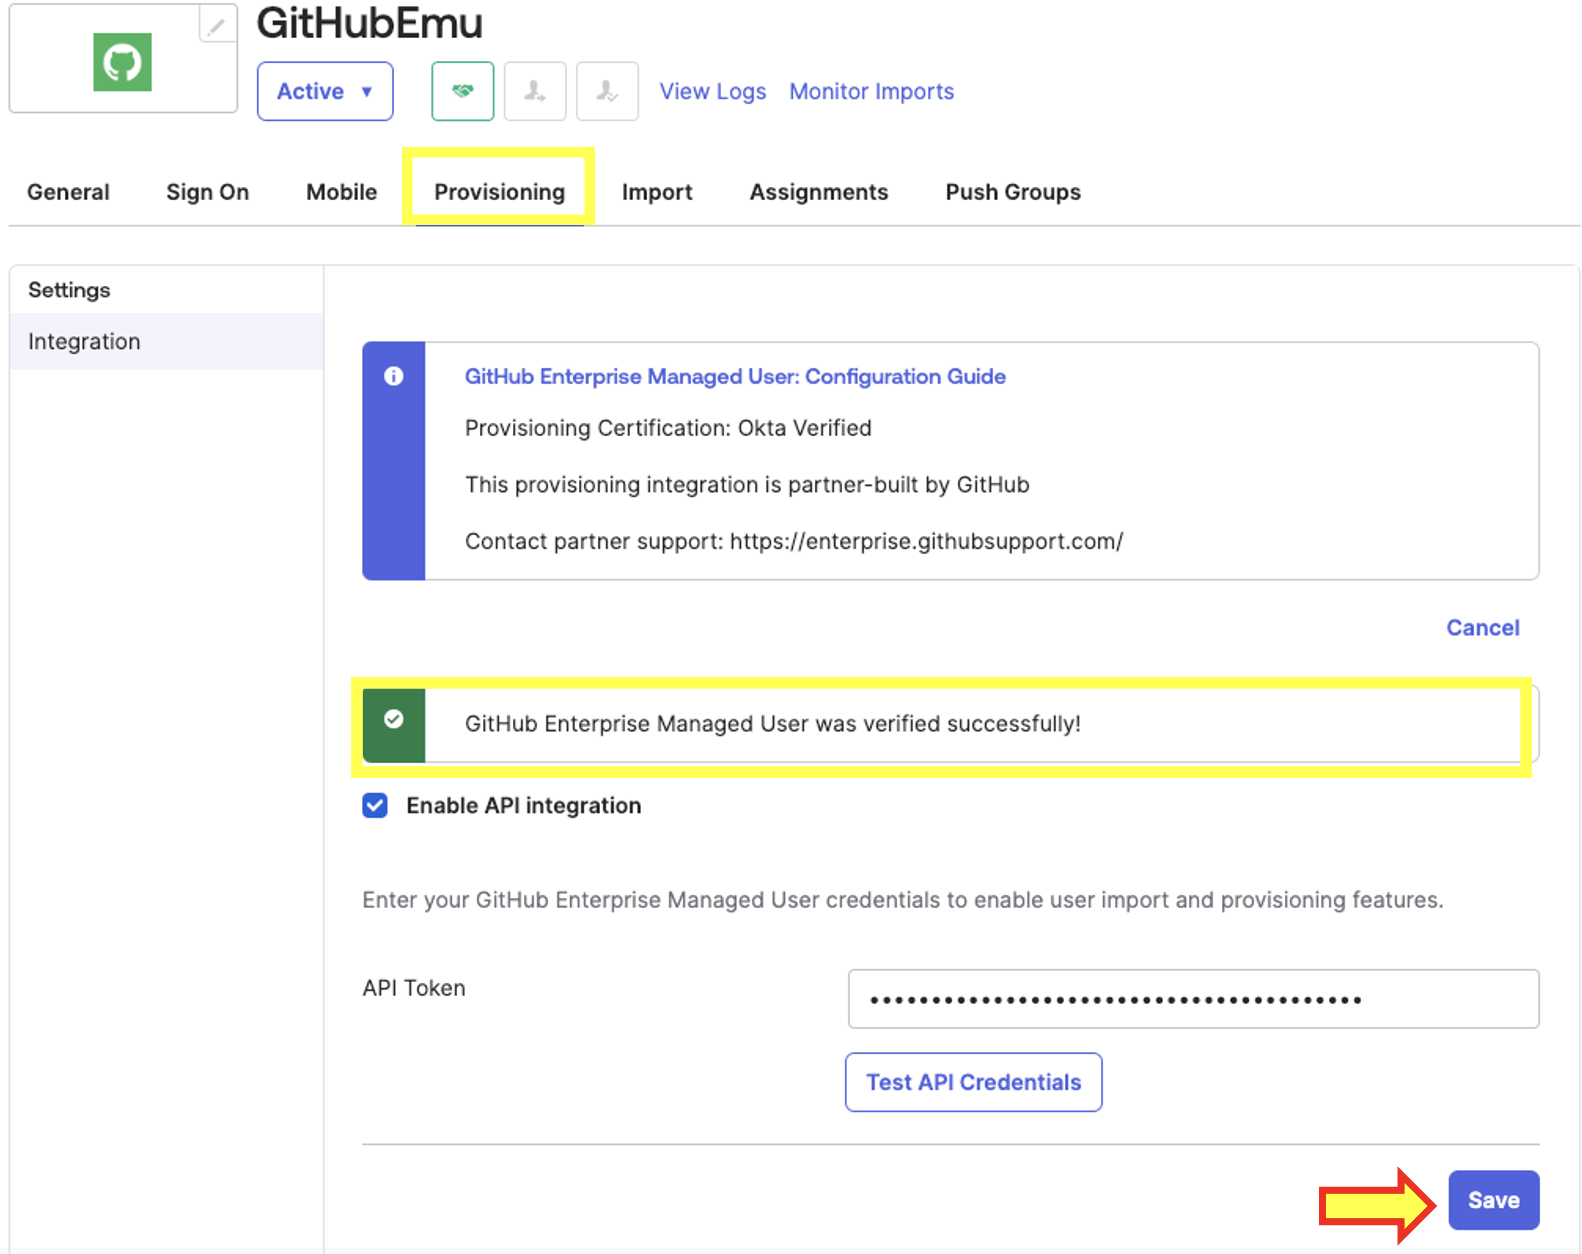
- After a successful test, you should see a banner displaying the message (Your_Enterprise_Name) was Successfully verified. At this point, click on Save.
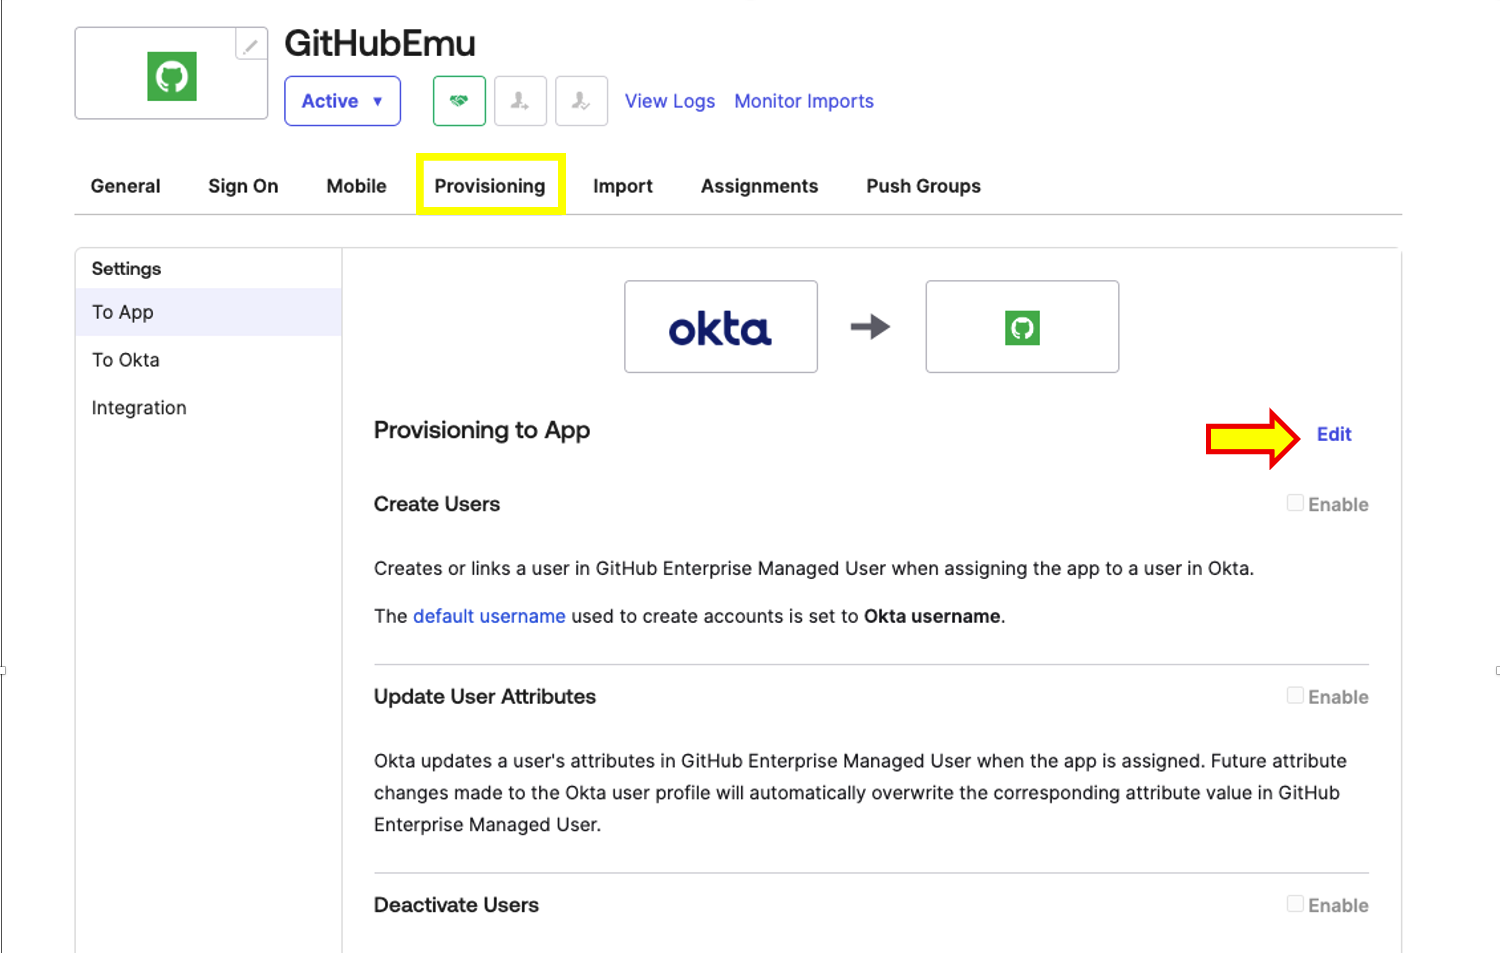
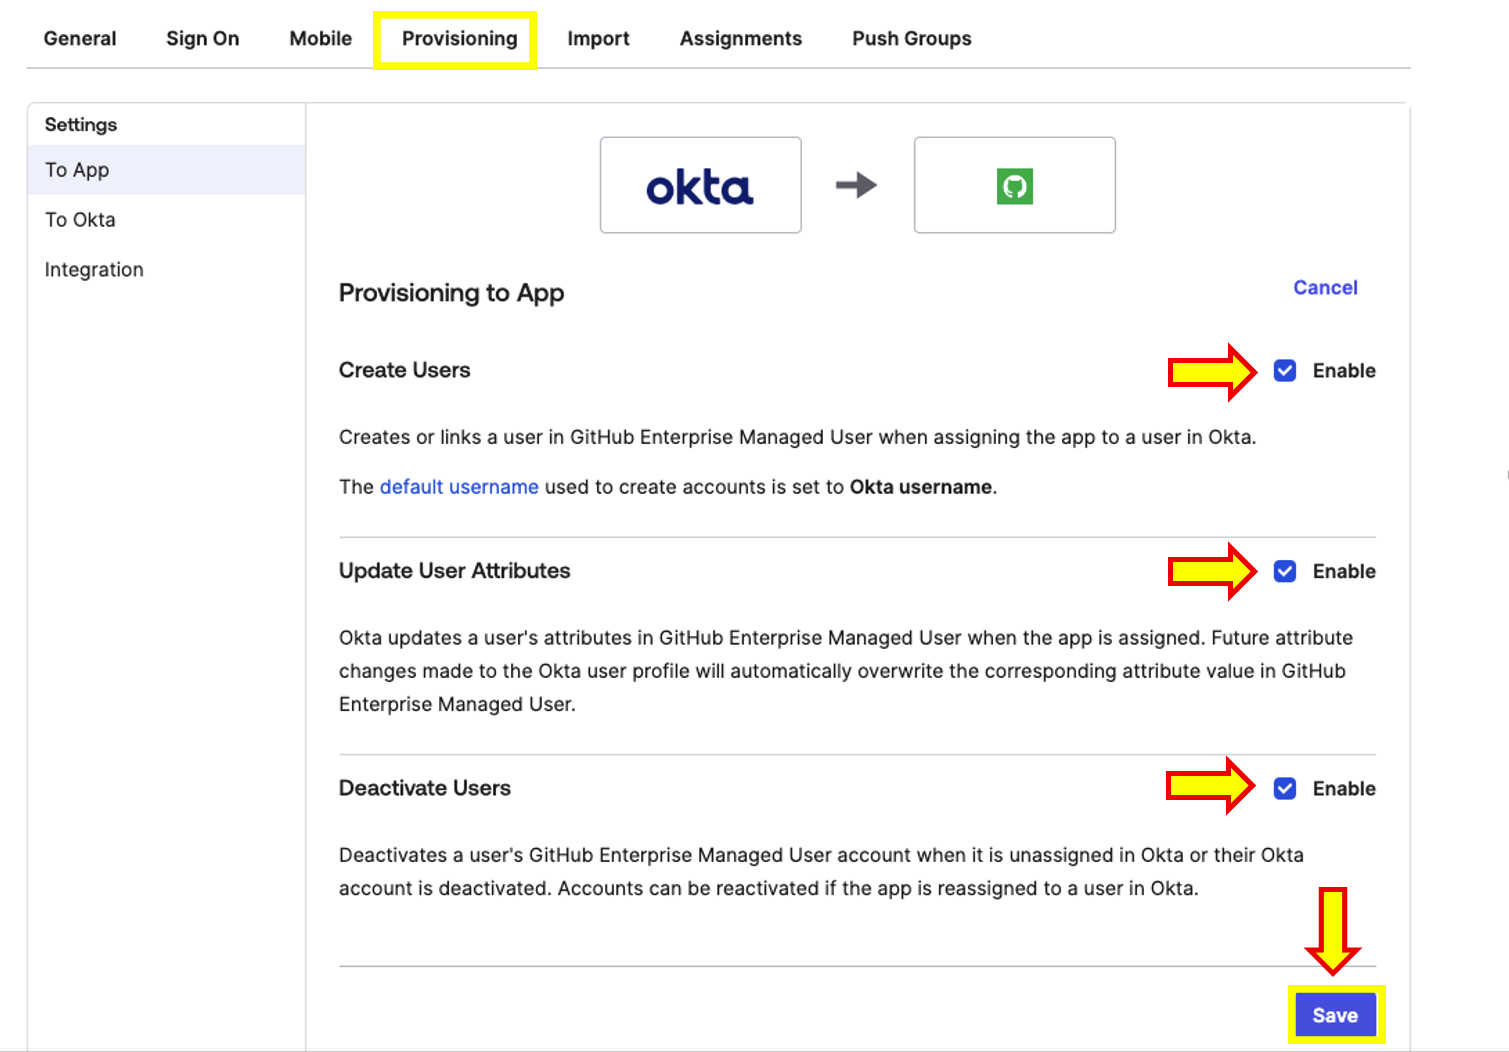
- Within the Provisioning tab, after saving your API Integration settings, you should see the option Provisioning to App. Click on Edit and proceed to enable the options detailed below, then click on Save.
- Create Users
- Update User Attributes
- Deactivate Users
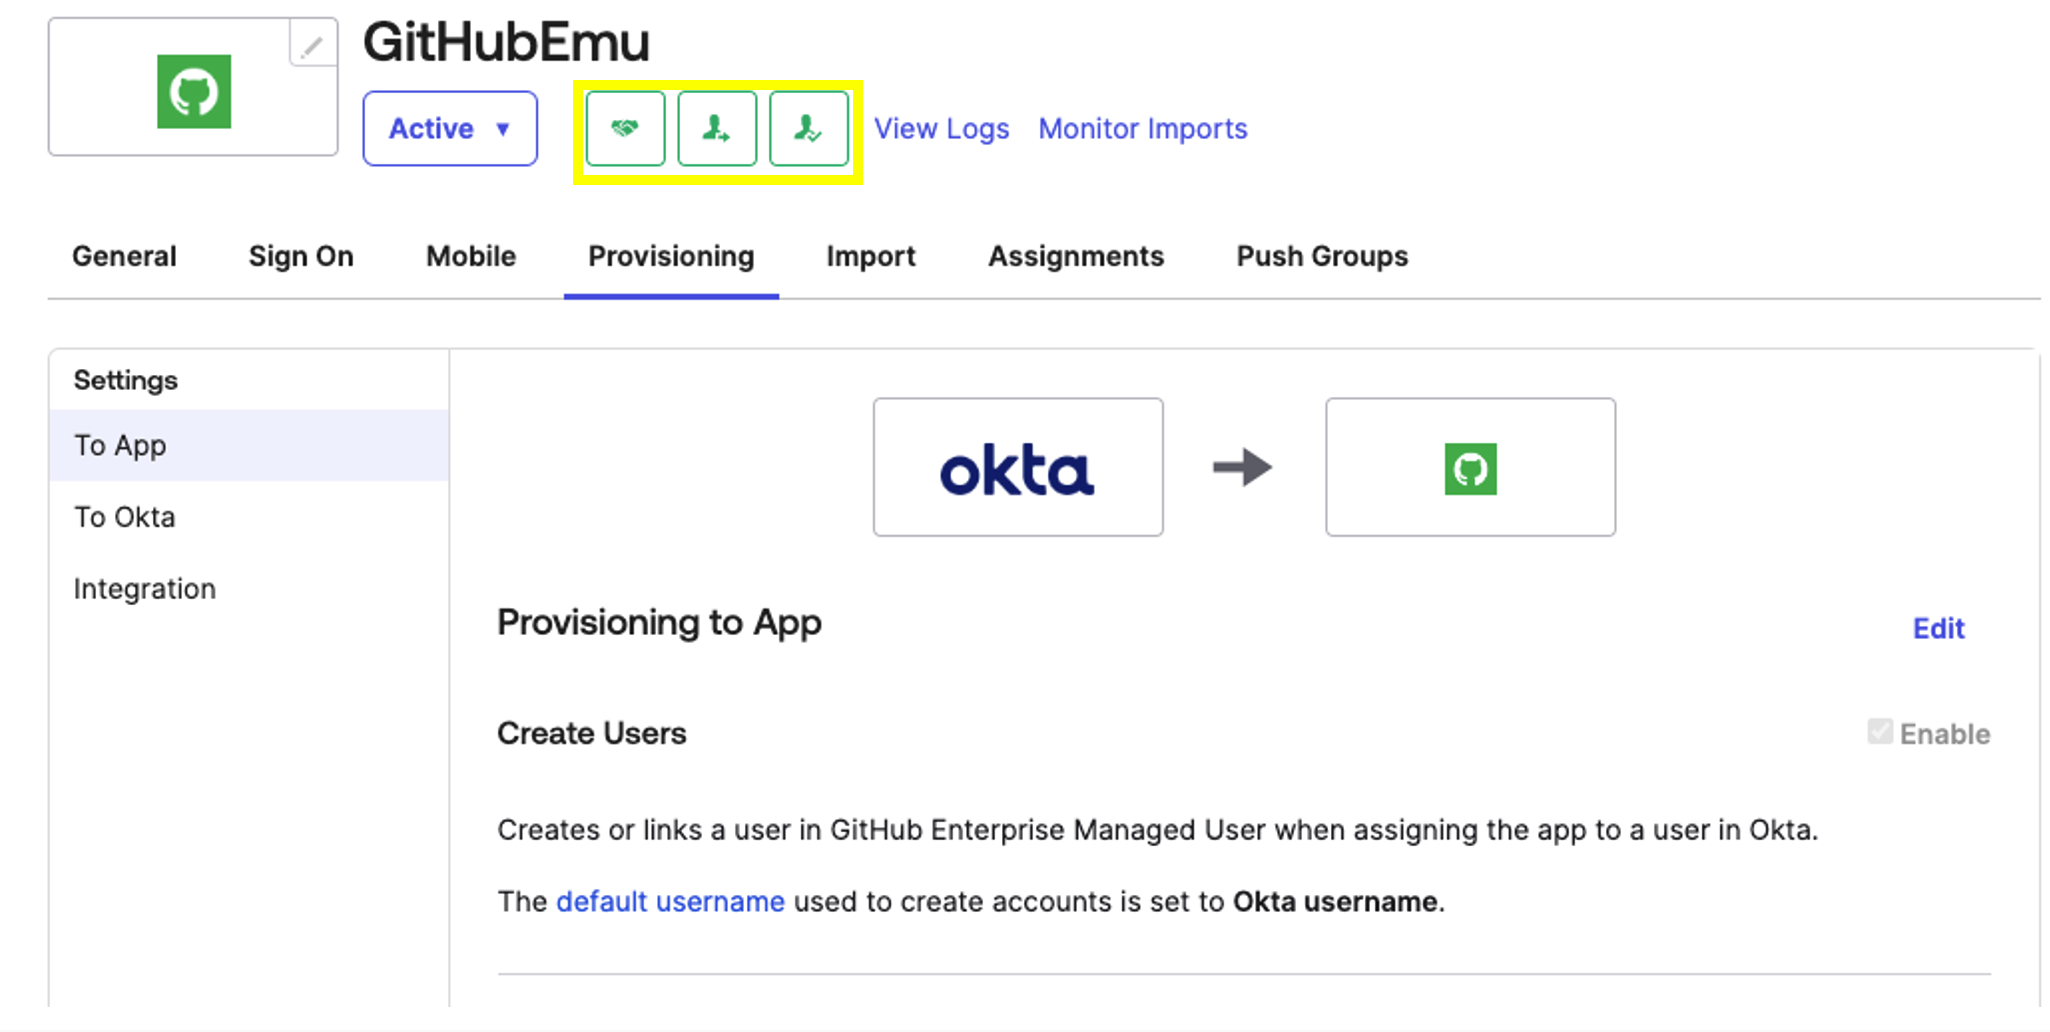
- Finally, once your provision settings have been saved, you will notice the following 3 icons turn green, meaning we are ready to provision Users/Groups!
Step 8: Provisioning Users/Groups to GitHub
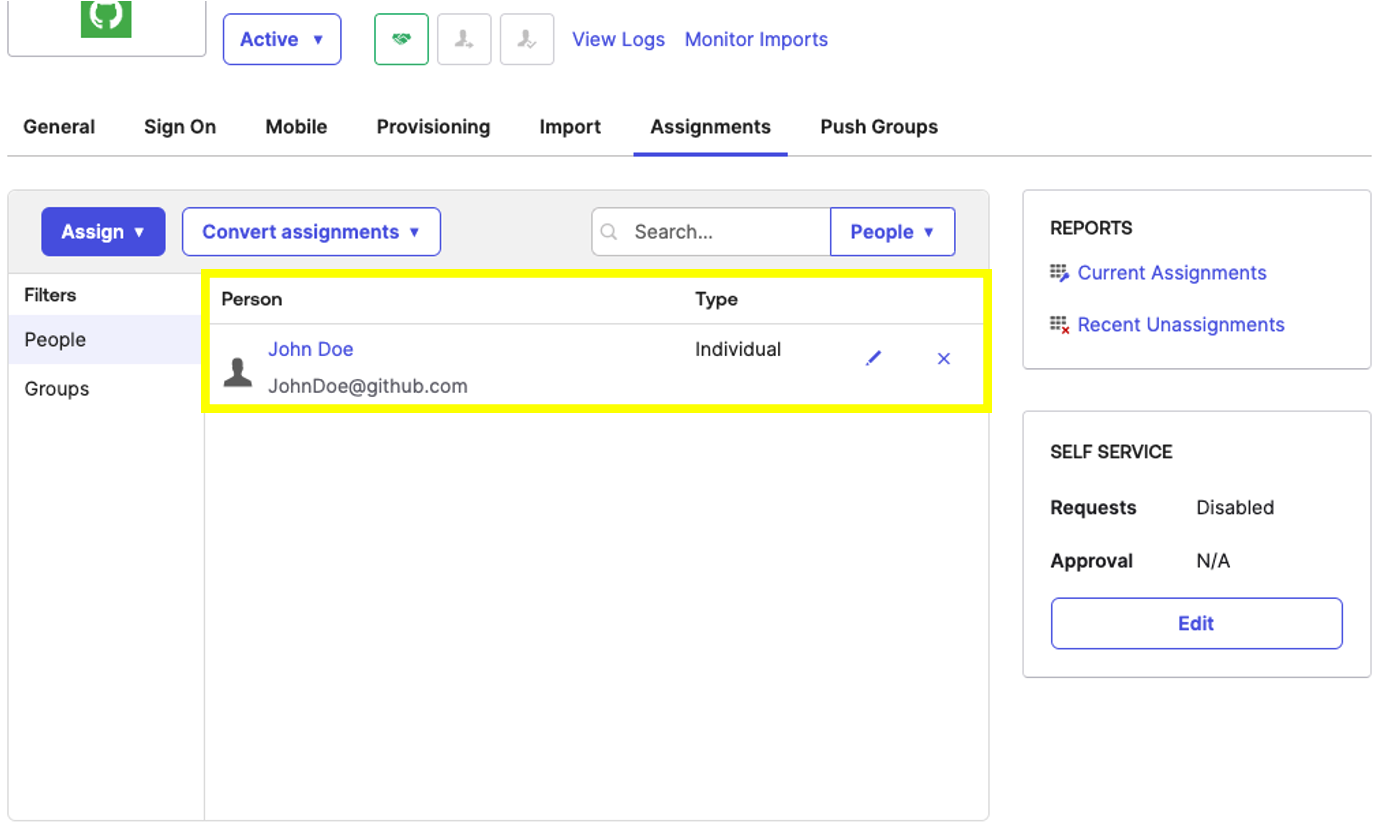
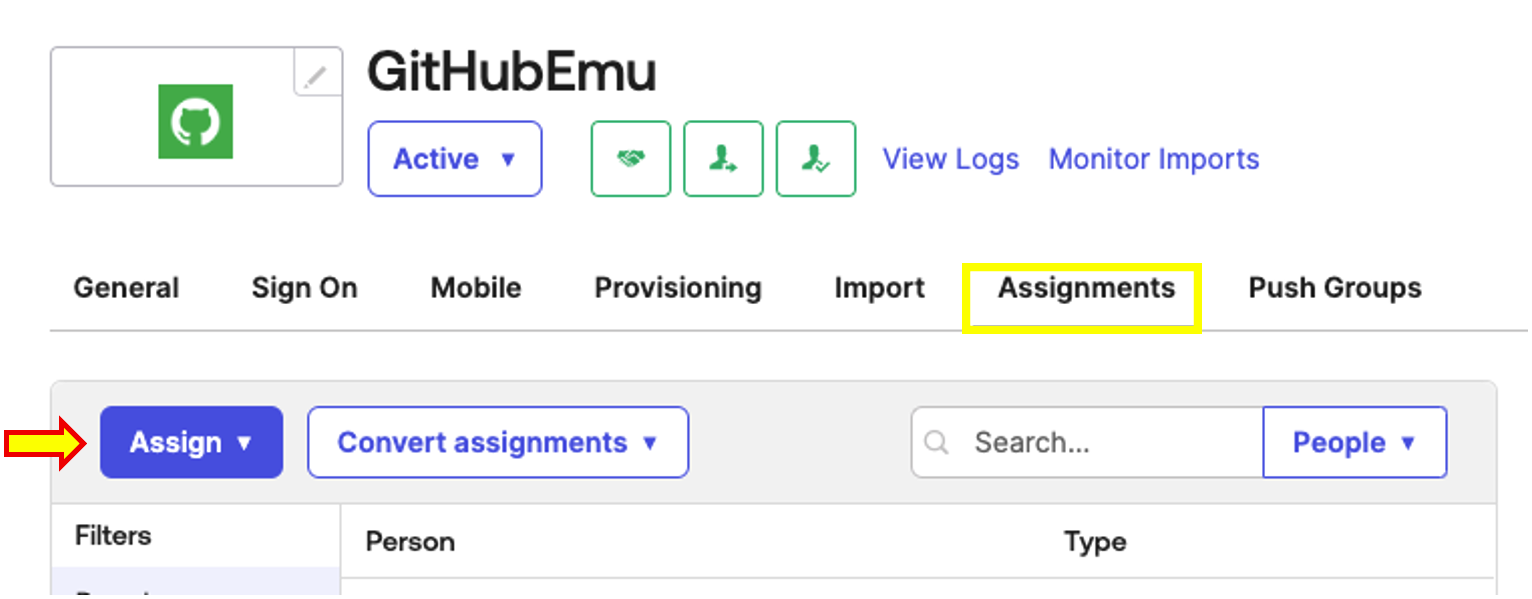
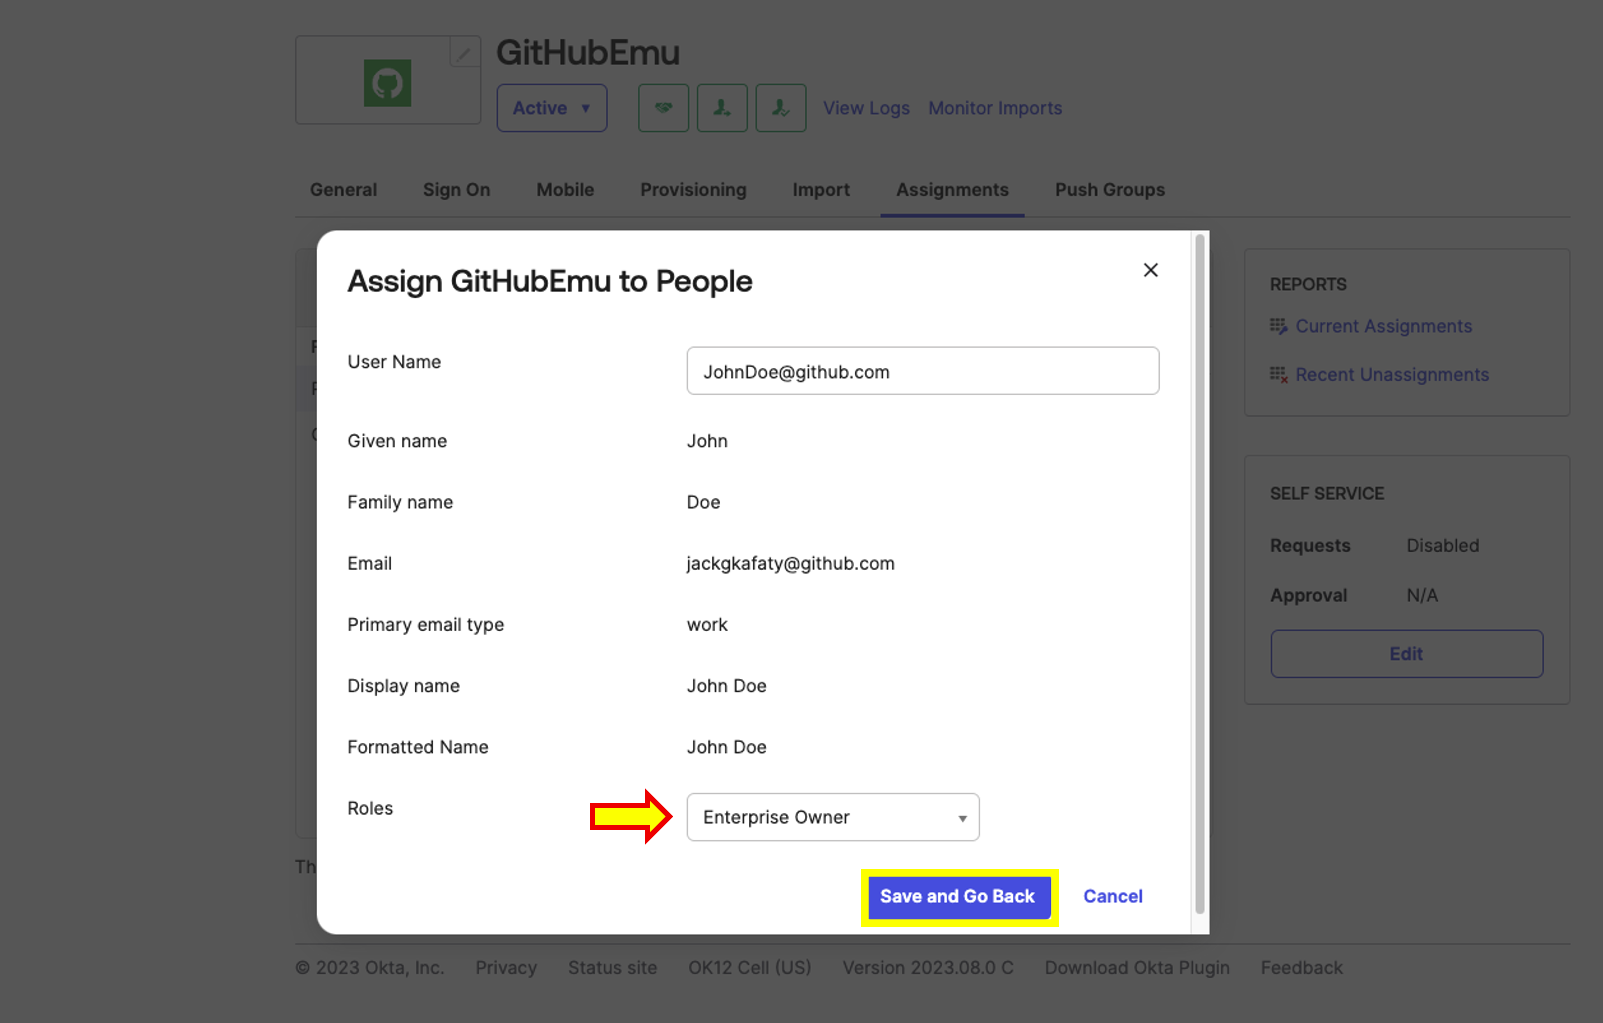
- Within the GitHub Enterprise Managed Users application in Okta access the Assignments tab click on Assignand select your user account. Under Roles make sure you select Enterprise Owner Si that your user is provisioned as the Enterprise Owner. Once done click on Save and Go Back We also recommend that you click on View Logs to validate that your user has been provisioned successfully.
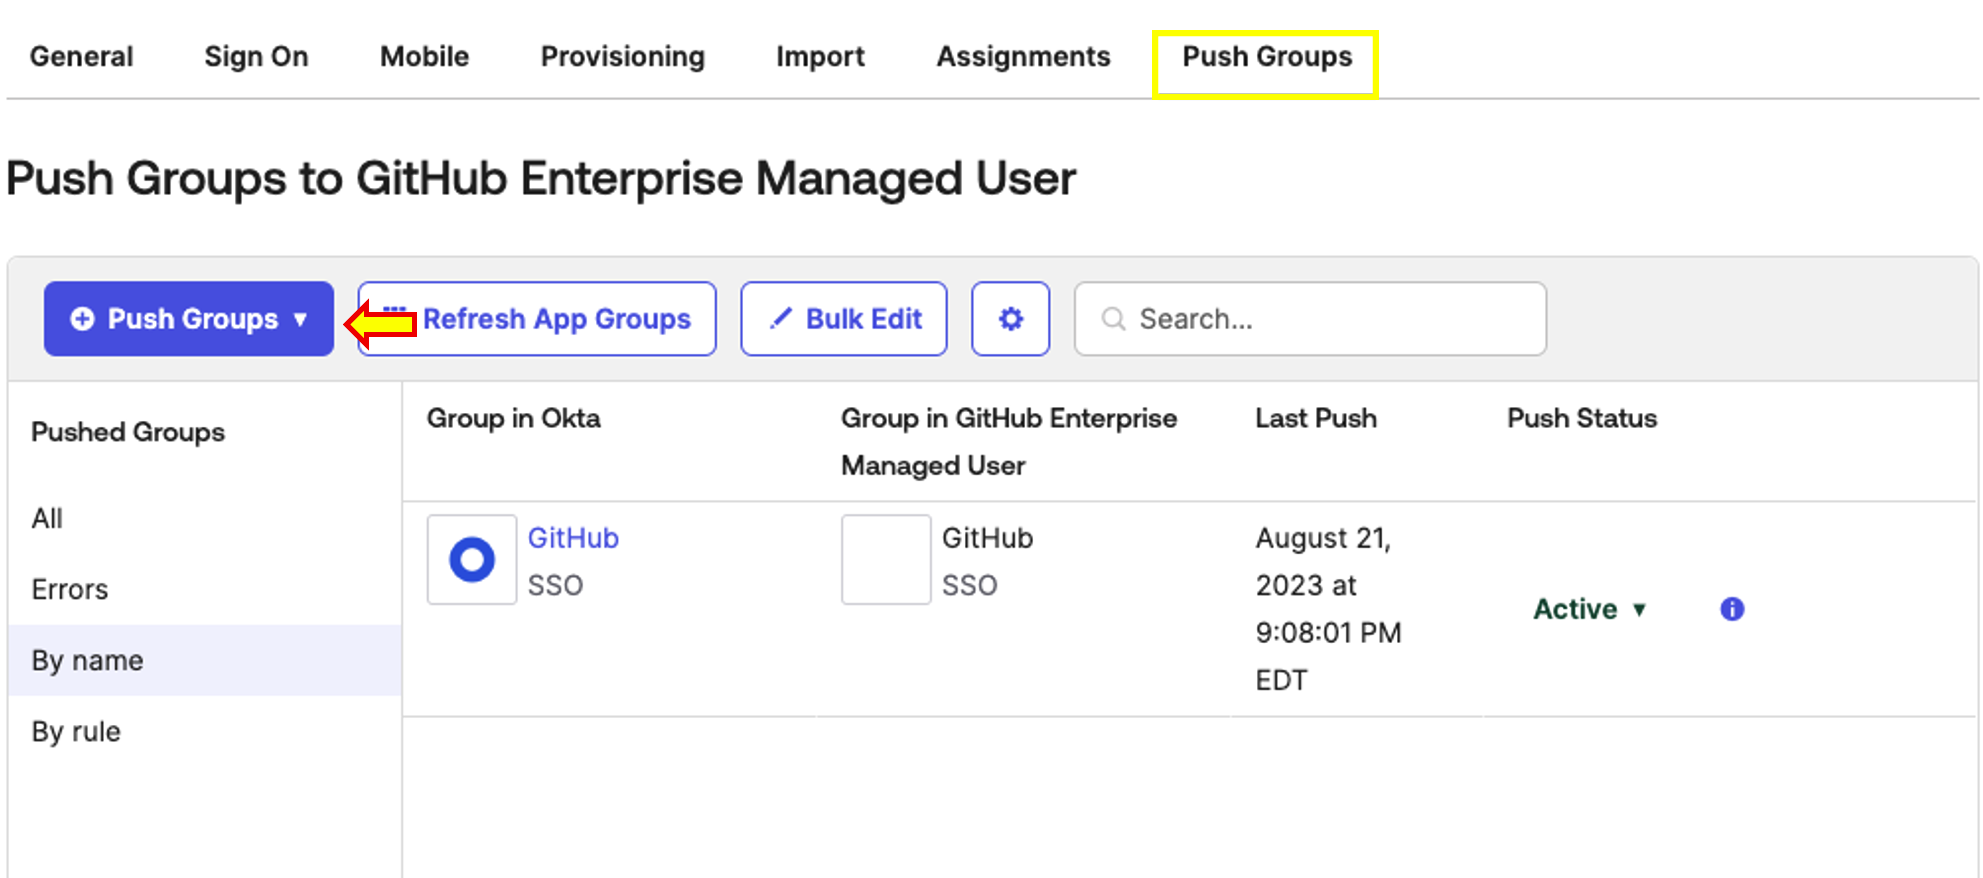
- You can add Groups by accessing the Push Groups tab and click on Push Groups as indicated by the arrow in the image below to select the group you wish to provision and Push on Demand Do keep in mind that you will not be able to assign roles at the group level this can only be done at the user level under Assignments
Step 9: Accessing GitHub as Provisioned user and validating settings
- Lets go back to your GitHub Enterprise Cloud Enterprise Managed Users tenant. On the left-side menu panel click on People within People from the expanded menu click on Members (should be the default option). From there you should be able to see your provisioned user.
- Once you are able to see your provisioned user this means Your setup has been completed, Congrats! At this point we suggest you logout from the admin user and login with your provisioned user.
Okta SSO Integration Frequently Asked Questions
1. How do you manage adding users to organizations and can this be automated by groups?
Answer coming soon!
2. What happens if we run out of licenses?
Answer coming soon!
3. What are the implications on having a member added to the Enterprise but not to an Organization?
Answer coming soon!
4. How can I limit users to exclusively have access to specific repositories ?
5. How frequent are user provisioned via SCIM?
User/Group provisioning is done on a fixed Hard-Coded interval of 40 Minutes.
6. Can someone get on a call with me to achieve this setup?
Hands-on Keyboard or dedication session assistance is only offered to customers under our Premium Support Plan or customers who have opted for a white-glove Professional Service engagement . If you are interested in learning more about our Premium Support Plan or Professional Services please reach out to your GitHub Account Manager for pricing details.
For Enterprise Customers without a Premium Support Plan or Professional Services engagement, please reach out to our GitHub Enterprise Support Team for assistance using the following LINK.
7. Why can't I edit or change my IDP configuration and what would happen if I disable it?
As a Single sign-on enterprise owner, accessing your enterprise admin panel you have full control over your GitHub Enterprise tenant. However, when it comes to your identity provider configuration your options are limited as an enterprise owner. You will be able to change the public certificate in case you need to but you will not be able to change your Sign on URL , Issuer or disable SAML single sign-On.For you to be able to accomplish this you will need to login with your Enterprise's provided setup user account also know as the default initial admin account. This is because in order for you to change the Sign-on URL or Issuer you will need to disable SAML first. Disabling SAML will have a significant impact in your Enterprise. Details of the impact can be found within the following documentation:
You can disable SAML or OIDC single sign-on (SSO) and SCIM provisioning for Enterprise Managed Users by using a recovery code to sign in as the setup user.
8. I'm unable to integrate Okta I keep on getting errors
Please reach out to our support team at GitHub Enterprise Support and provide them with:
- Screenshot of the issue or error message.
- Screenshot of your Okta SAML configuration.
- Screenshot of your GitHub SSO configuration.
- Screenshot of the application you selected during our setting.
- Also what Step and sub-step you are having issues with, for example Step 5.2
Trademark Disclaimer
-
Okta®, Auth0®, and the Okta® and Auth0® Logos are registered trademarks of Okta, Inc. in the U.S. and other countries. All other names, logos, product and service names, designs and slogans that may appear on the Site are the property of their respective owners, who may or may not be affiliated with, connected to, or sponsored by Okta. See Okta's Logos and Usage for further policy details.
-
GITHUB®, the GITHUB® logo design, the INVERTOCAT logo design, OCTOCAT®, and the OCTOCAT® logo design are trademarks of GitHub, Inc., registered in the United States and other countries. The OCTOCAT design is the exclusive property of GitHub, Inc and has been federally registered with the United States Copyright Office. All rights reserved. See GitHub's Terms of Service for its Intellectual Property